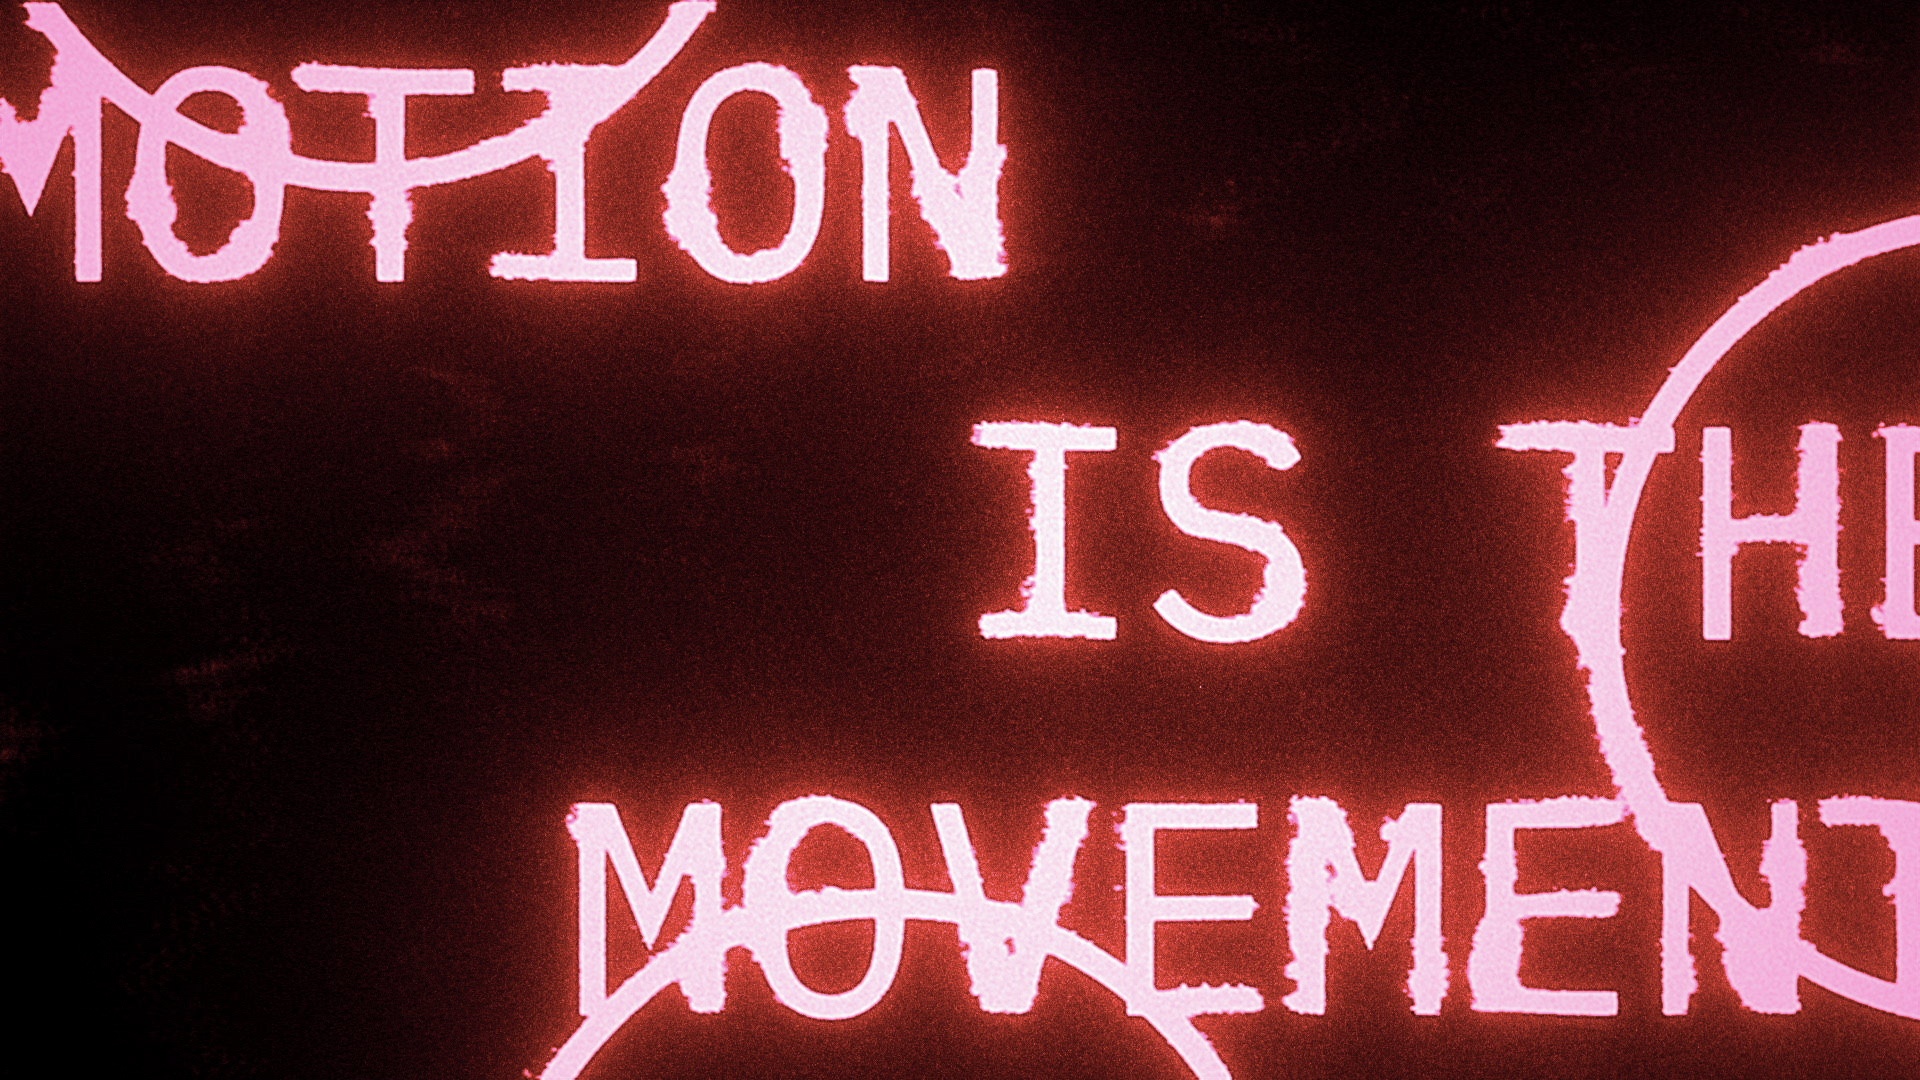
CoMotion 2023
Project Overview
CoMotion, established in 2010, is an annual event hosted by MOMELove and held at the Savannah College of Art and Design. As the longest-running and largest student-led symposium dedicated to motion graphics, CoMotion invites top companies and industry professionals to participate in portfolio reviews, provide feedback to students, and engage in dynamic learning experiences. Through one-on-one meetings, networking opportunities, and engaging sessions, the symposium offers a comprehensive platform for anyone seeking to advance their skills and knowledge in the field of motion graphics. The event also features an annual Student Showcase where select students have the chance to showcase their work, receive evaluations from top industry professionals, and be recognized for their efforts. Throughout the event, industry guests share valuable insights and advice through panels and lectures on topics such as freelancing, immersive technology, digital storytelling, and more.
Responsibilities
As a seasoned Animation Lead, I have led 8 animators on the 2023 title sequence and student showcase title cards for my third time, and with this being my fifth time on the branding team. Our production spanned from late November to March 10 and utilized a hybrid of virtual and in-person collaboration.
My focus extends beyond completion to establish a smooth foundation for main work. Communication and understanding among team members can be challenging, but I oversee an efficient framework, forecast issues, and identify opportunities for improved productivity. I work with a dynamic CoMotion team that frequently sees new students with a range of expertise. My role is to ensure we meet our goals by charting out a completion roadmap and staying on track.
Lead Animator, Toolkitting: Workflow Development, Project & Knowledge Management, Colorist
Creative Treatment
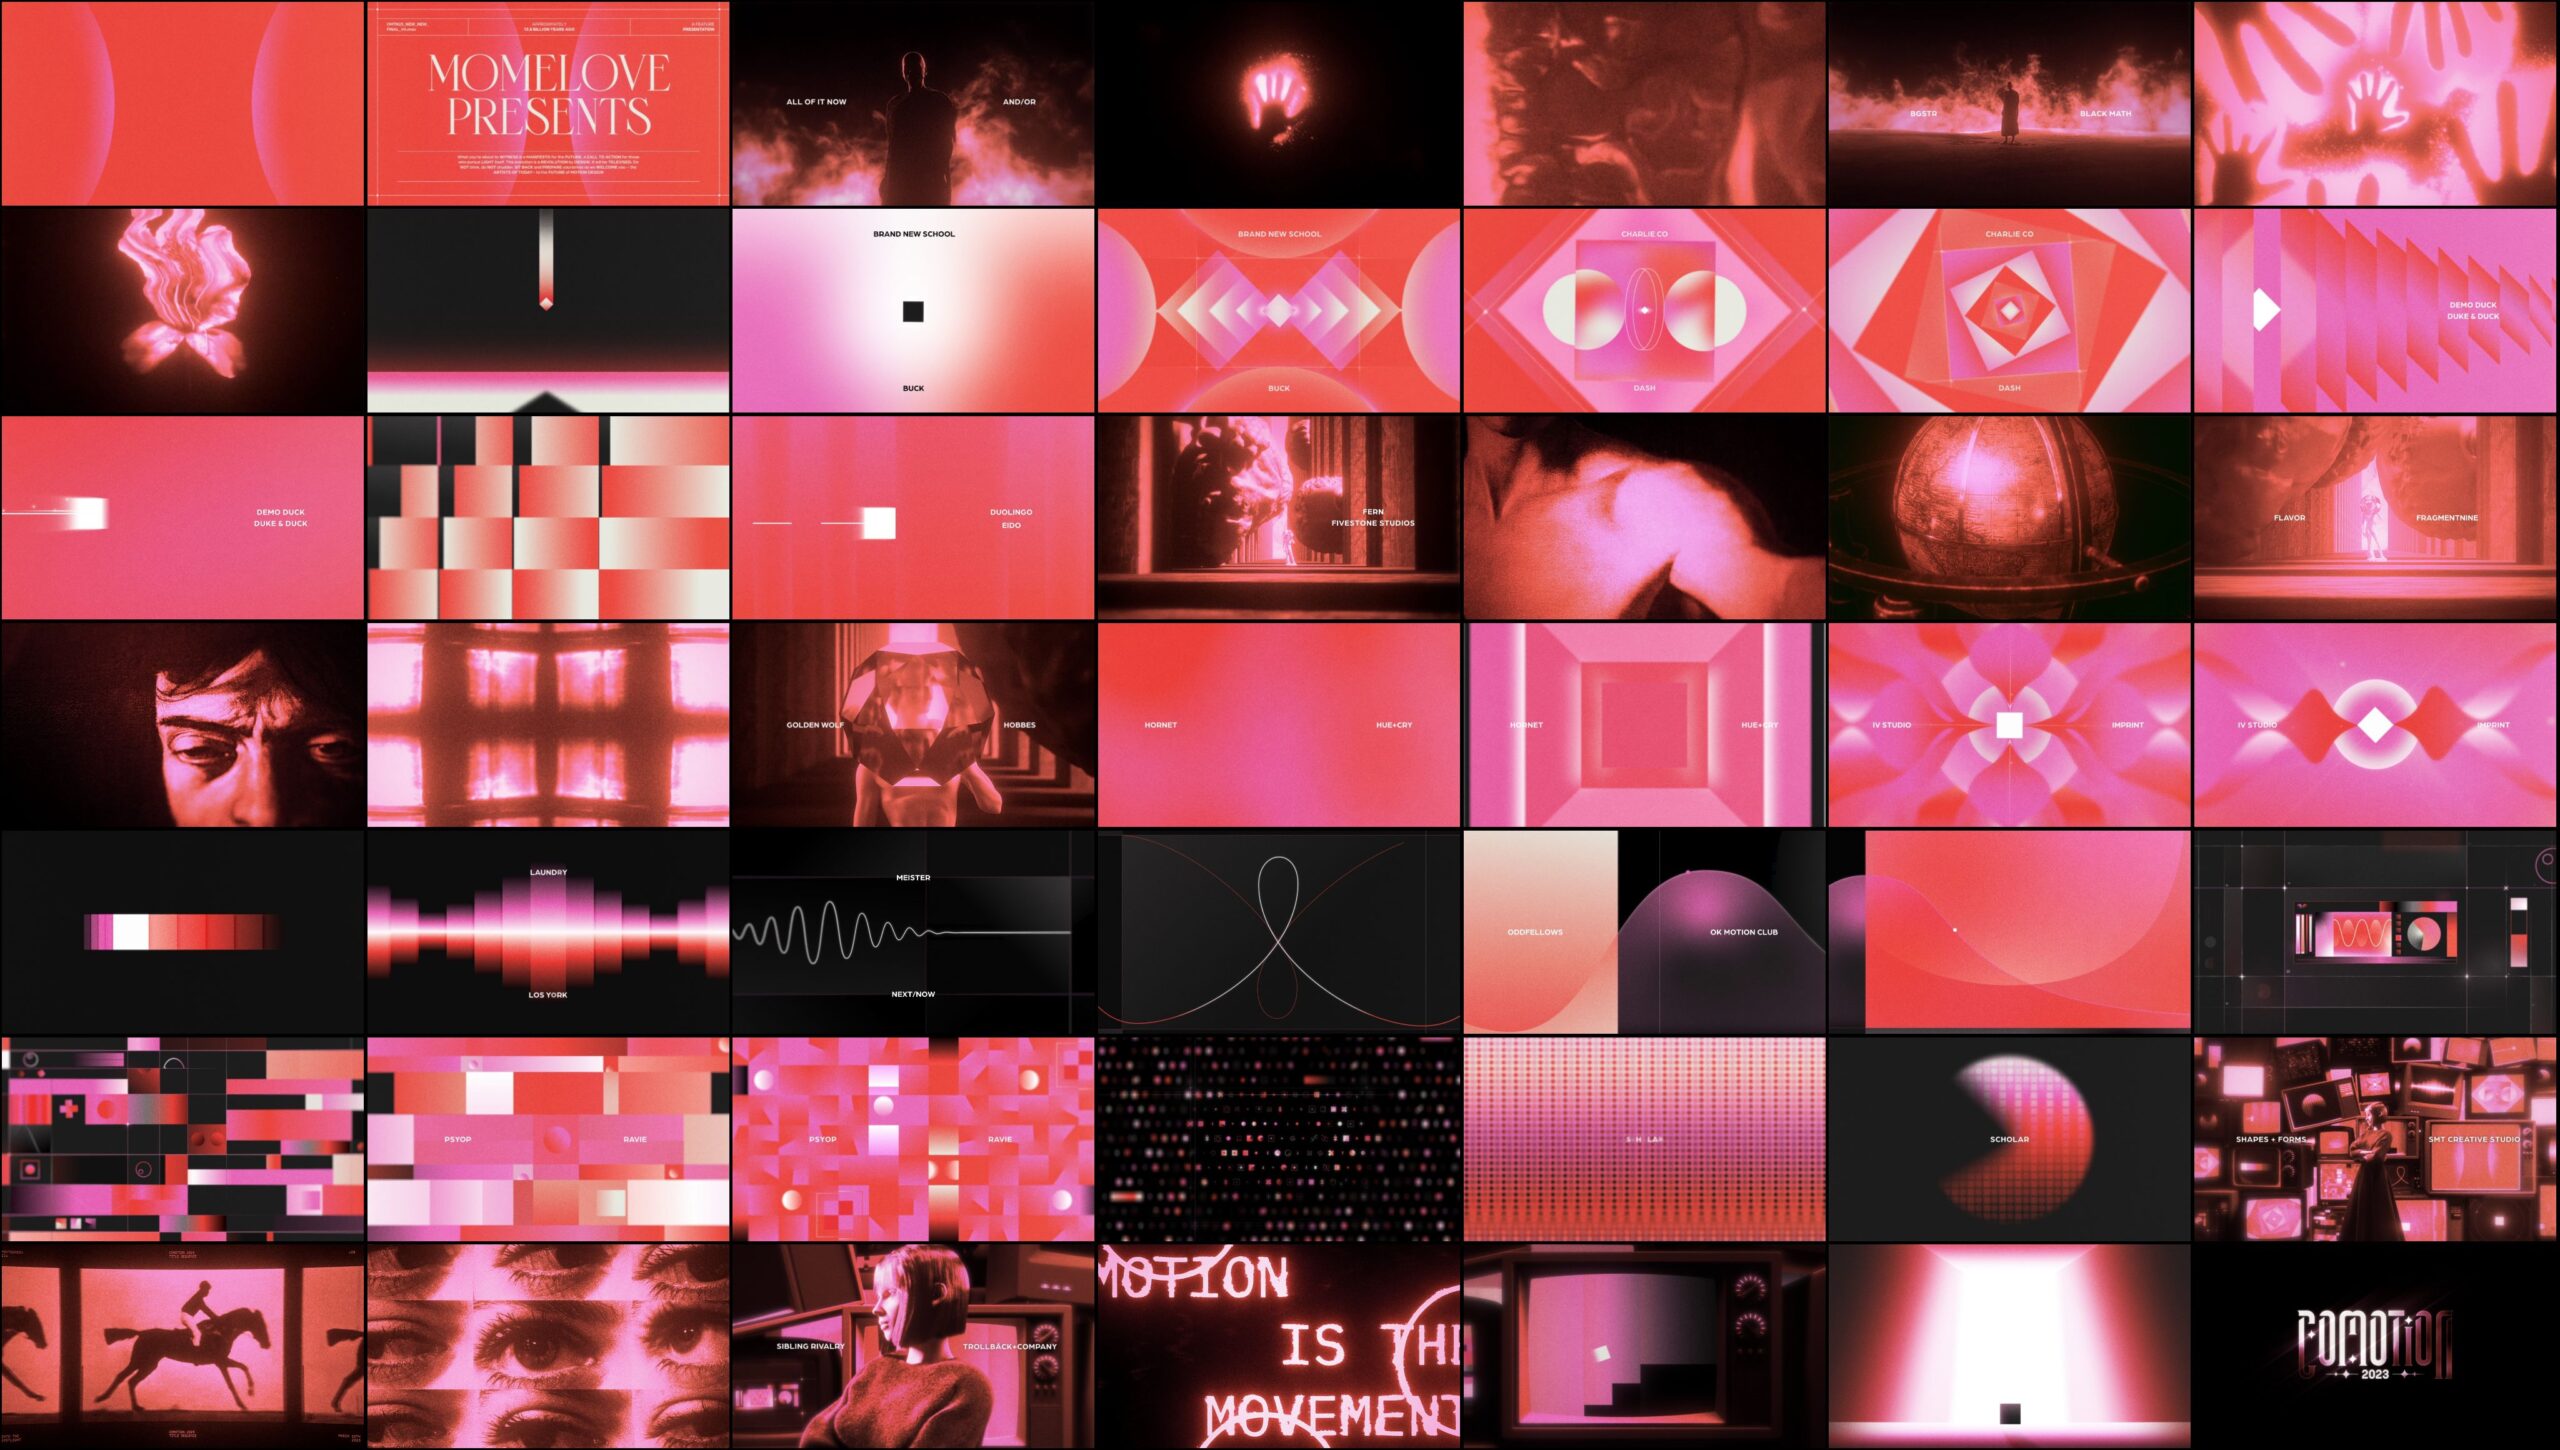
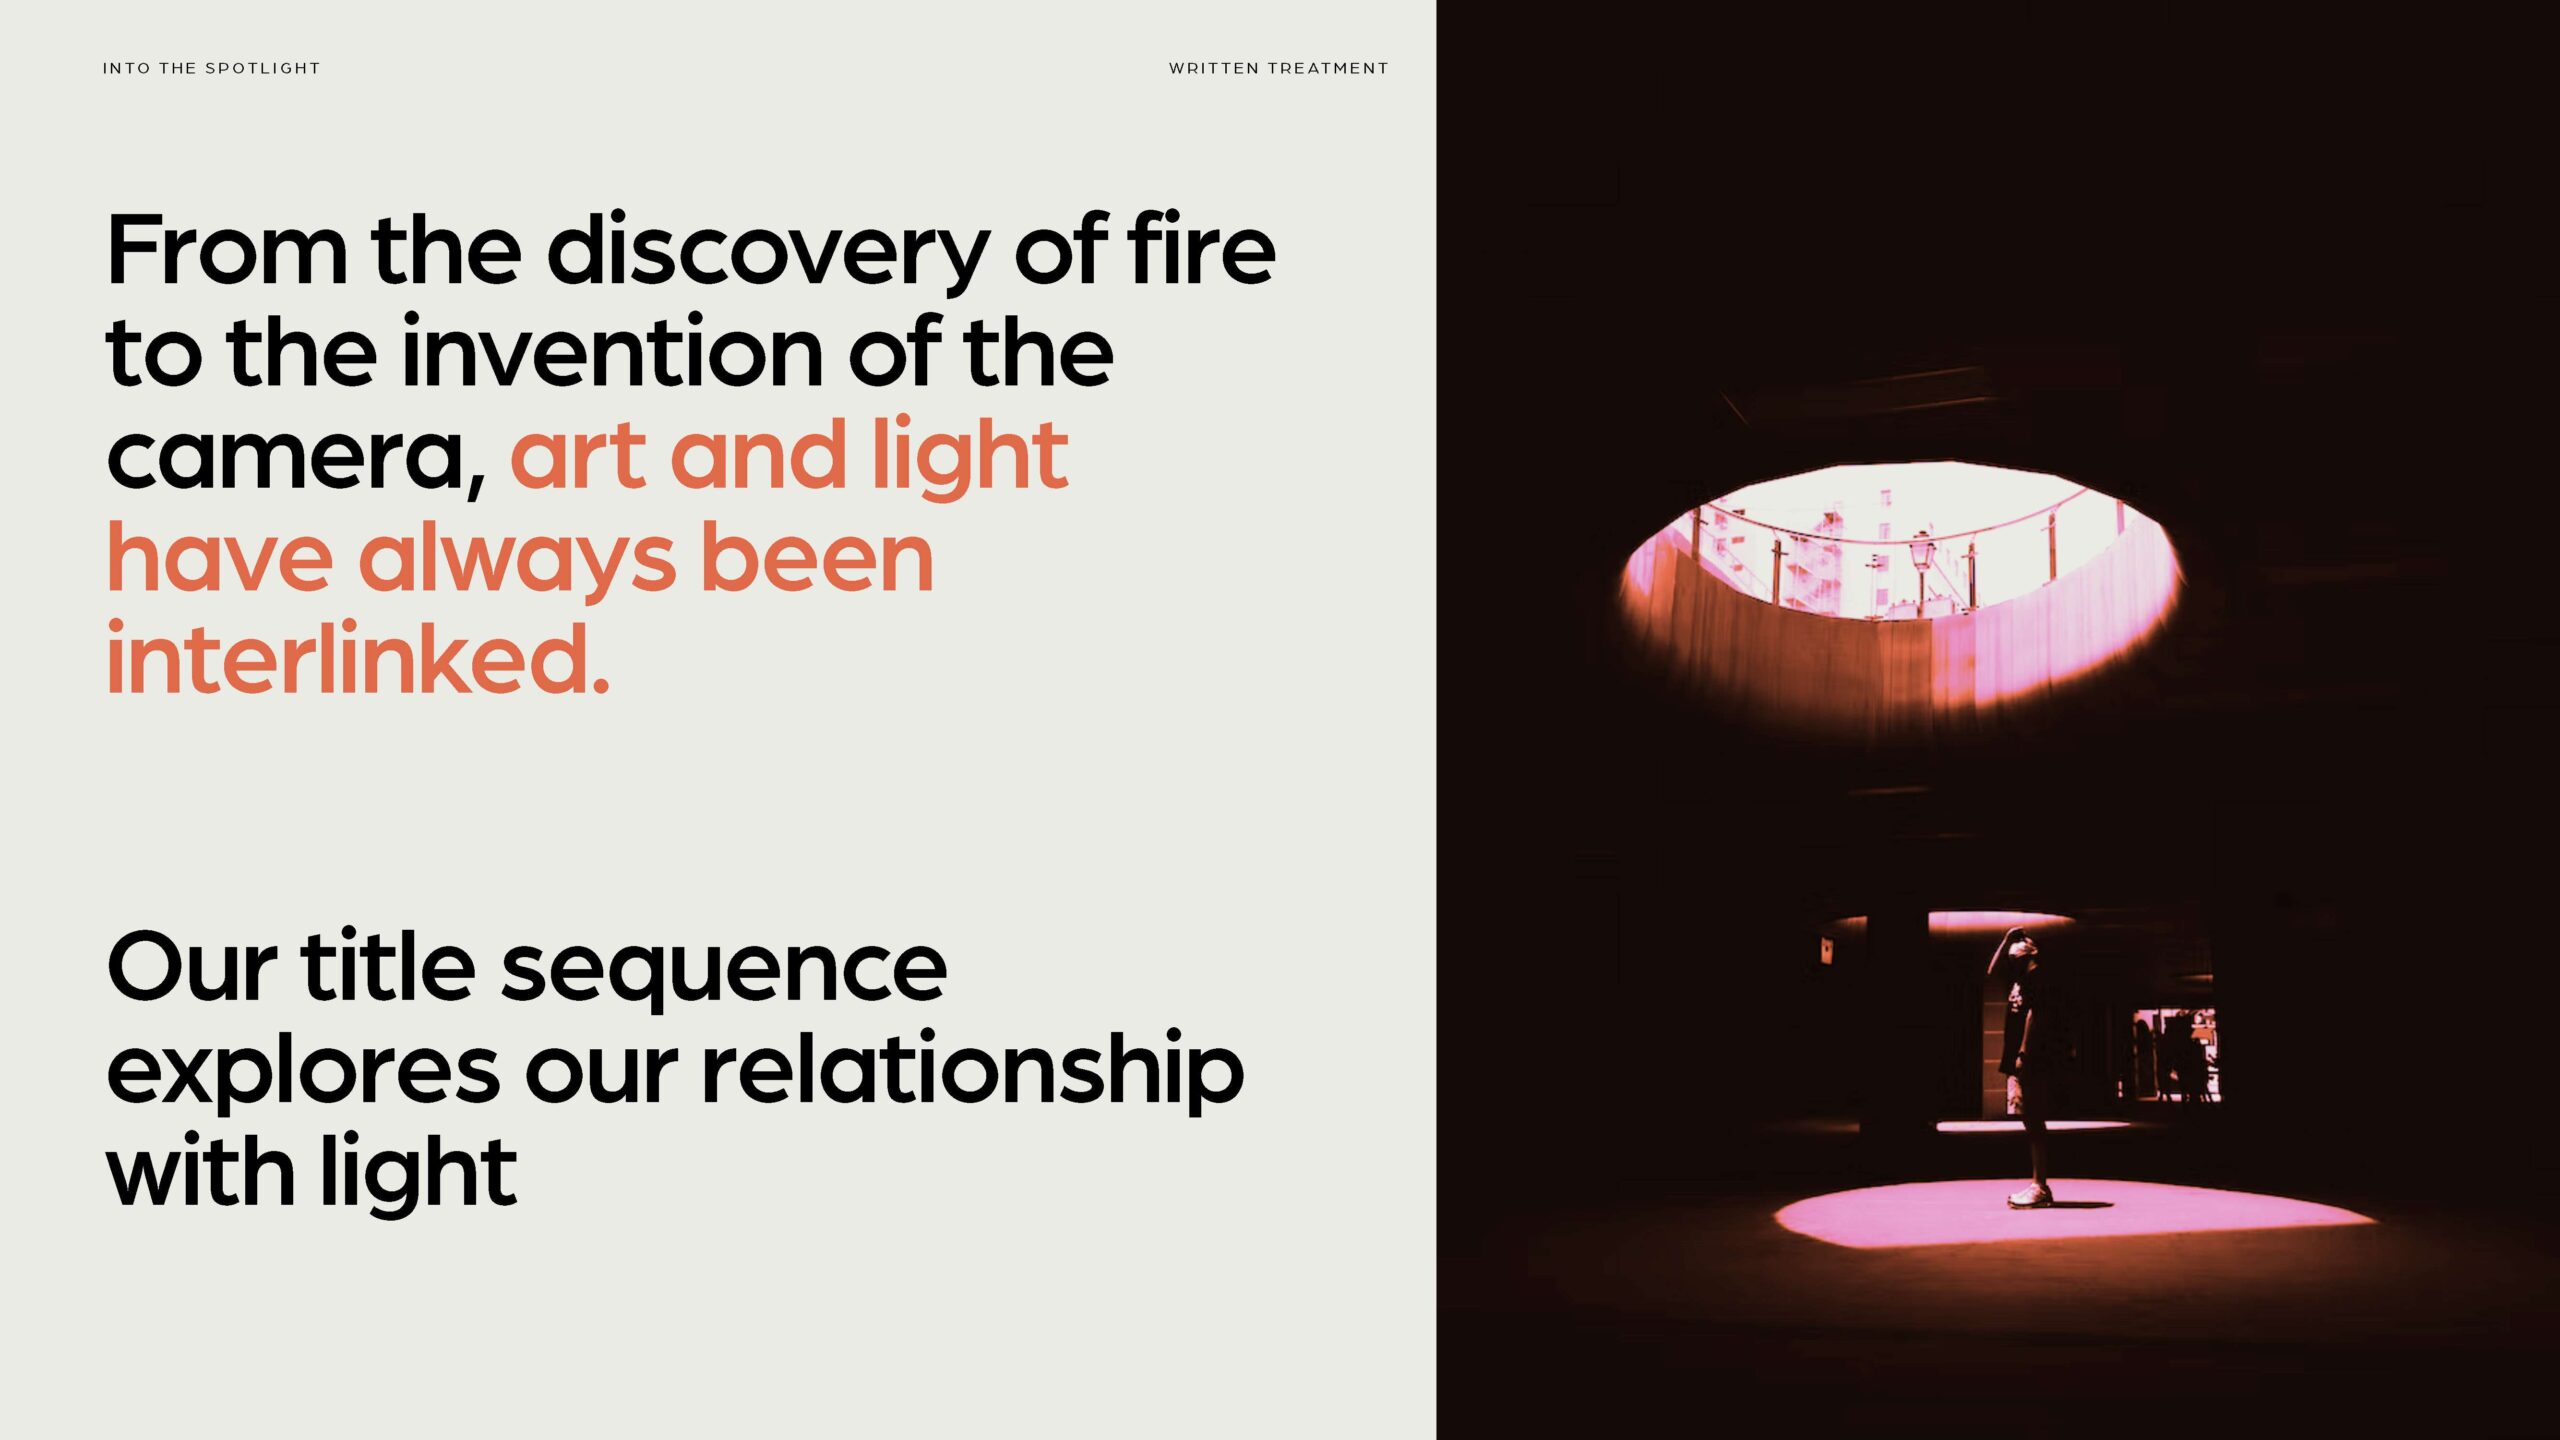
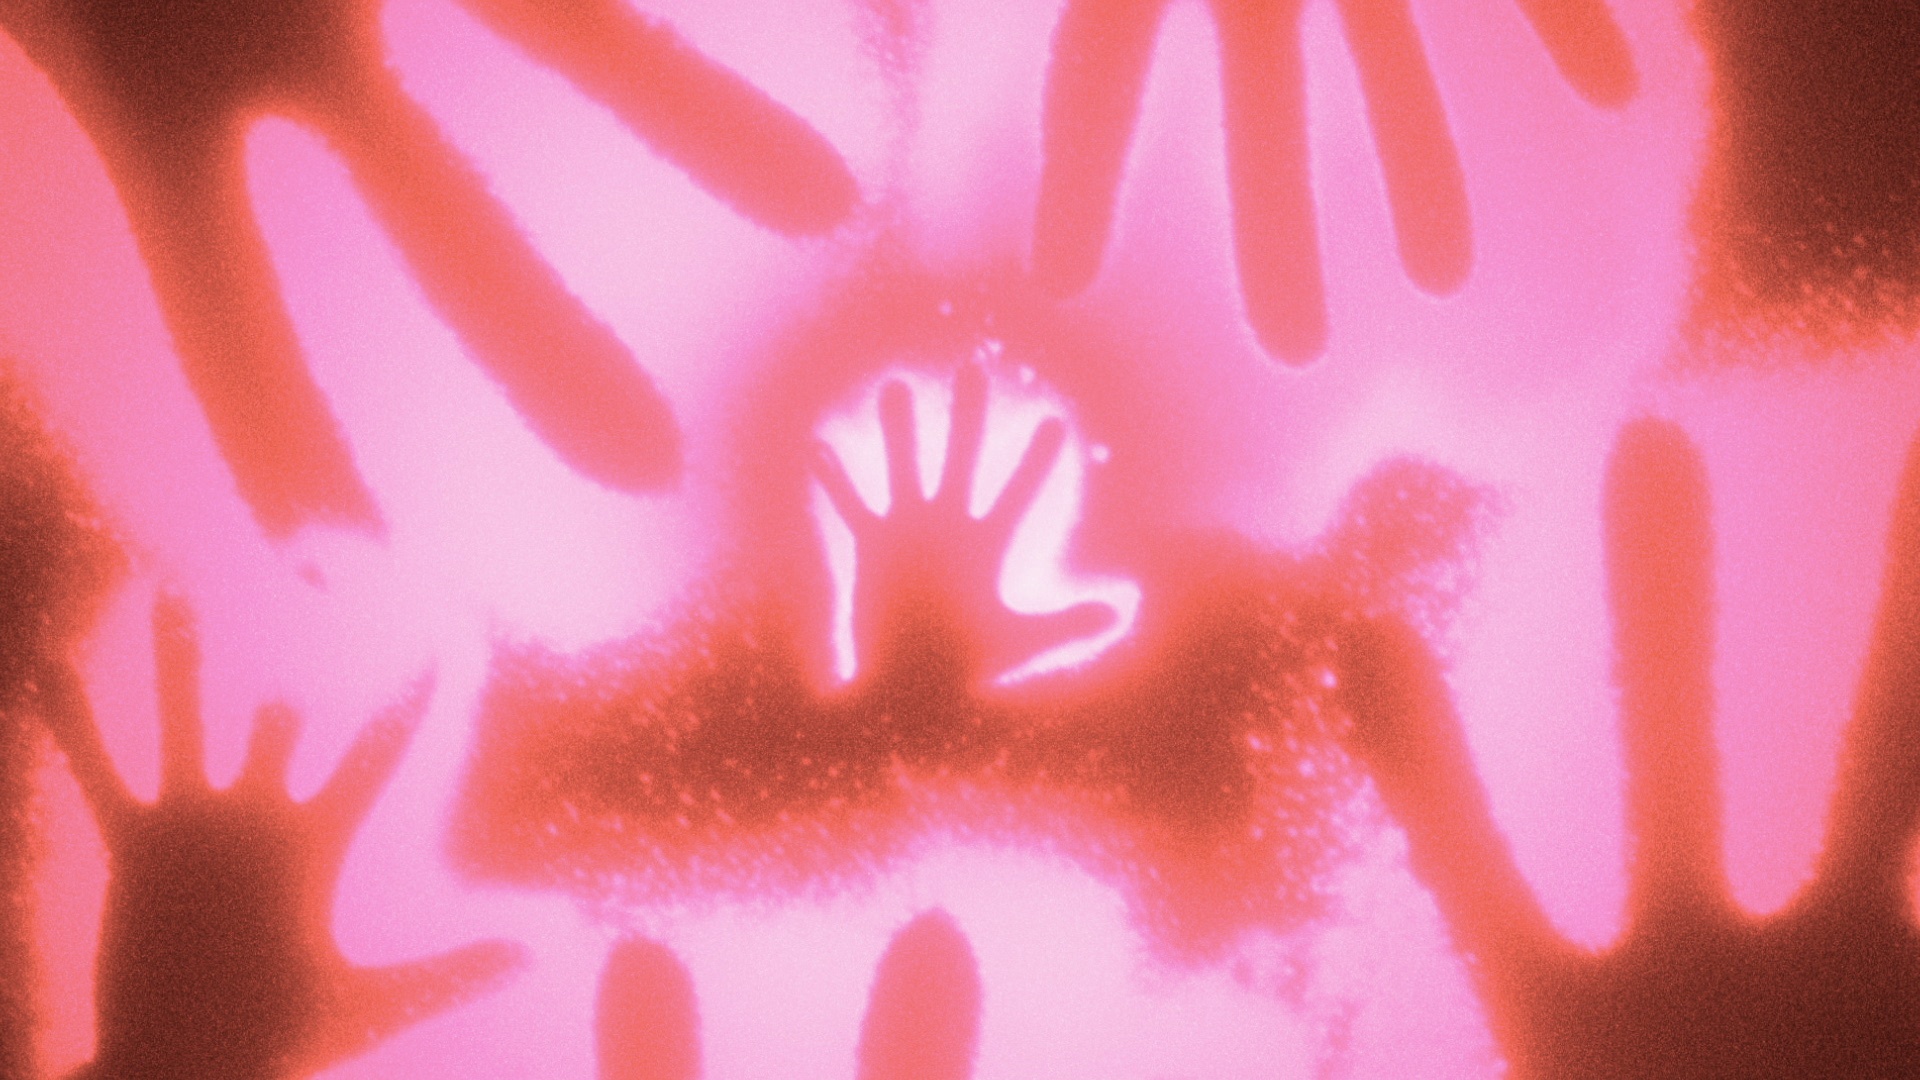
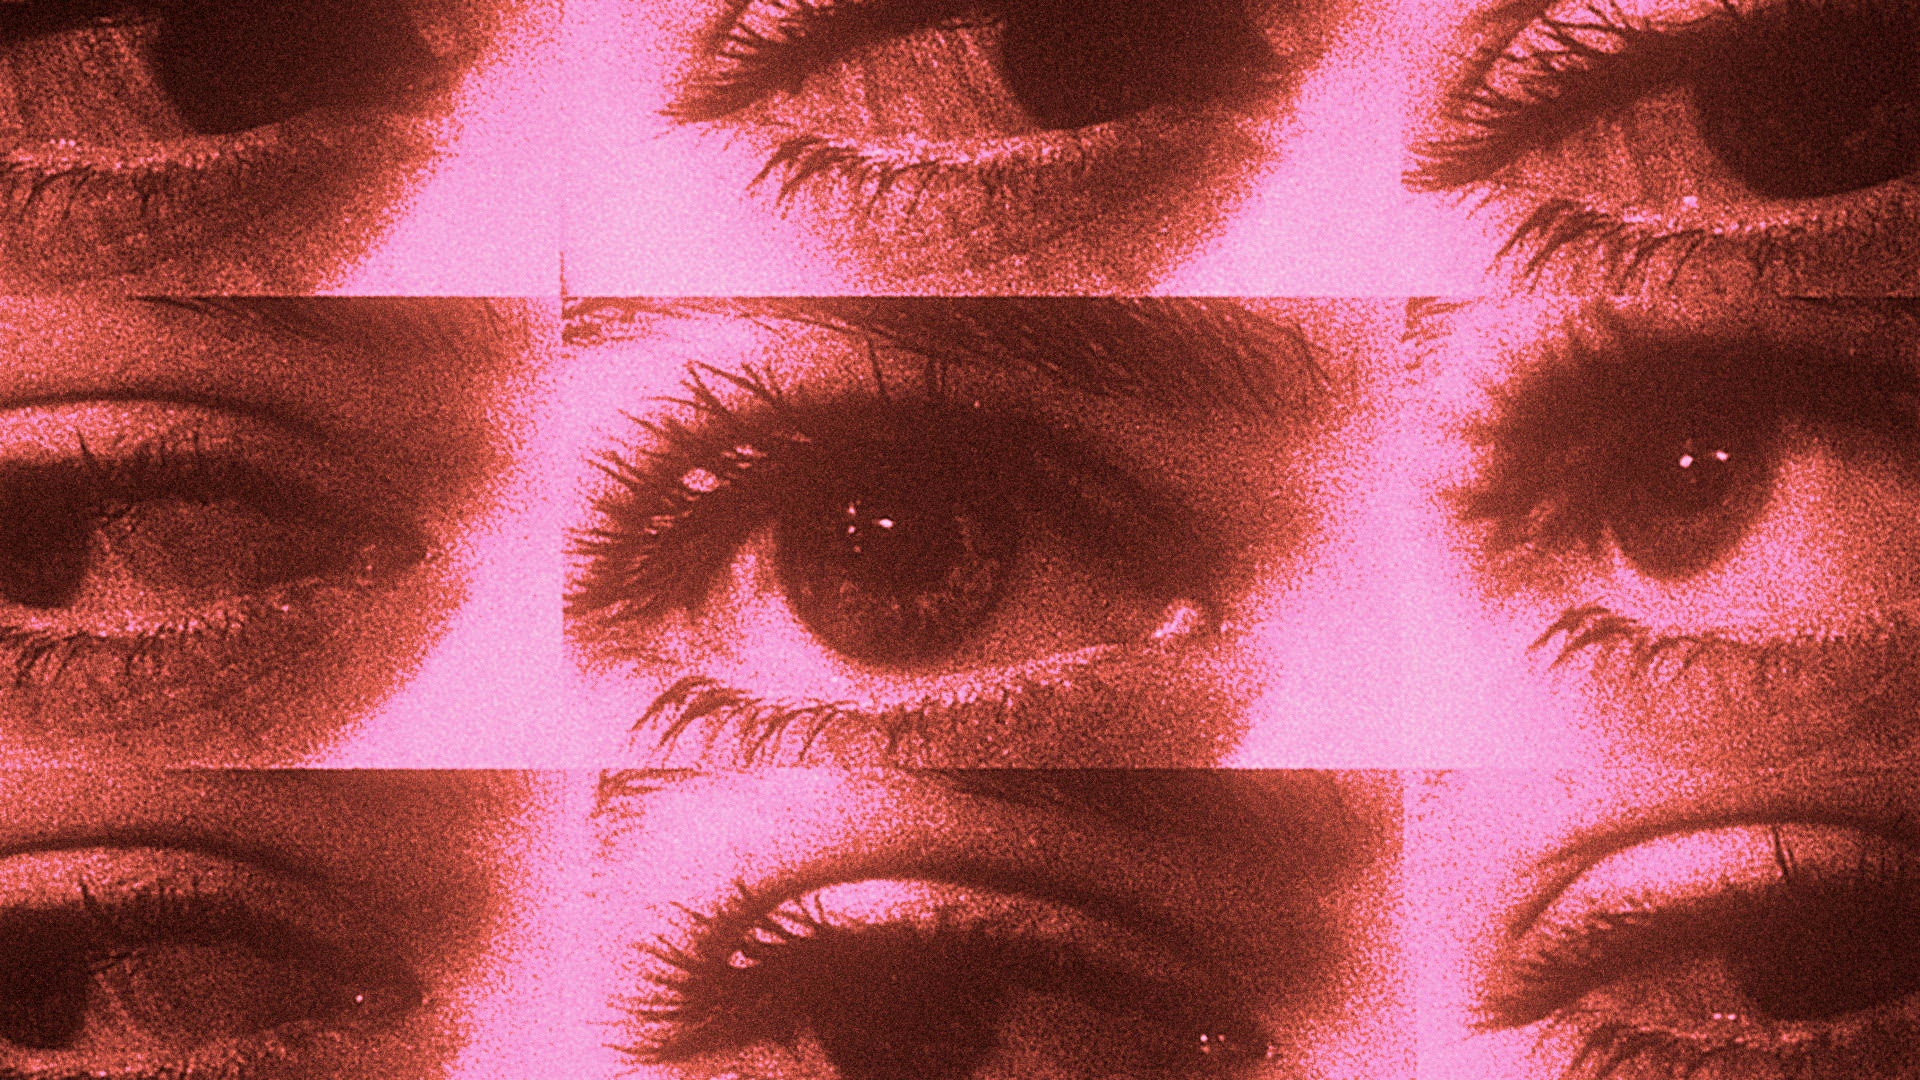
The CoMotion 2023 motion design symposium brand focuses on the medium of light and its connection to motion design. The goal is to showcase the diversity and community within CoMotion by highlighting four key principles: boldness, tradition, innovation, and refinement. The brand identity celebrates the motion designers themselves, through the universal medium of light. From the earliest days of mankind with the discovery of fire, to the modern age with the invention of the camera, light has always played a crucial role in the art of motion design. The title sequence explores this relationship and how it relates to the unique blend of diversity and community that makes CoMotion special.
Pitch Deck by Aanvik Singh & Marly Koven
1. Organizational & Project Management
My greatest strength lies in my exceptional organizational skills. It serves as a fundamental component of how I approach work and manage teams. In fact, it forms the basis for the operational structure of CoMotion animation team, and I intend to replicate this approach when leading teams in future collaborations with other companies.
1.1 Onboarding
Working on CoMotion, a large-scale animation project involving a team of about 40 students, is challenging, particularly for new team members who may not have experience working on a project of this size. To ensure that everyone is on the same page and working towards the same goals, it is important to establish expectations and provide background information at the outset of the project. To do this, the Animation team has been using an onboarding playbook that includes information about the project’s deliverables, proposed timeline, production pipeline, and virtual collaboration guidelines. Over the past 2 years, I have been using and building upon this playbook to guide the team through the project.
1.2 Collaboration & Project management
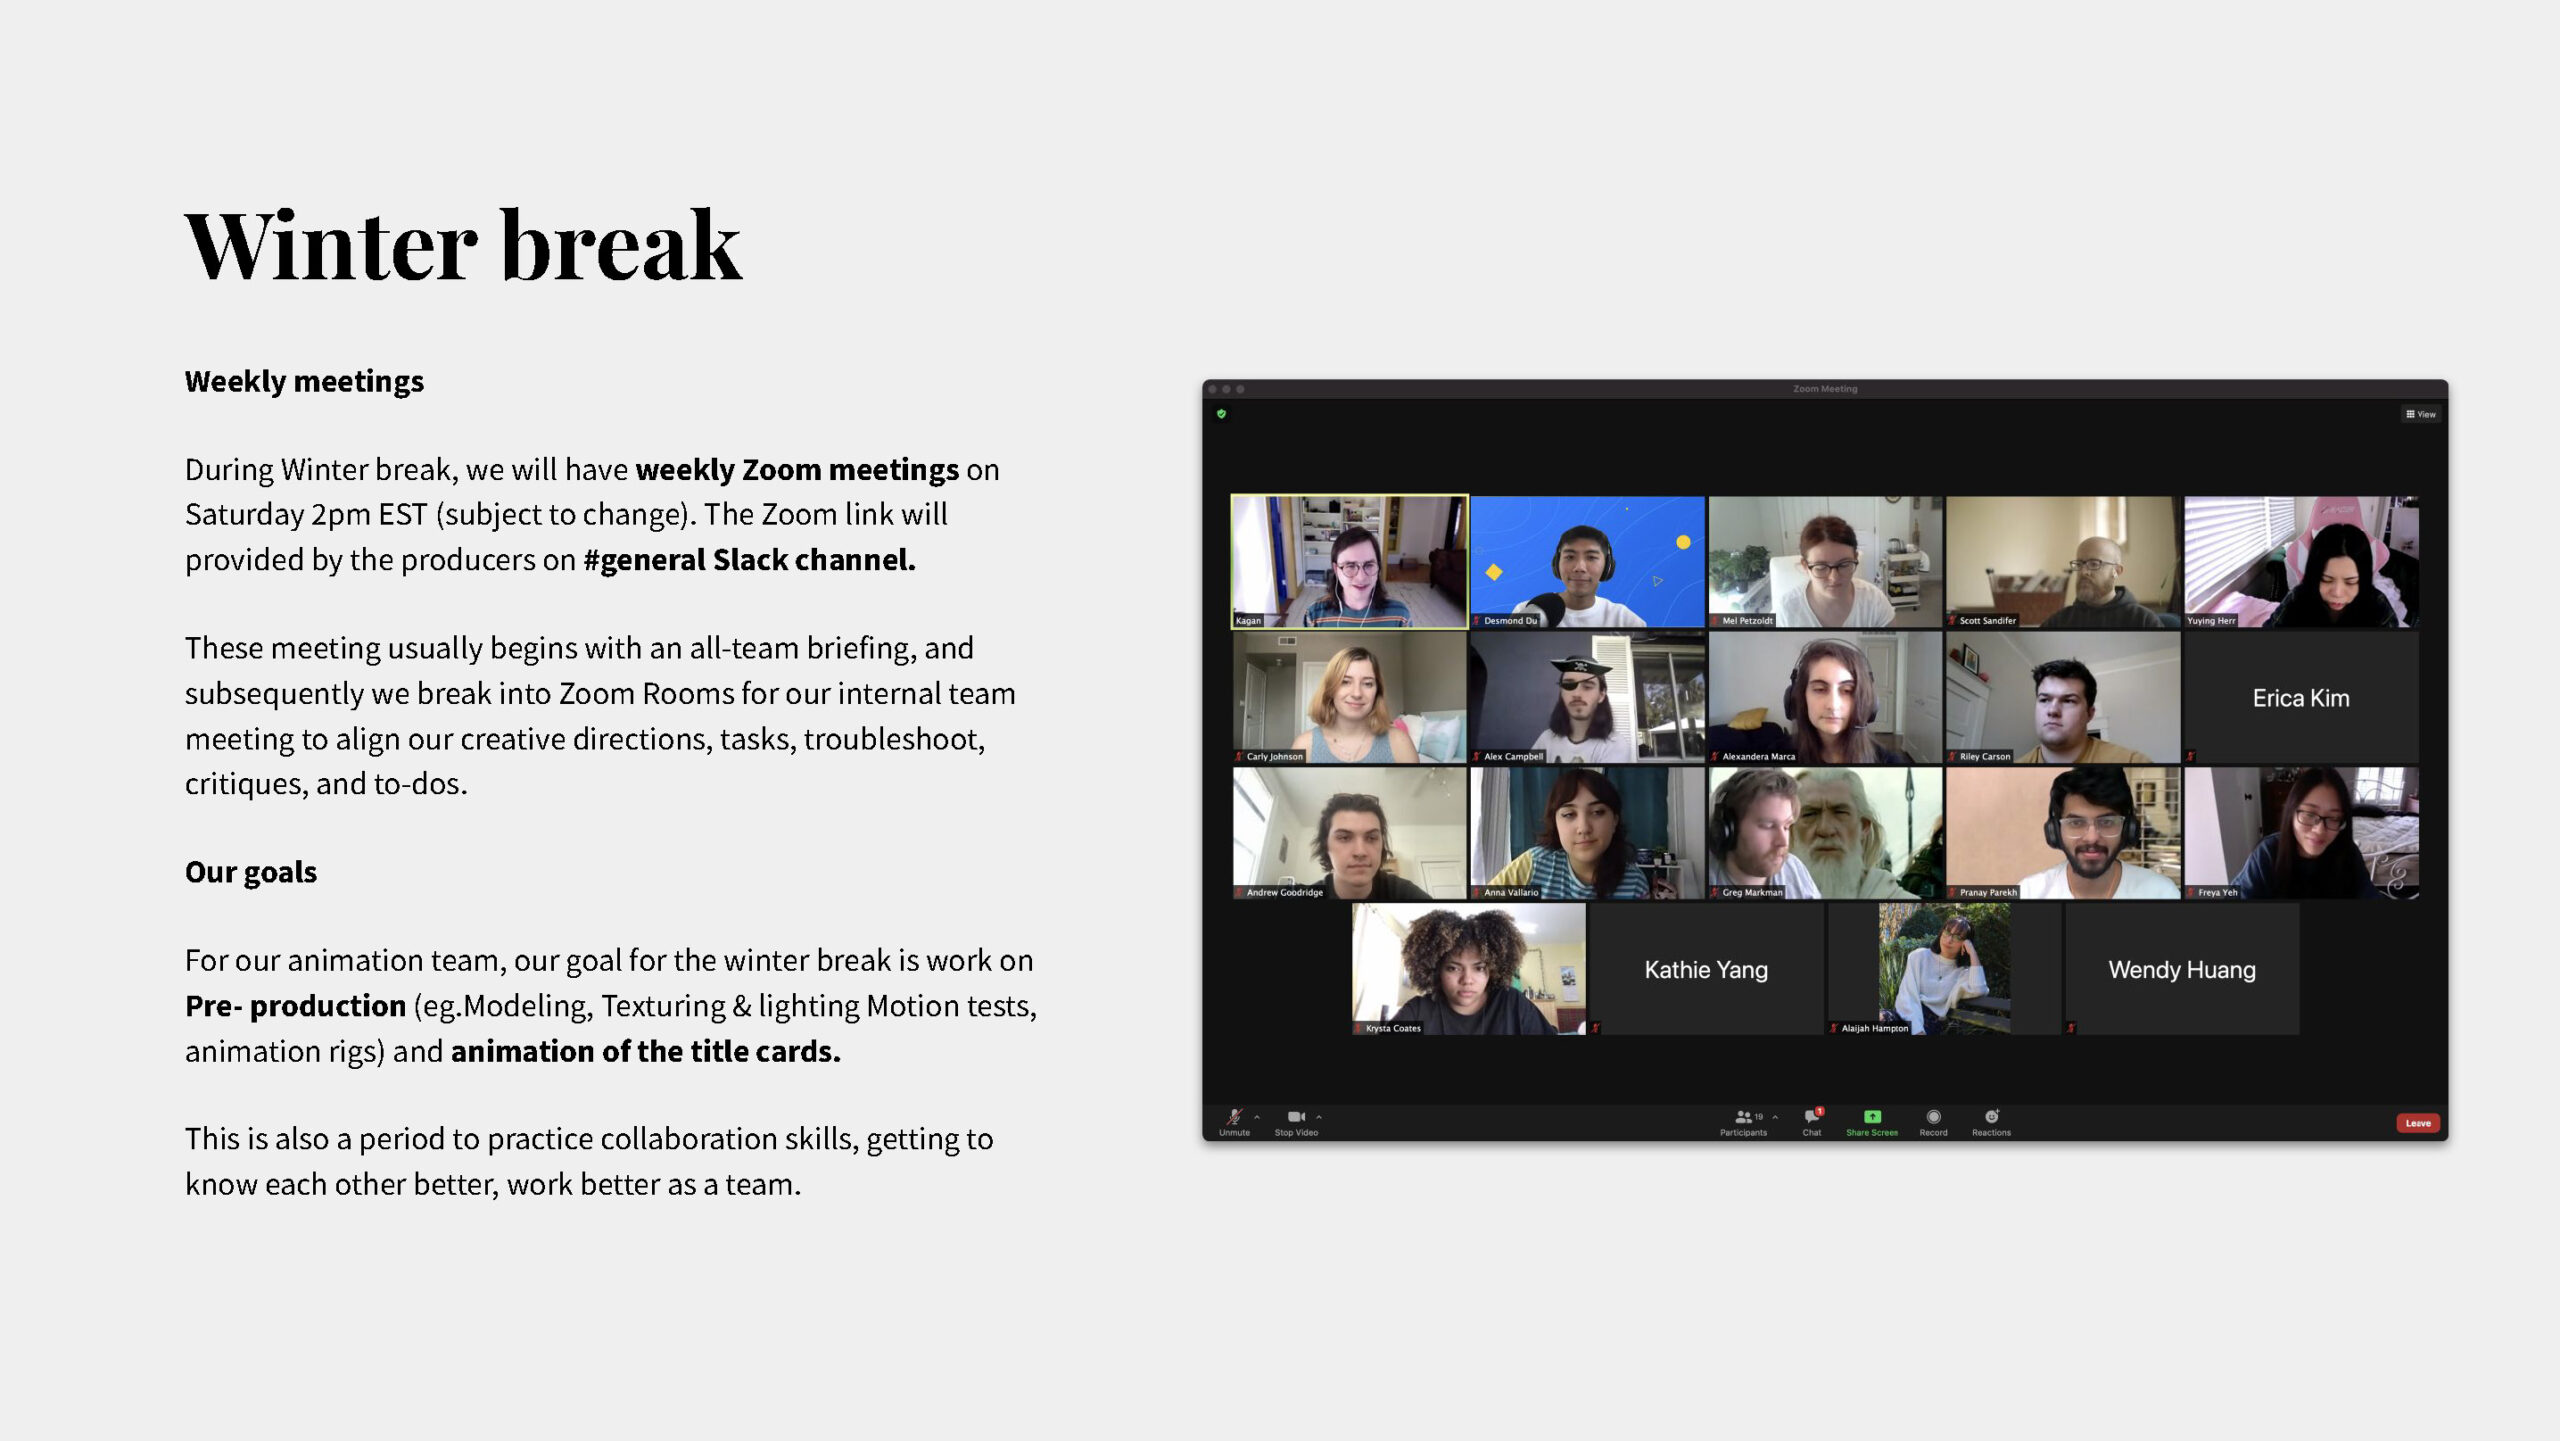
The collaboration was a mixture of remote over winter break and in-person during the winter quarter. We communicated and collaborated with team members through Slack and Zoom. On this project, our team consisted of Erica, Meg, Isabelle, Kyle, Harshitha, Marly on the 2D team, Stephen and JC on the 3D team, and Kyle, Kaleb, and Aanvik on experimental team. One challenge we faced was the impact of the post-pandemic, as team members had more travel plans and weekly progress was slower compared to the previous year. We also had lower attendance at weekly meetings, which made it harder for people to catch up on missed work. To address these challenges, we used Notion to document weekly meeting notes and provide instructions on how to catch up.
As for how tasks and responsibilities are assigned to team members, I review team members’ portfolios and assign tasks based on their strengths and the style of the project. I facilitate meetings that are broken into three segments: administrative announcements, individual feedback rounds, and demonstrations of techniques or resources that can aid in the production process. This helps to ensure that everyone is on the same page and that we are able to make the most of our time and resources.
1.3 Knowledge Management
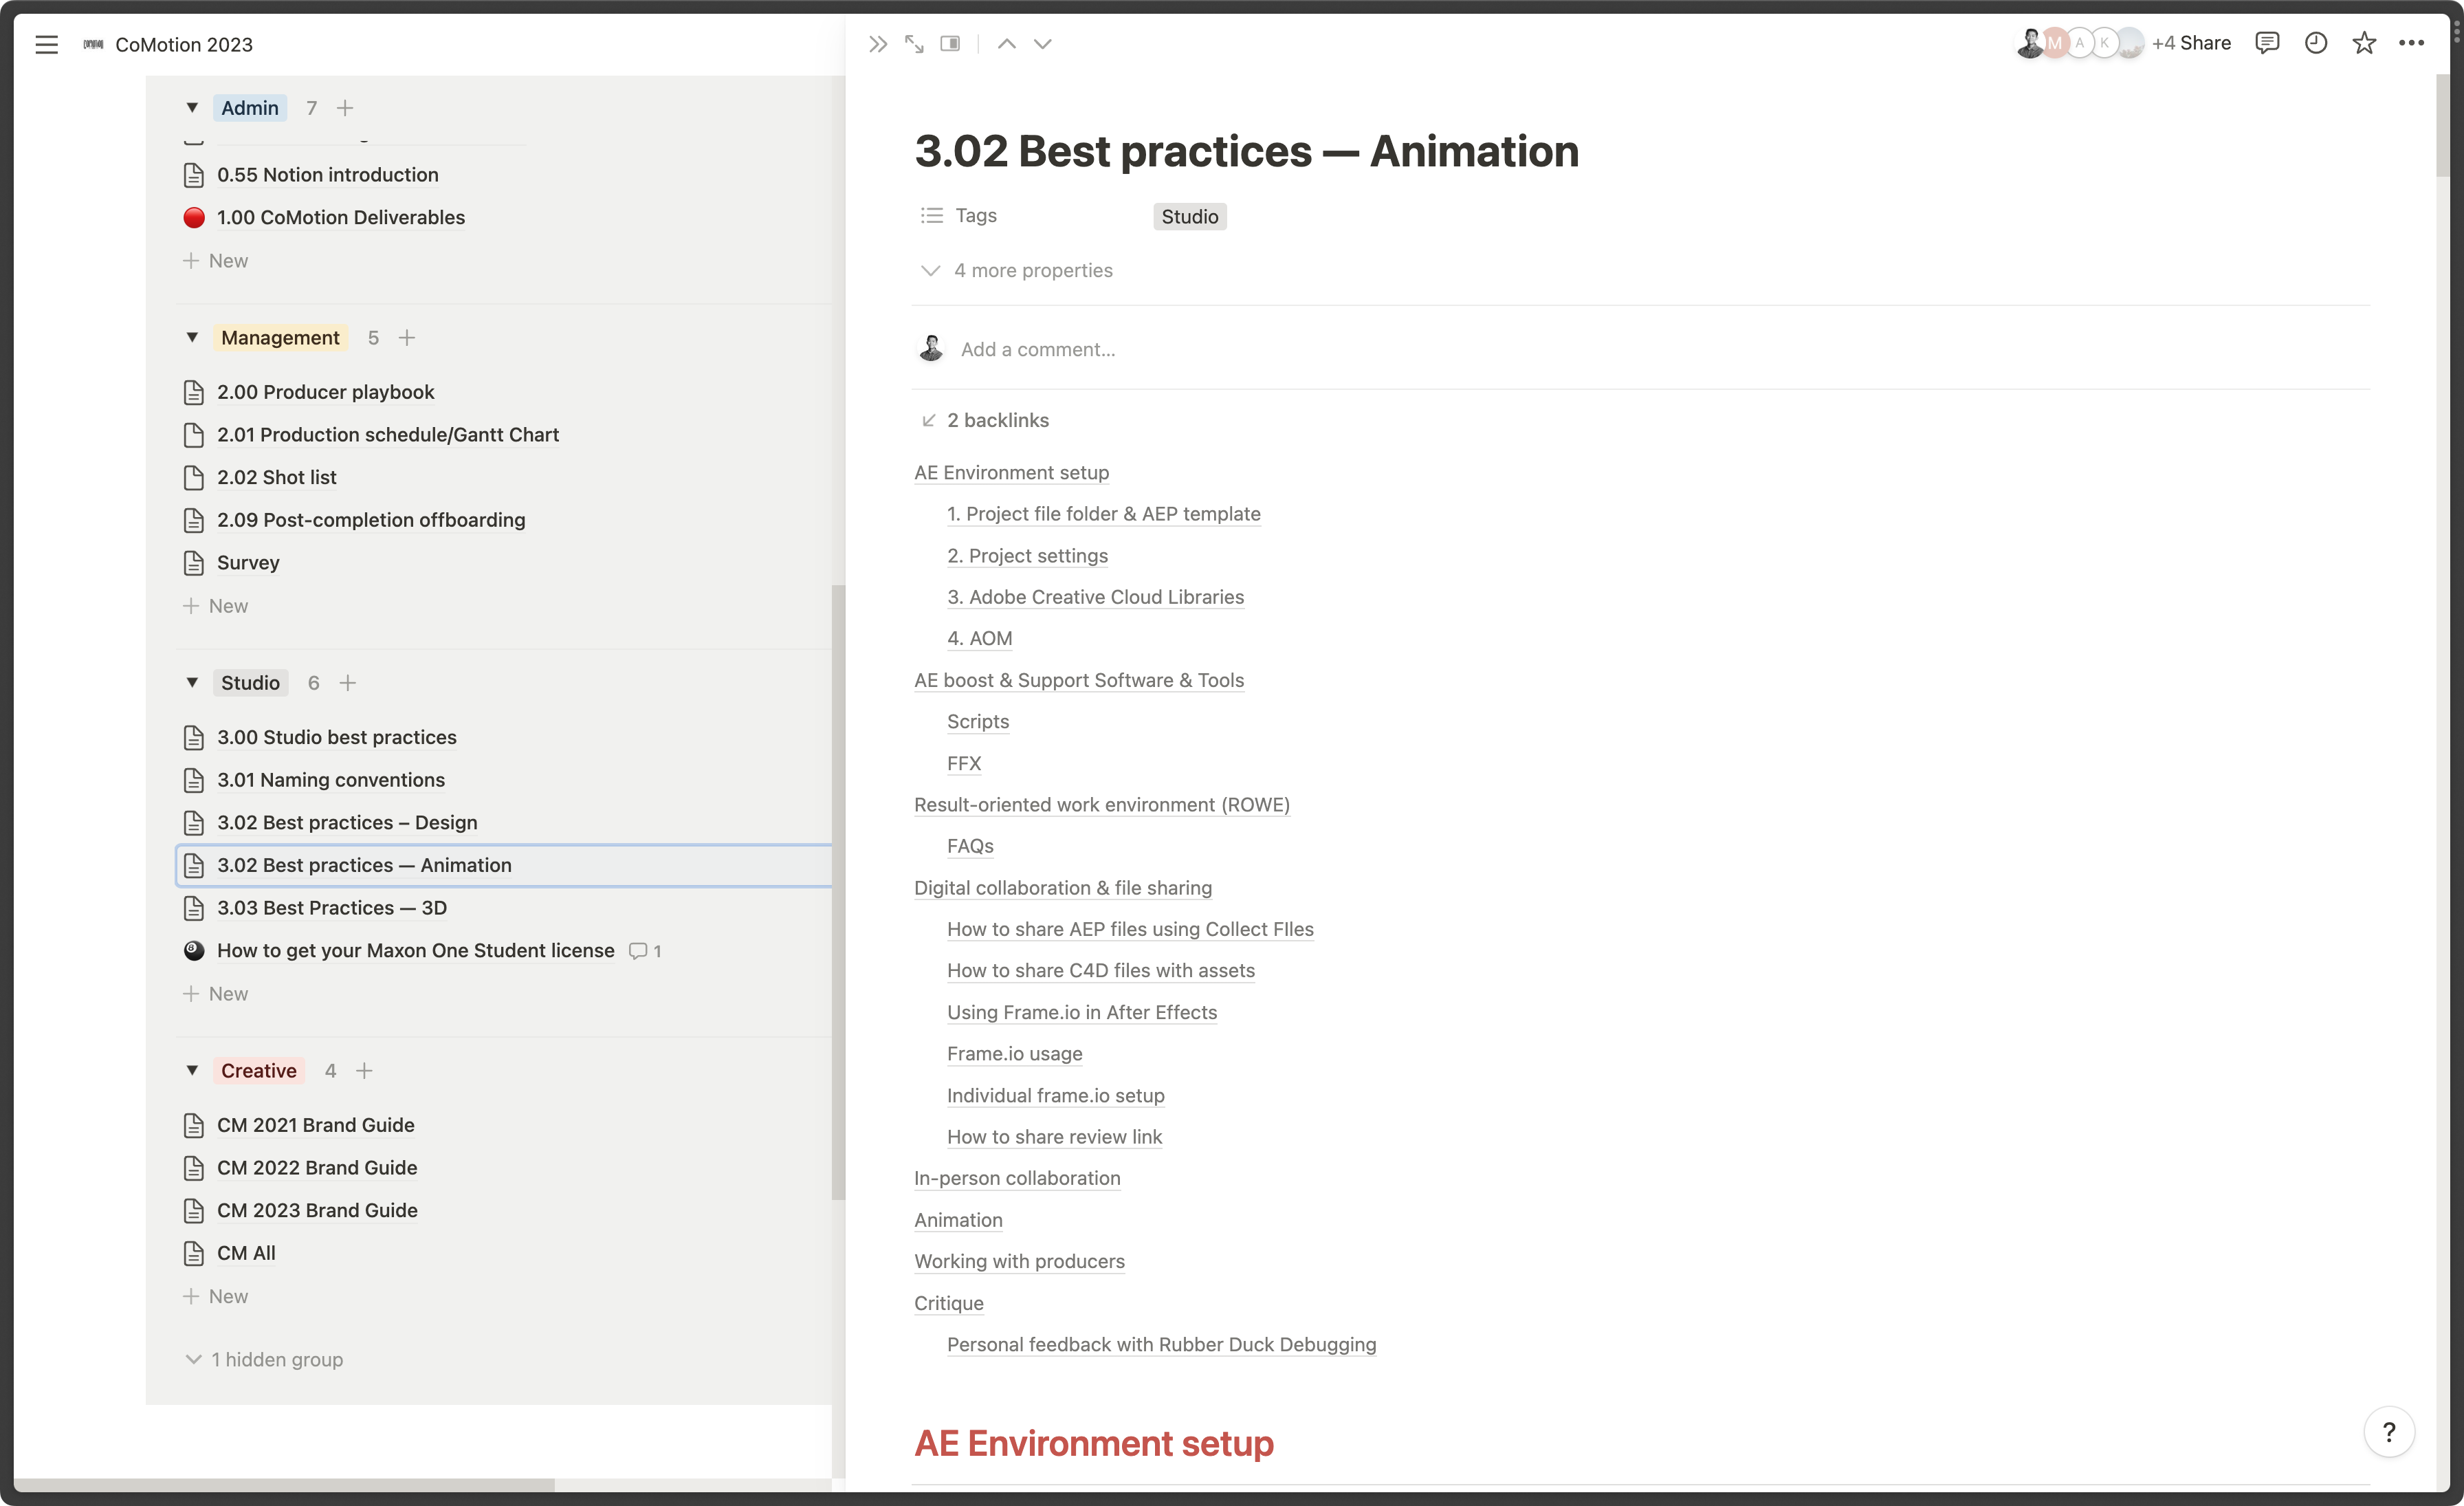
I have used Notion to curate and standardize practices and knowledge for the past three CoMotion productions, operating it as if the Branding Team were a studio. I have created a dashboard for the animation team to access all the resources and information related to deliverables, as well as FAQs about situations where meetings may be missed and how to catch up. This has helped to streamline the team’s workflow and ensure that everyone has the information they need to complete their tasks effectively.
2. Student showcase title cards
2.1 Workflow
The 22 title card animations are broken into two parts, the main animation which is handled by my 6 teammates, and the title overlay which is animated by me. Once the art director and I approve the title card animations, team members will render and deliver their animations in prores 422HQ for all title overlays and stylization to be placed on top. This allows team members to focus on their individual animations and makes it easier to track the progress of each animation.
Compositing breakdown of title card animation
2.2 Tool development
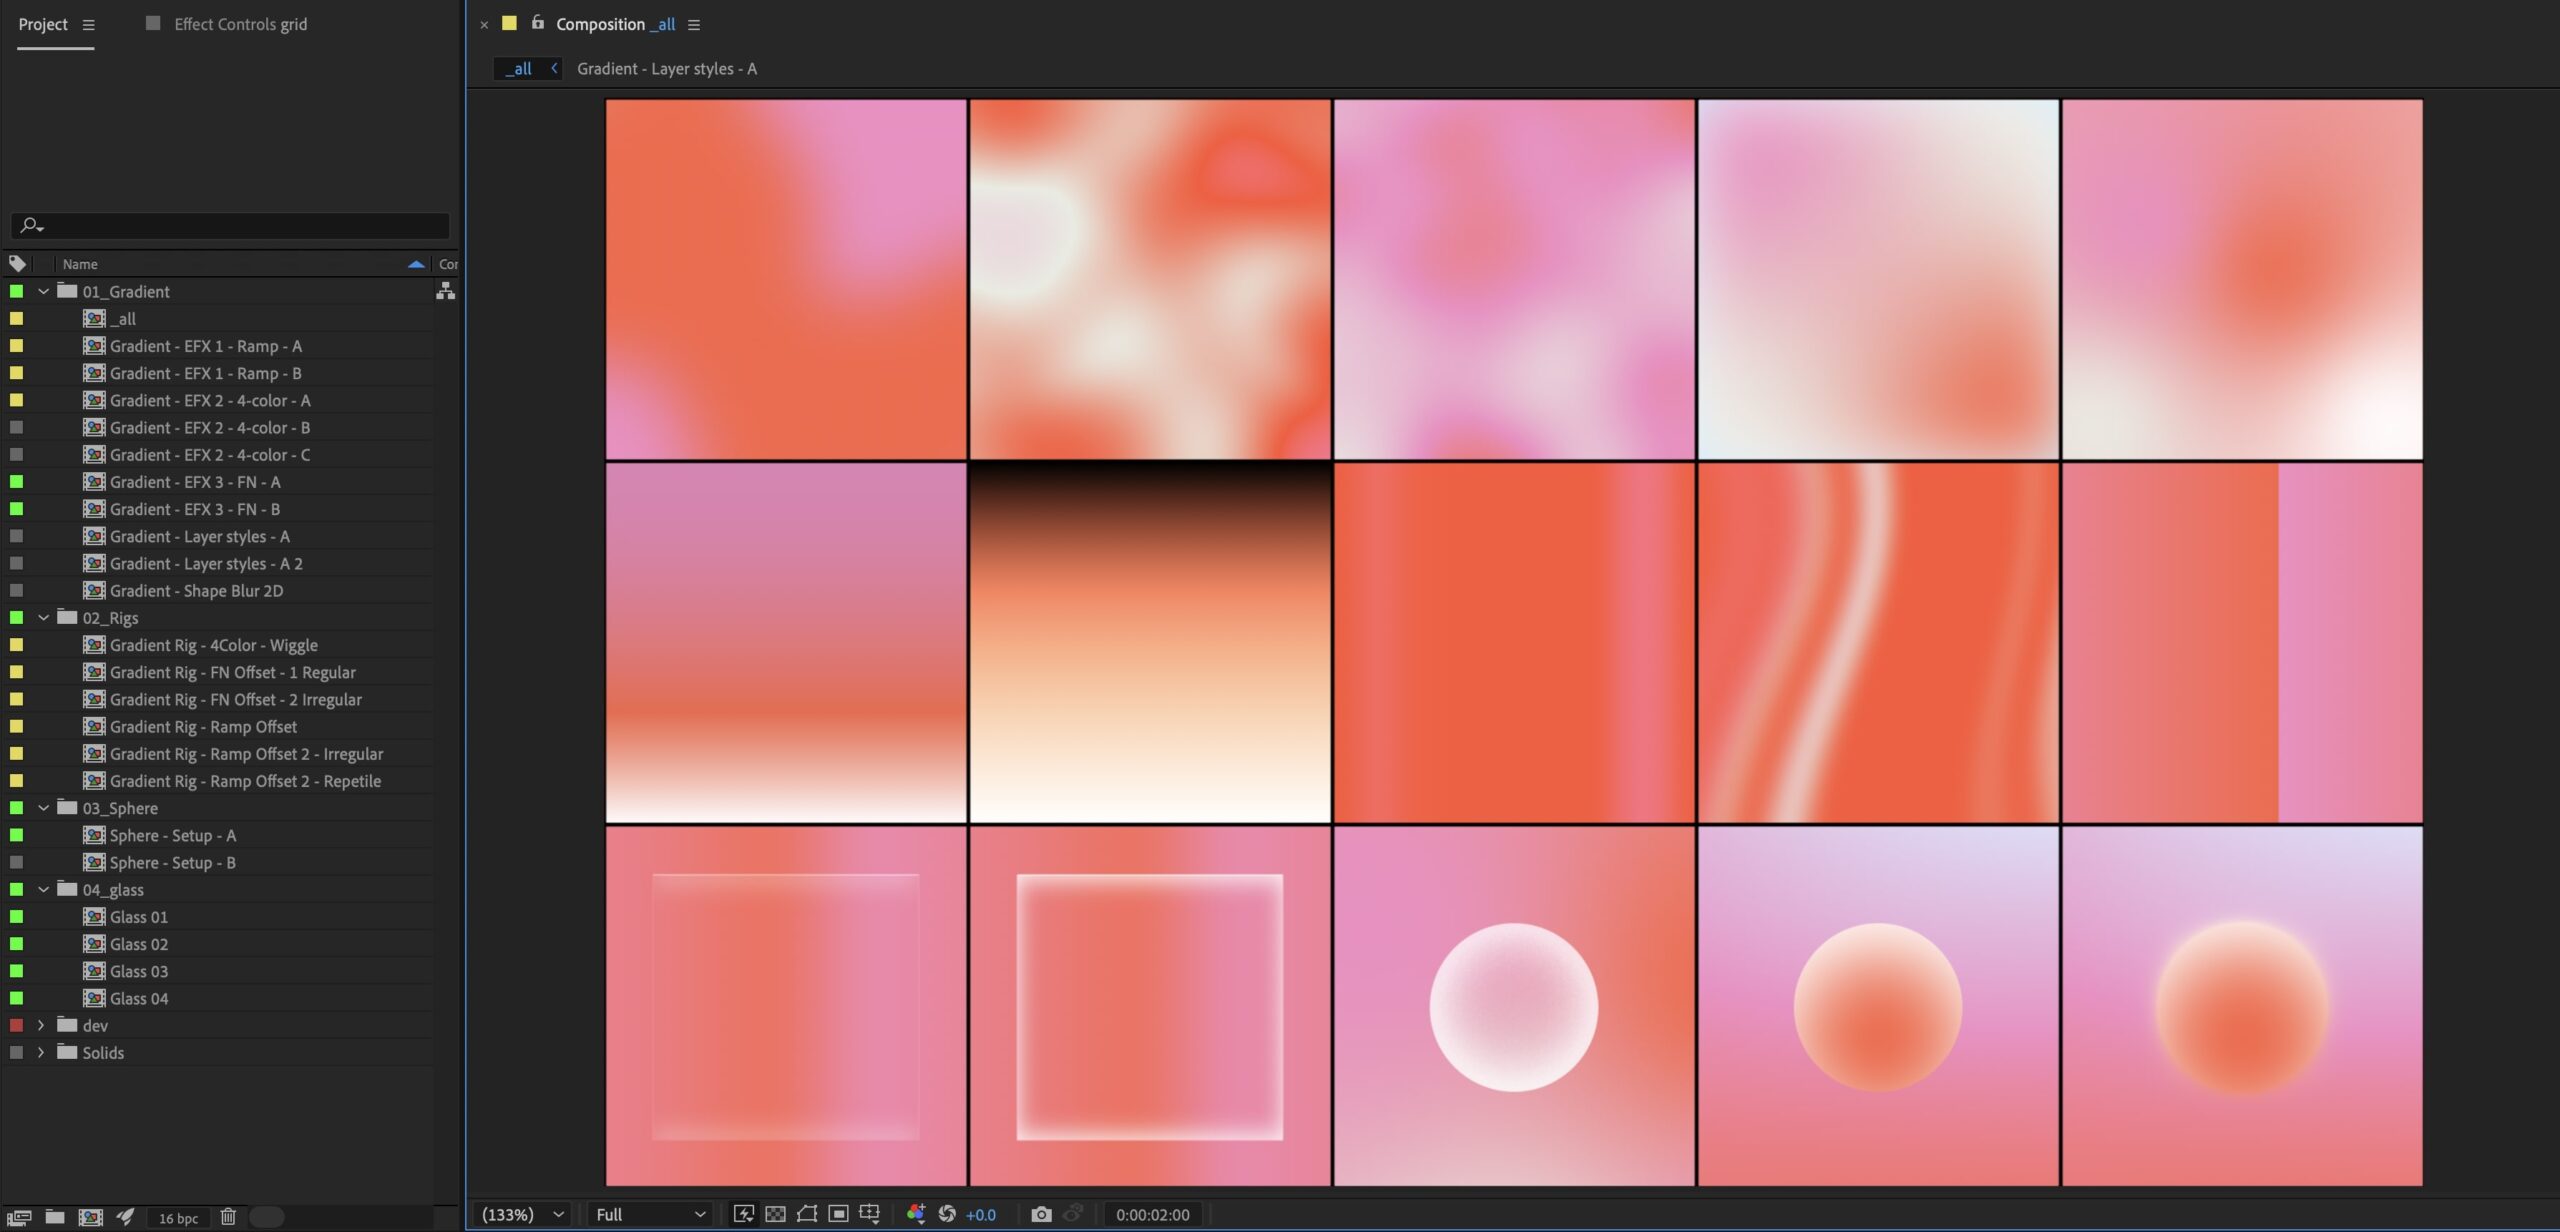
Gradient & Glass Stylization Toolkit
Maintaining consistency is crucial, and I don’t want team members to have to start from scratch every time they work on an animation. To streamline the process, I provide a toolkit AEP and walk team members through its usage so that they can easily incorporate it into their work. There were no challenges with team members using the toolkit I prepared. Just like introducing any new technology, it’s important to familiarize team members with the toolkit by demonstrating its use. One notable challenge in the preparation process is the need to rename and organize all the compositions and layers neatly, so that users don’t feel overwhelmed.
Title Overlay Animation
The grid frame of the Student Showcase Title Card Overlays was rigged and animated with Flex, a tool by Zack Lovatt, and each rectangles were used as mattes to reveal different size of the title. This setup is made into a Motion Graphics template (MOGRT) that allows users to select the title card design and vary the overlay animation by adjusting values of slider control values.
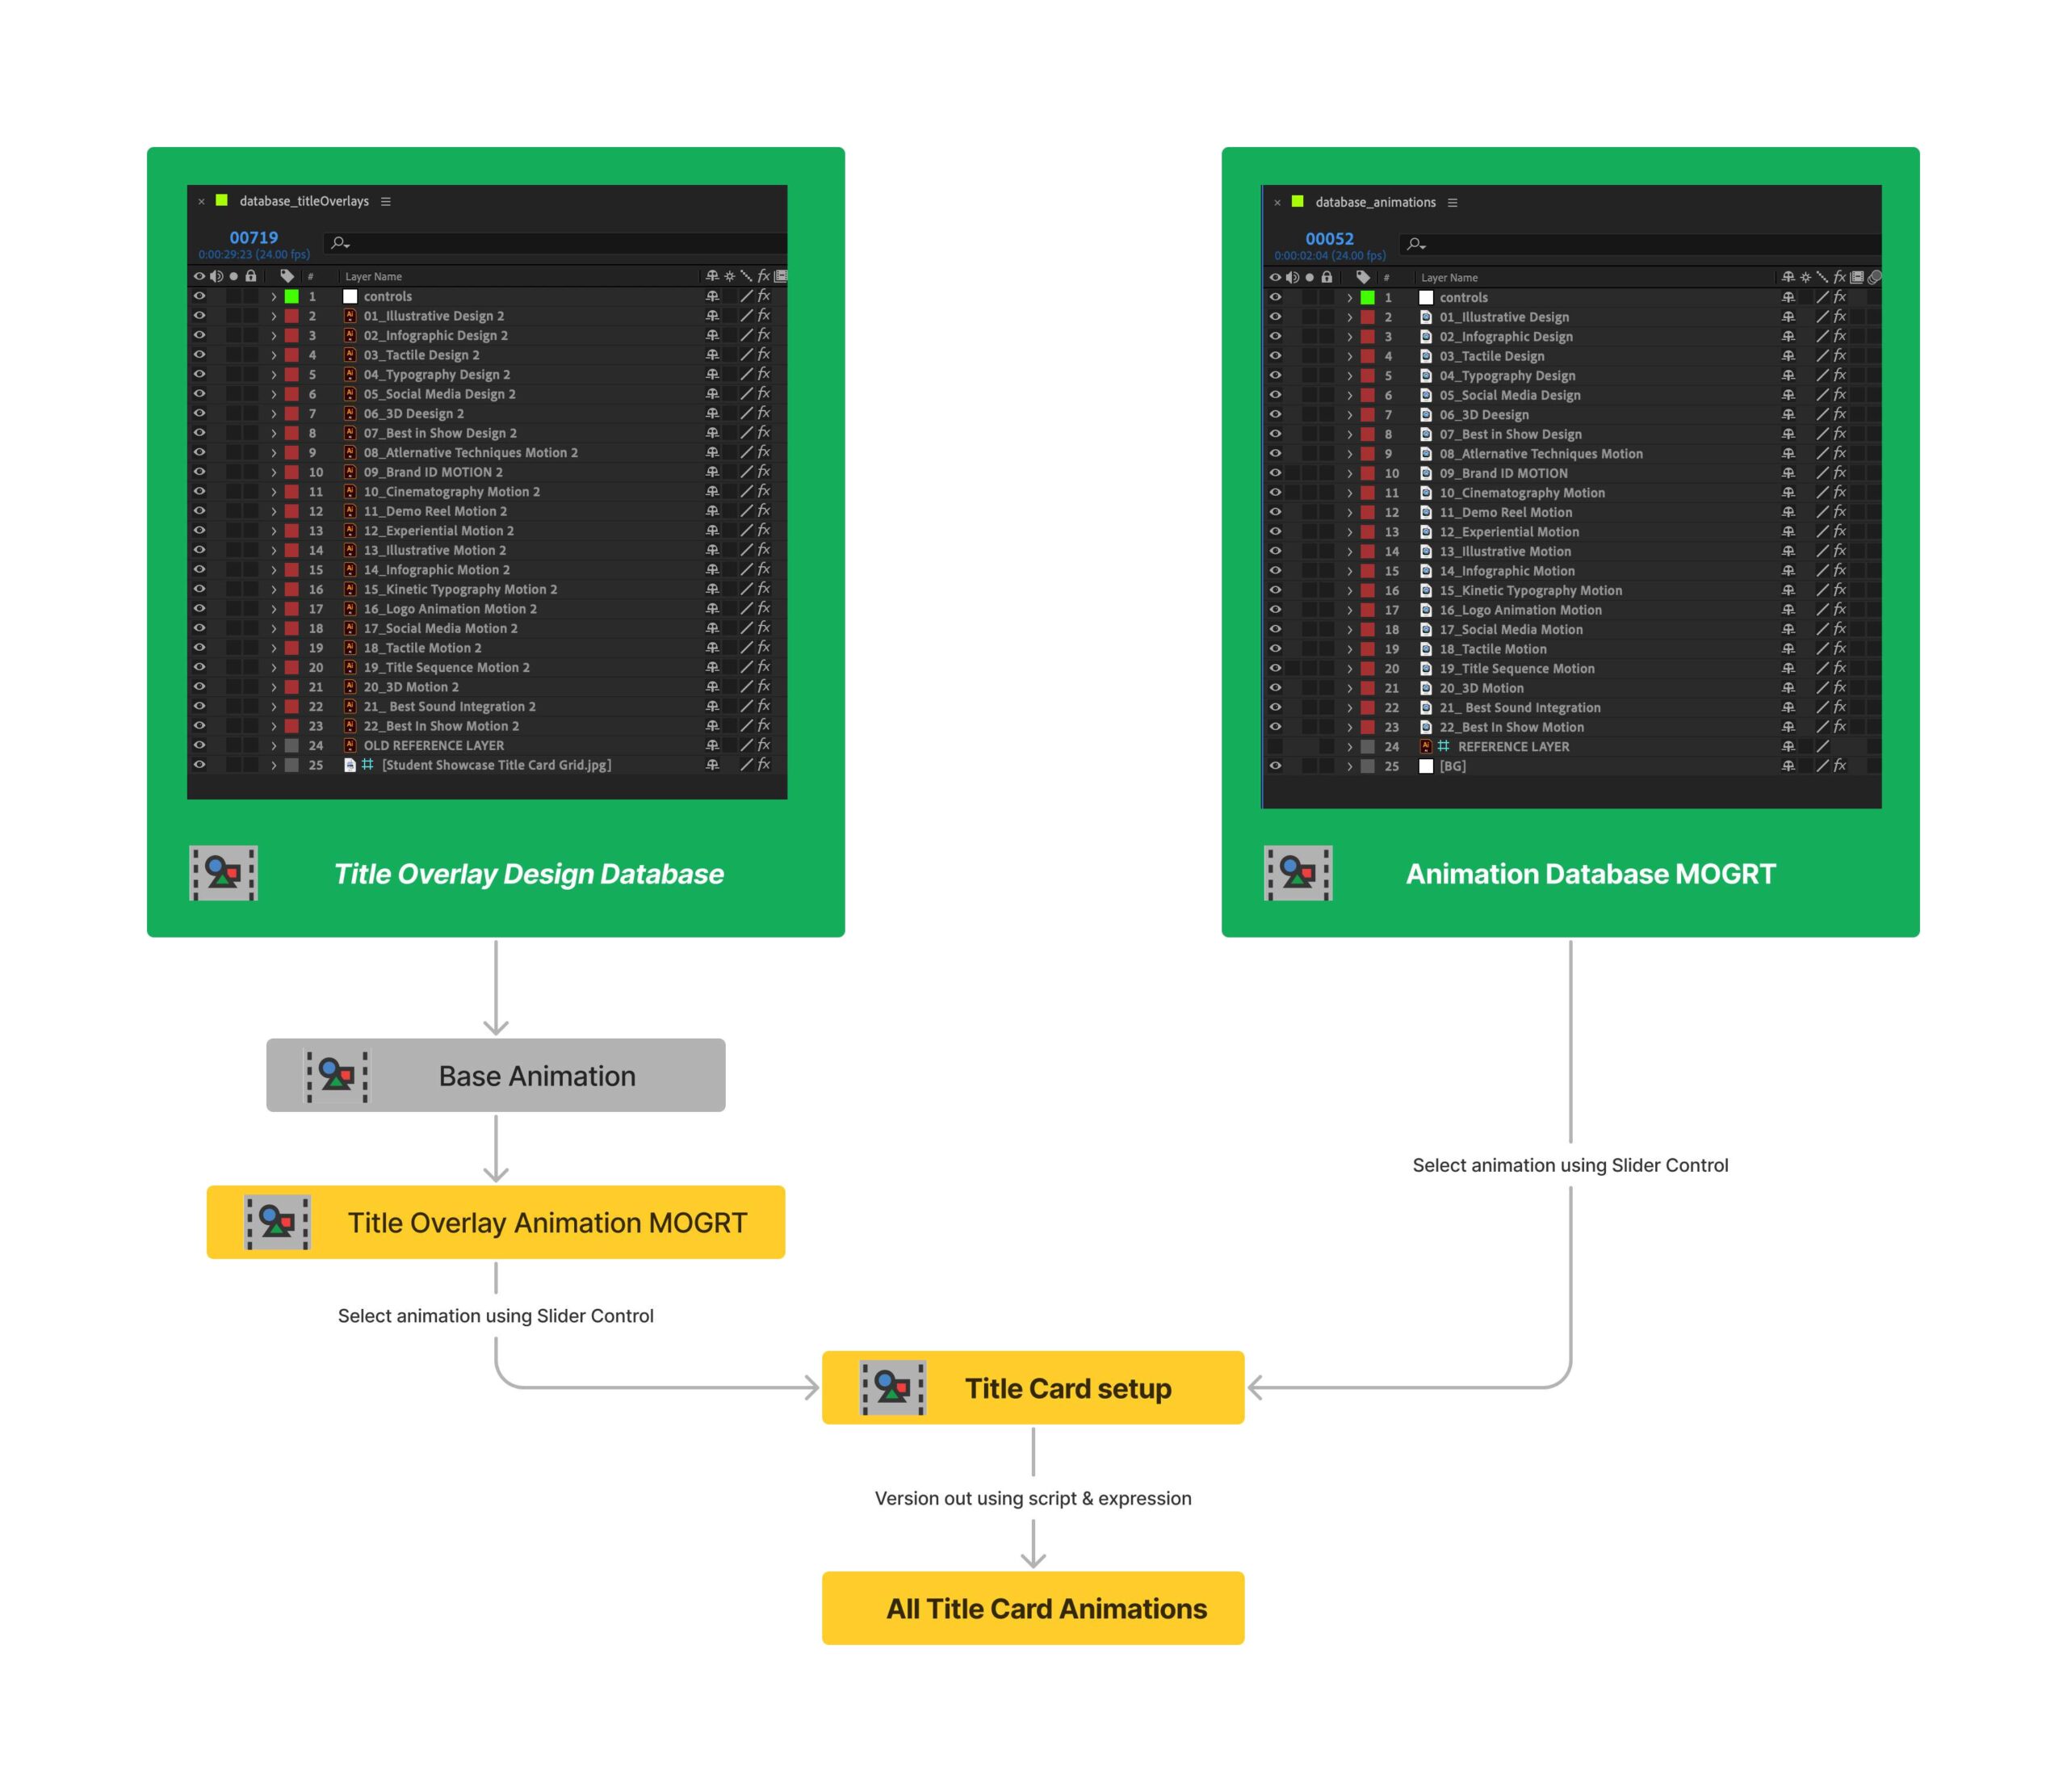
2.3 Automation and finalization workflow
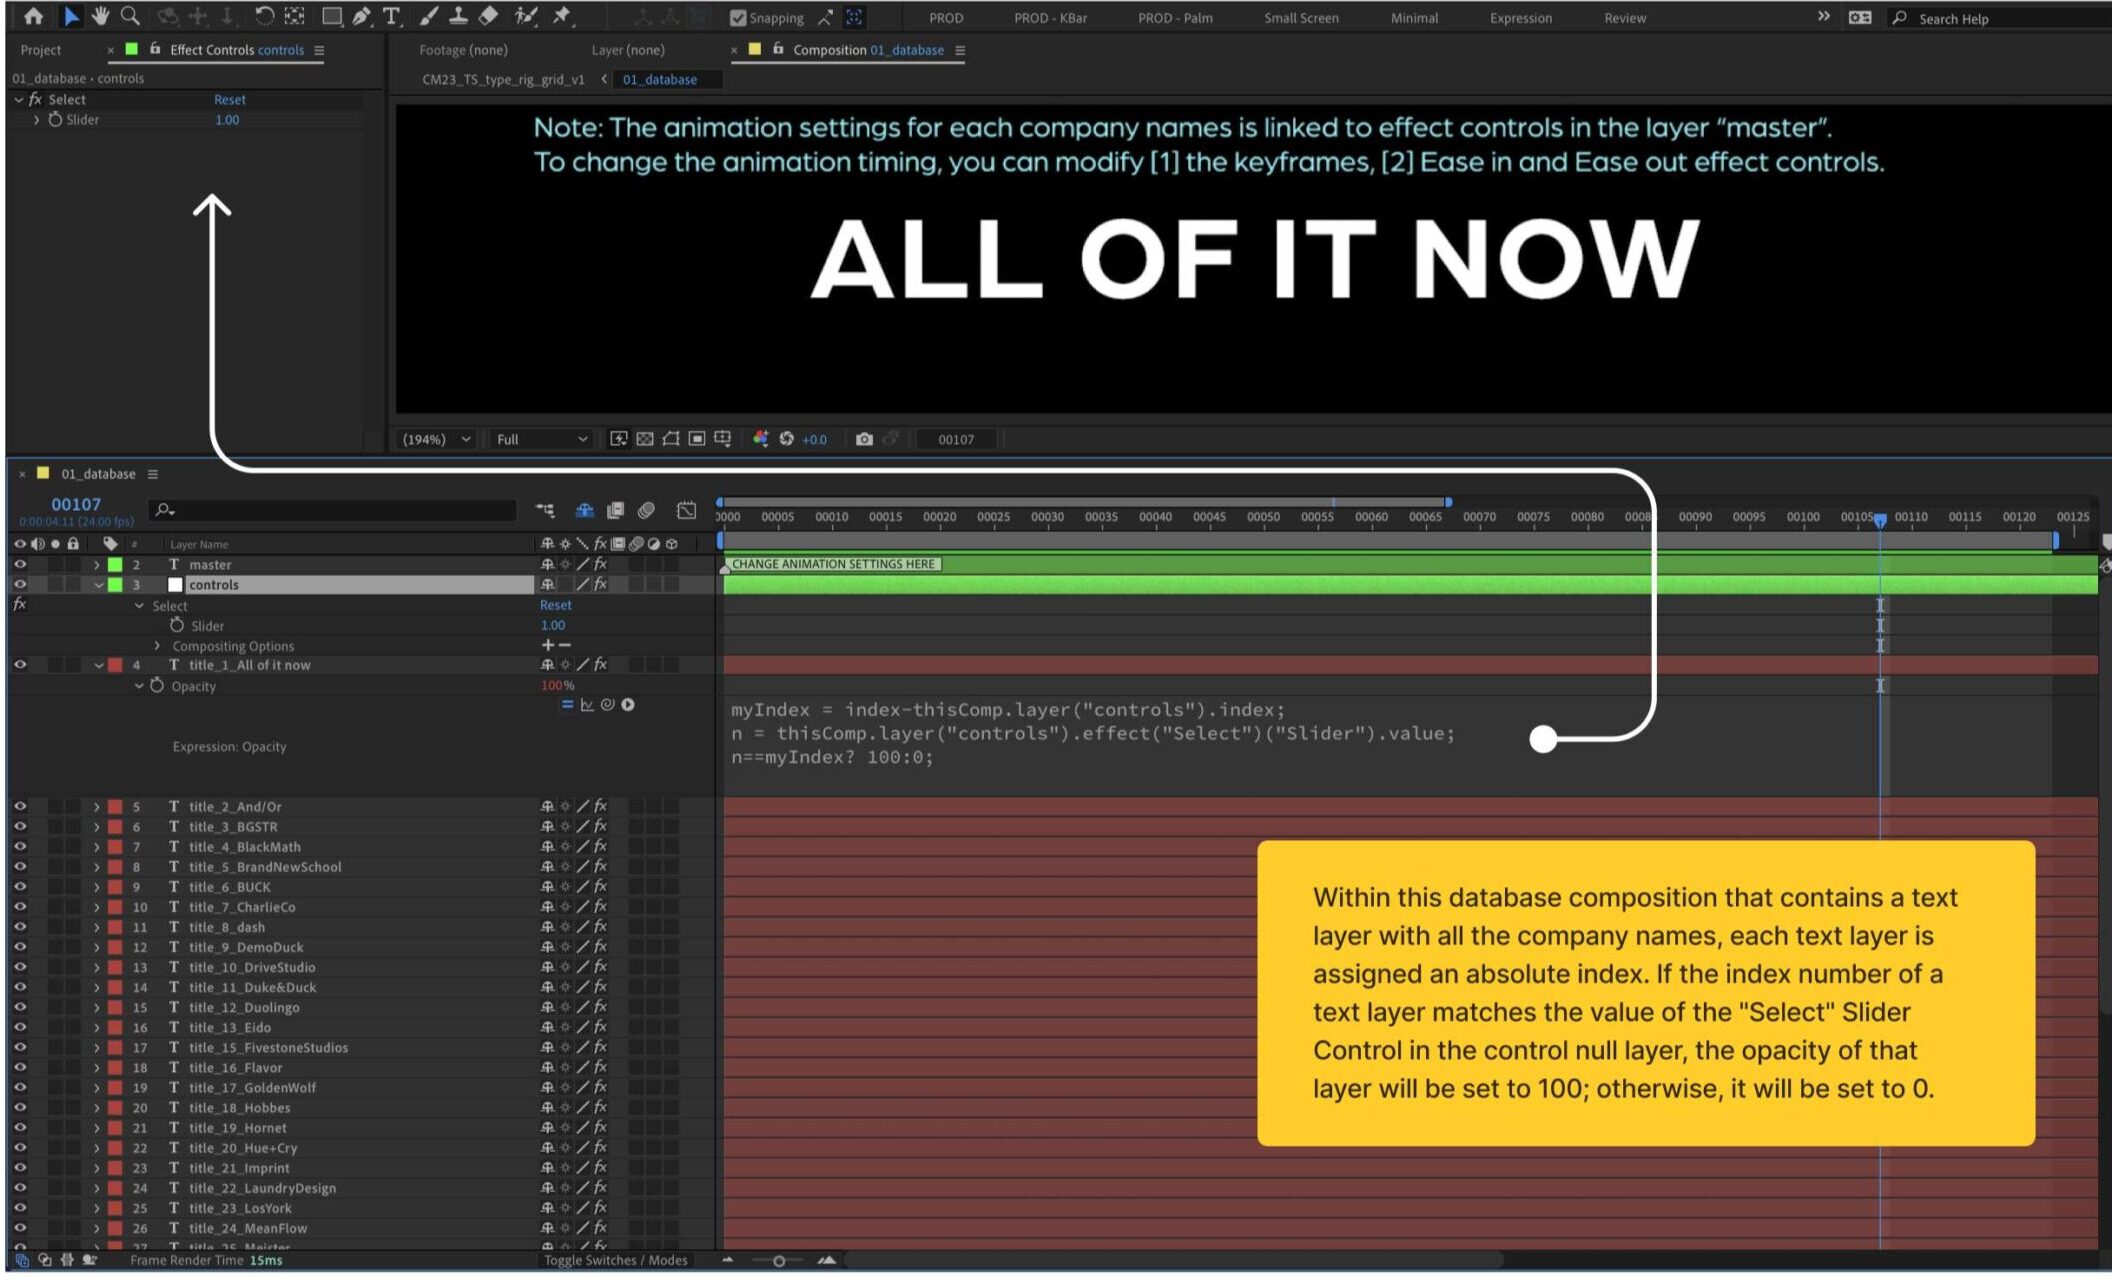
Rather than manually versioning each title card animation with its corresponding animations and overlay, this was automated as done using combination of expressions and scripting.
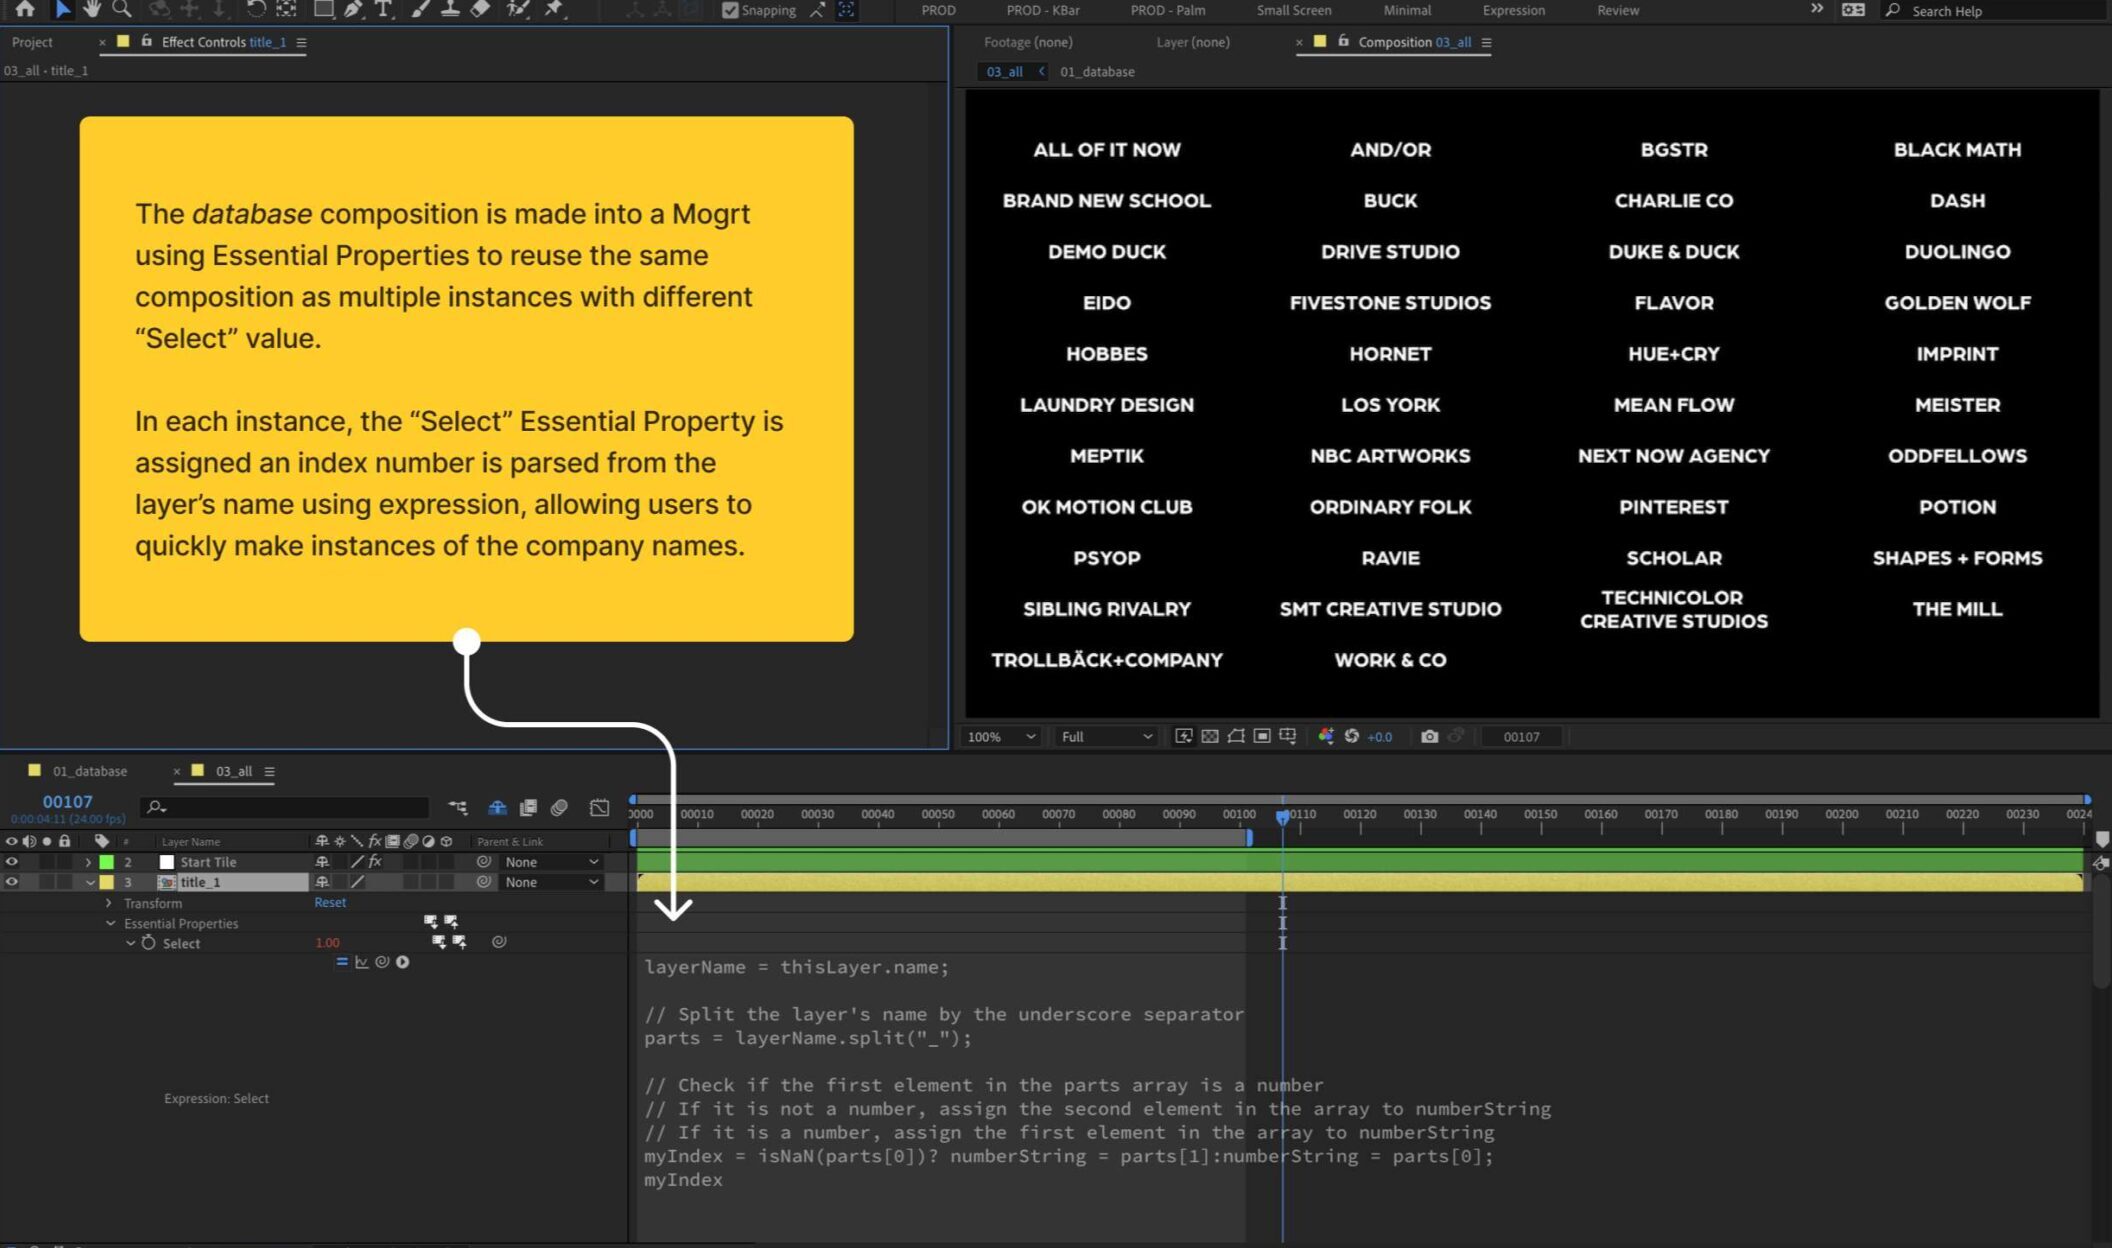
- The pre-requisites for this process included preparing a database composition with all the main animations and a separate one with all the overlays, as well as adding an expression to each layer that sets the opacity of an element to 100 if its number in its name matches the value of Null layer’s slider control. Both of this composition were made into MOGRTs which were used in a master composition with additional adjustment layers for stylization. Since each title card animation had an index number on our spreadsheet, an expression is written to parse the numbers from the composition name.
- This master composition is used to version out all the title cards using a JSX script. This script automate the processes of including duplicating the master composition, renaming it to the corresponding title card name with an index number, which is then link into the slider control of the essential graphic templates, thus replacing the main animation MOV and title overlay layer.
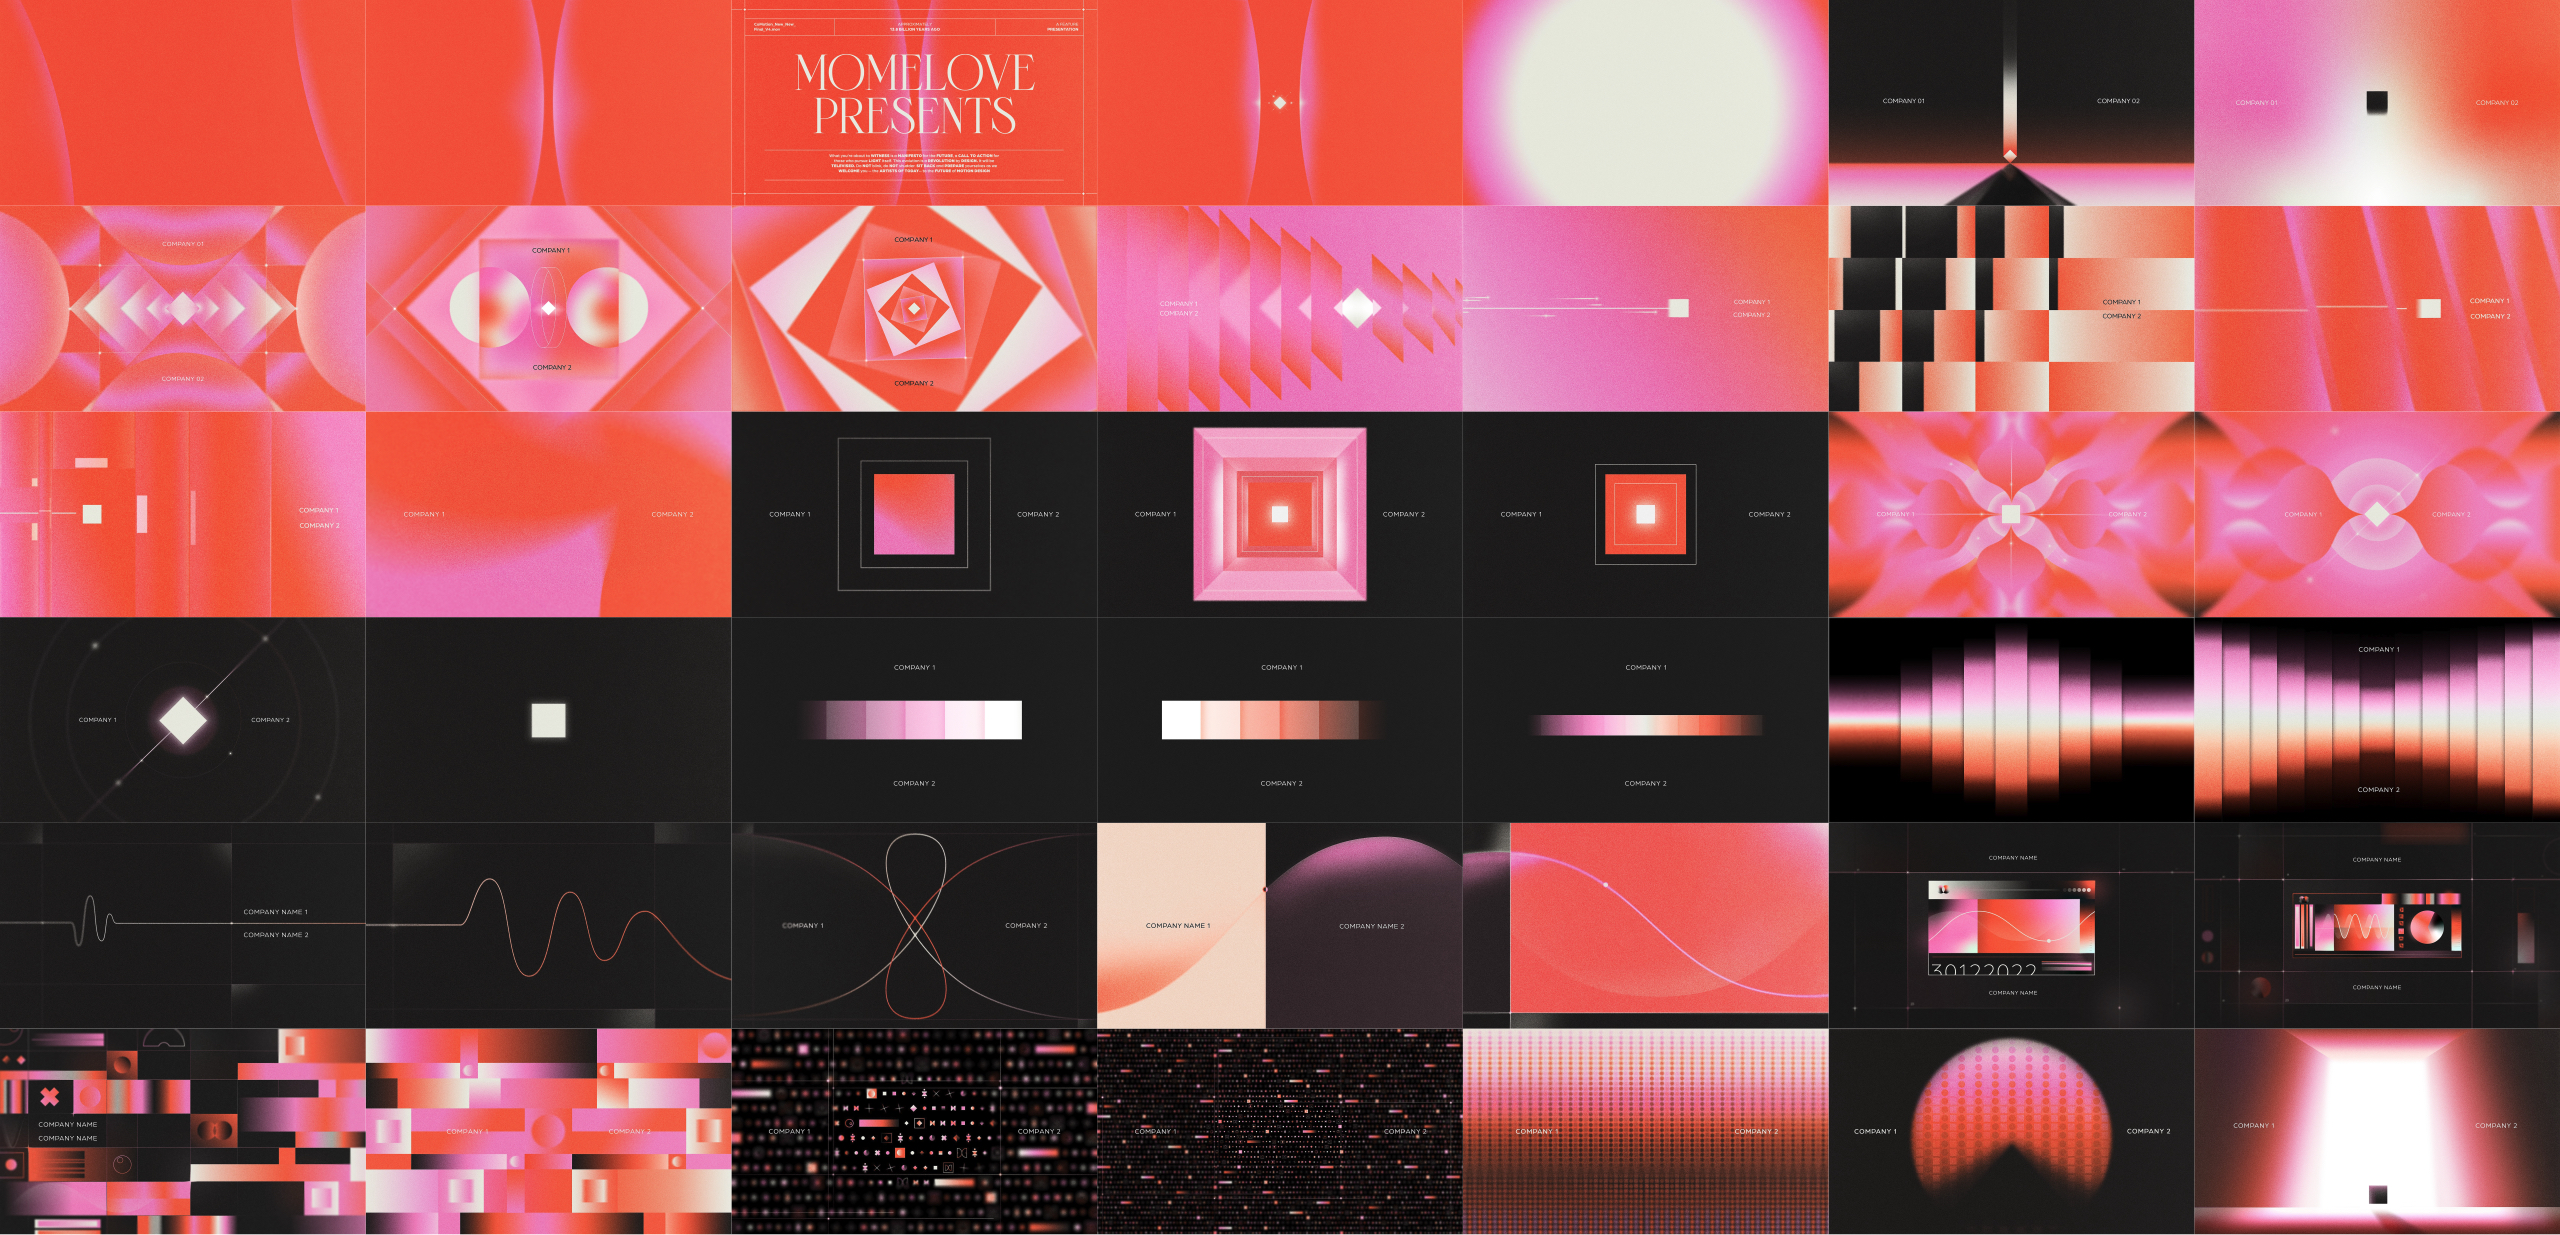
3. Title Sequence
The sequence for the CoMotion event is composed of two intertwining storylines, referred to as the micro world and the macro world. The micro world features 2D geometric abstractions in the style of past CoMotion title sequences and traditional motion graphics. The macro world, on the other hand, depicts the real world, starting with the discovery of fire and culminating in the rebirth of light through technology. This latter section presents a significant challenge that will require careful planning and experimentation, potentially incorporating techniques such as rotoscoping, 3D animation, and even some live-action/macro photography.
3.1 Workflow
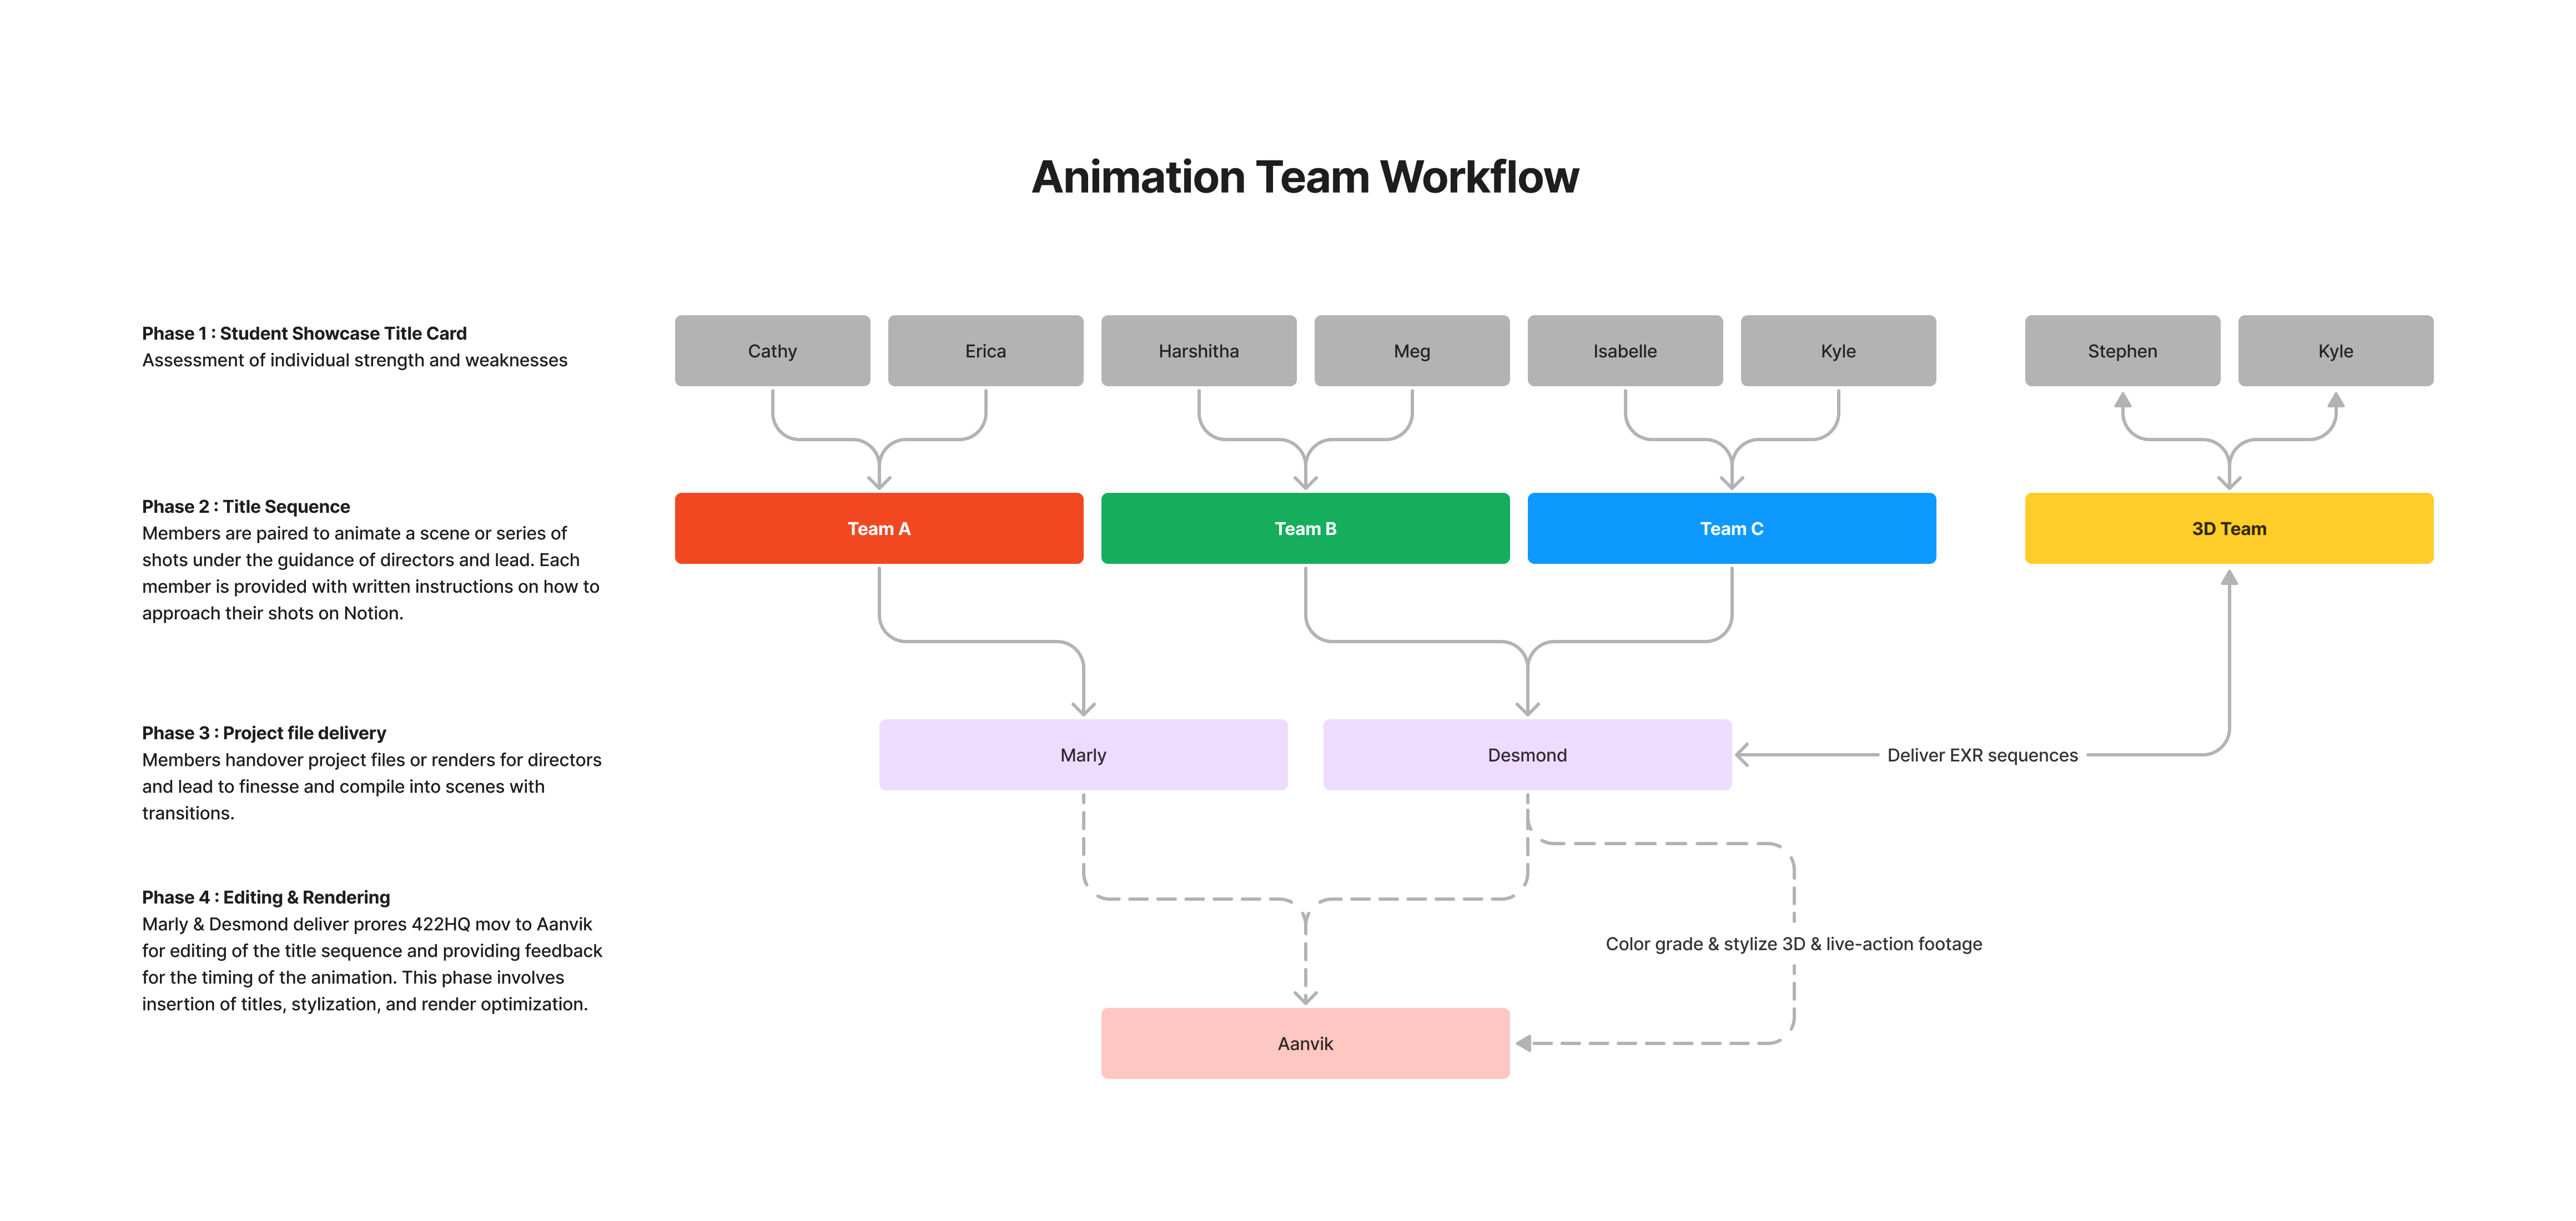
After completing the title card animations, I gained a clear understanding of my team’s strengths and weaknesses, enabling me to assign shots that best match their skill levels. I assigned shots to the 2D Animation Team based on their proficiency in working with similar elements to those in the title cards they previously completed, allowing for a smooth transition and warm-up process.
I divided the team into pairs, matching stronger animators with those in need of more assistance and guidance. I provided everyone with specific recommendations for their shots, and they worked on them accordingly. To ensure proper delivery, I instructed the team to provide both the MOV files and the work files to Marly and I for further refinement. After this, I passed on the project to Aanvik for editing, title overlay, and sound integration.
3.2 Animation Direction
As the animation lead, my role is to manage and oversee the animation team’s work. However, I often faced the problem of being too busy helping others, which results in not being able to work on my own tasks and an increasing workload each week. To address this, I prioritize delegation as an important aspect of my role. As a student, I cannot have the same expectations as in a full-time work setting, where the risk of being “fired” if one does not perform exists. To address this, I prioritize education and classes for my team members and encourage CoMotion as a form of volunteering.
To work with teammates who faced difficulties approaching their shots:
- I wrote clear instructions, provided necessary skills, tools, and resources, and walked through the process in our internal knowledge base
- I also built rigs, blocked out animation, and handed it over to another animator to complete.
Title Sequence Cookbook
The Title Sequence Cookbook is a comprehensive guide in our internal knowledge base that provides guidance to team members responsible for creating the title sequence. It details all the necessary tasks, available resources, and recommended tools for developing the animation. Additionally, it functions as a tool for keeping the team focused and coordinated during the animation process. Below are selected sections from the Cookbook.
In conclusion, as an animation lead, it is important to effectively manage and delegate tasks while also considering the unique challenges and limitations of working with a team of students. This approach will lead to a more efficient and successful animation direction. By splitting the team into smaller groups and pairing more experienced animators with those who need more guidance, providing clear instructions and necessary resources, and allowing team members to take ownership of certain tasks, we can empower each team member to do their best work and contribute to the overall success of the project. By leveraging everyone’s strengths and providing support where needed, we can ensure that the project is the best it can be, and that everyone feels a sense of ownership and pride in their work. This approach not only benefits the project but also helps in the growth of each team member.
Logo Animation

The logo animation was created through a procedural setup: a fractal noise effect was used as a luma matte to gradually reveal the letters of the logo. The reveal was broken up into three separate layers, each with a different color, and these layers were offset in timing to create a blend of colors as the logo was revealed. The animation was then further stylized to add visual complexity and interest to the final animation using several effects including CC Radial Fast Blur, Deep Glow, and Vibrance. Finally, lens flares and grain were composited onto the animation to give a filmic treatment. I handed Marly my project files to develop the final animation.
Selected Animation Breakdown
Shot 130-140: Glass Refractive Journey
This shot was made using wide composition of 18000px wide compositing of two parts: the series of columns that the square only appear within, and the refractive glass-like columns in the 2nd half. The latter was built using assets from the style frames and Flex, and each rectangle is used as alpha mattes to reveal different sizes and displaced position of the hero square. This was a meticulous shot as every details of the glass and refracted squares had to be finesse individually; there was no way to procedurally accomplish this (even though I tried) because I needed detailed control over every aspects of this scene.

Shot 240-250
The 2nd half of the shot with the gradient rectangles was accomplished primarily through the use of expression. The distance between the center of a composition and a layer’s position is calculated, which is used to calculate the phase offset for a sine function to create the wave value. It then multiplies the wave value by the amplitude, returns the absolute value of this result, and adds it to the original scaleY value to create the wave animation.
Finally, the third expression modifies the scaleY and scaleX properties of a layer. It gets the original scaleY and scaleX values, as well as a wave value from a slider control. It then adds the wave value multiplied by the amplitude to the original scaleY value to create a wave animation, and returns the new scaleY and original scaleX values.
					// Slider Control : Calculate distance of the layer from the center //

// Get the position of the layer relative to its parent, or to the composition if it has no parent
if (hasParent) {
    pos = parent.toComp(transform.position);
} else {
    pos = transform.position;
}

// Subtract the center point of the composition from the layer's position
center = [thisComp.width / 2, thisComp.height / 2];
delta = pos - center;

// Calculate the distance of the layer from the center of the composition
length(delta)
					// Calculate Wave Value with phase offset based on Distance //

// Set the frequency, amplitude, and speed of the wave
freq = thisComp.layer("controls").effect("Wave Freq")("Slider"); // number of cycles per second
speed = thisComp.layer("controls").effect("Wave Speed")("Slider"); // speed of wave motion in pixels per second
offset = thisComp.layer("controls").effect("Phase offset")("Slider");

// Calculate the wave offset based on the current time and wave speed
waveOffset = time * speed
delay = thisComp.layer("controls").effect("Delay (s)")("Slider");
f = linear(effect("Distance")("Slider"), 0, 1000, 0, delay);

// Calculate the wave value using a sinusoidal function
waveValue = Math.sin(freq * 2 * Math.PI * (time - waveOffset) - f + offset)
Math.abs(waveValue) * thisComp.layer("controls").effect("Wave - Amplitude")("Slider")
					// Add the Wave value to the scale of the rectangle //

// Get the scale values from the transform property
scaleY = thisComp.layer("controls").effect("Child Length (%)")("Slider")
scaleX = thisComp.layer("L-6").transform.scale[1]

waveValue = effect("Wave Value")("Slider")

// Multiply the wave value by the amplitude and add it to the original scaleY value
scaledY = scaleY + waveValue;

// Return the scale values as an array
[scaledY, scaleX]
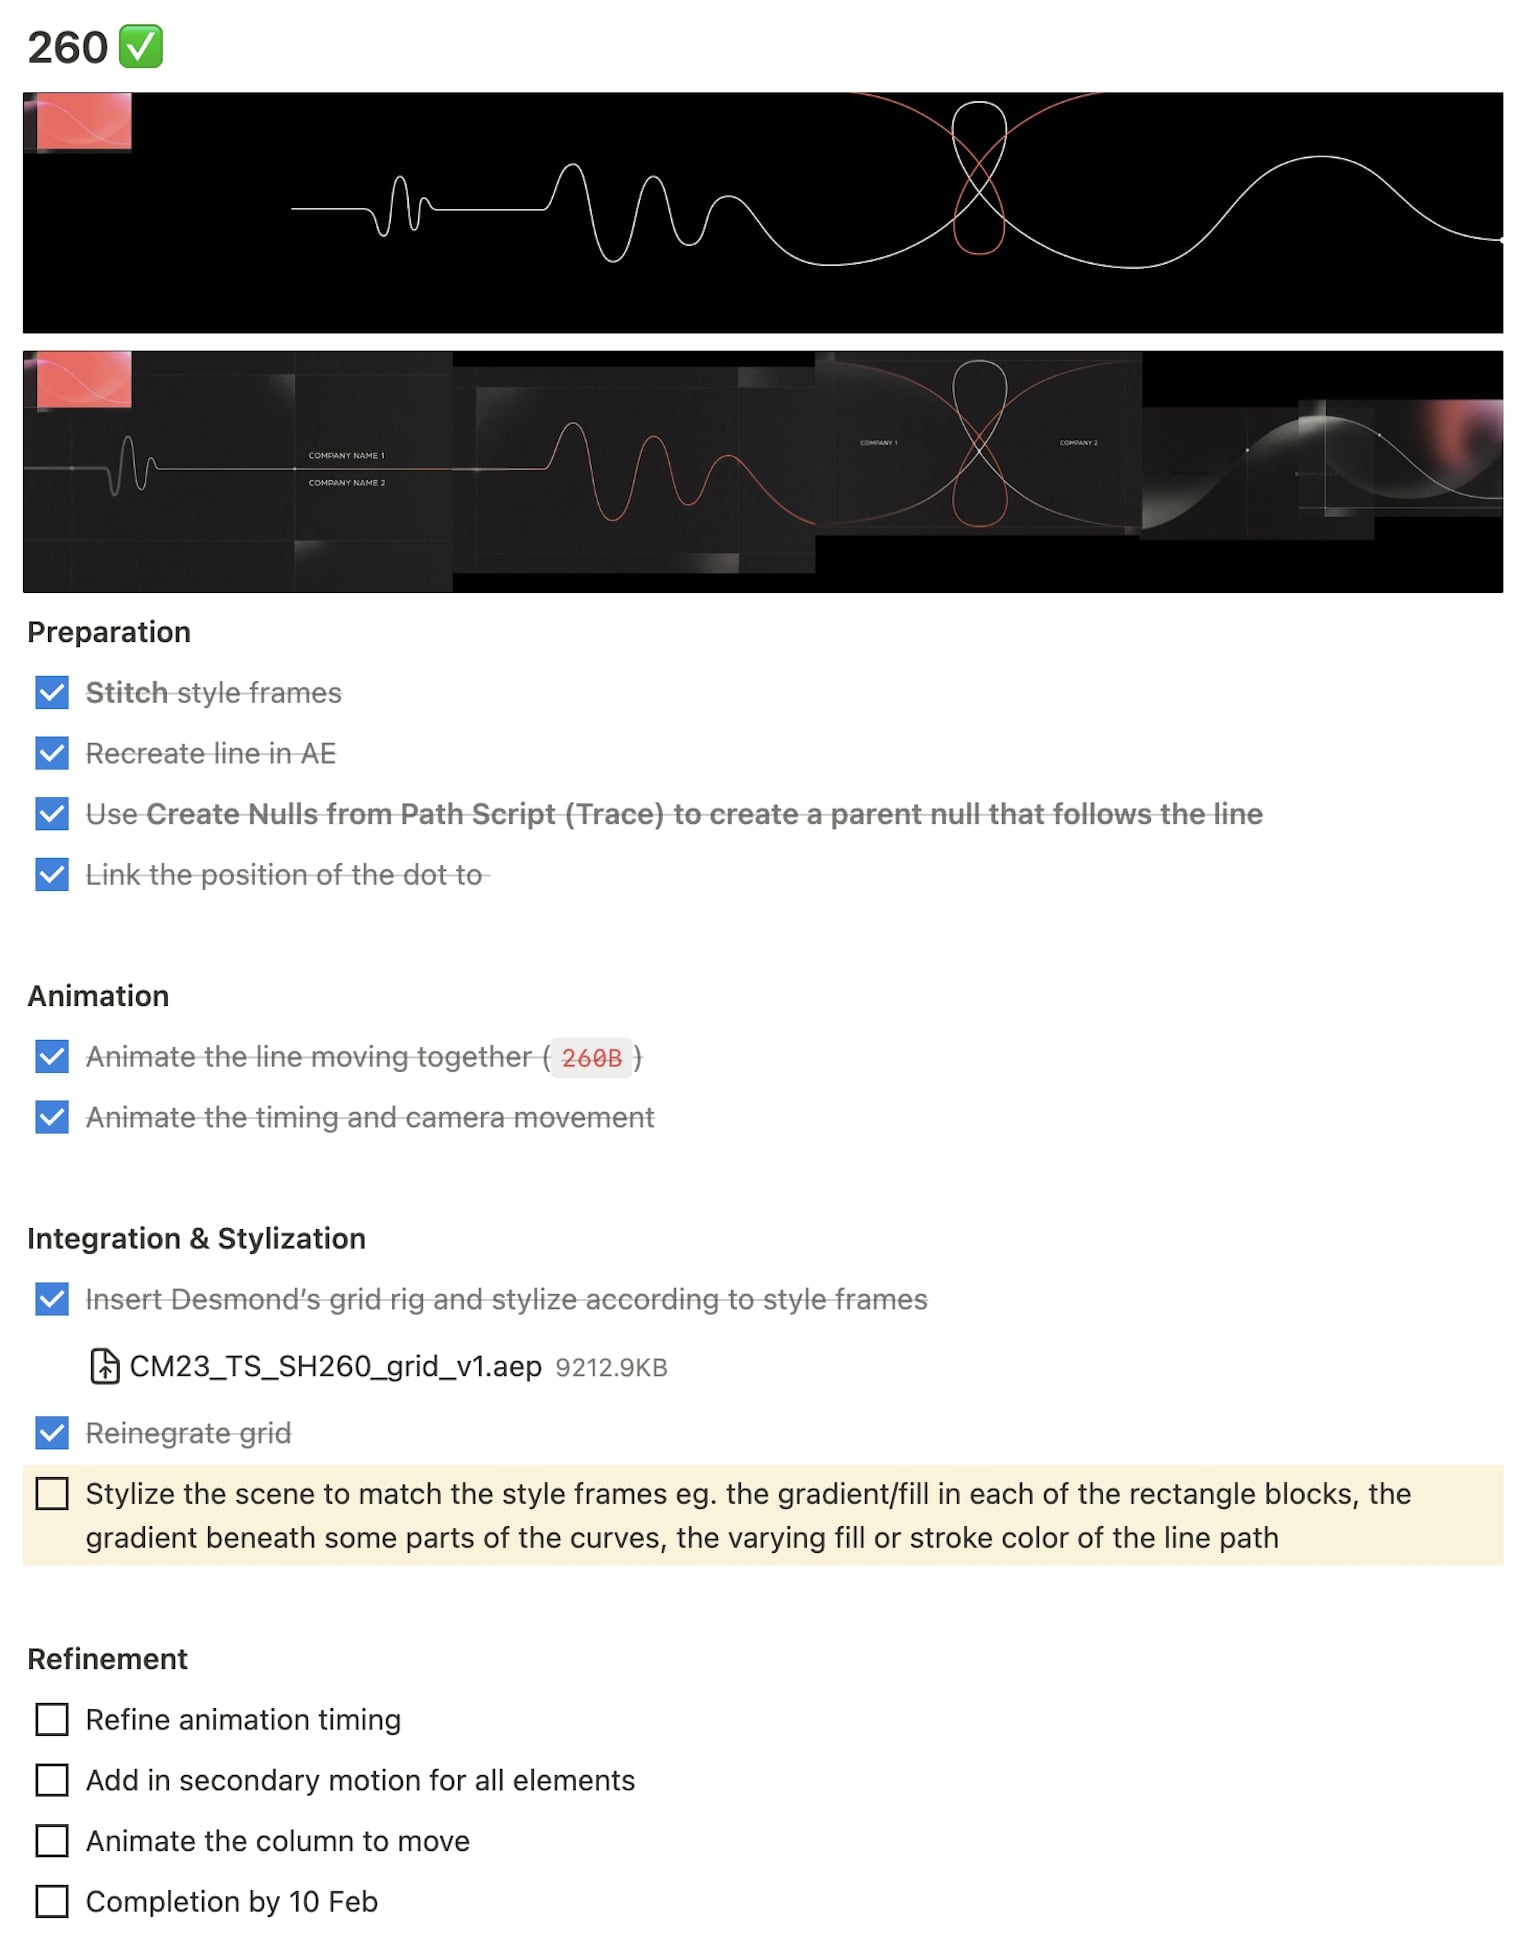
Shot 260
My co-animator Meg initiated the animation process by consolidating the styleframes into a unified composition that conveys the path’s journey. The path was reconstructed in After Effects and segmented into sections, each of which was color-coded according to the corresponding styleframe. To animate the path’s curvature and the sphere along its path, we employed the Create Nulls from Path script. I provided a grid rigged with Flex, which Meg integrated into her animation. We also incorporated camera movements to complete the scene, and added subtle animations to each gradient block.

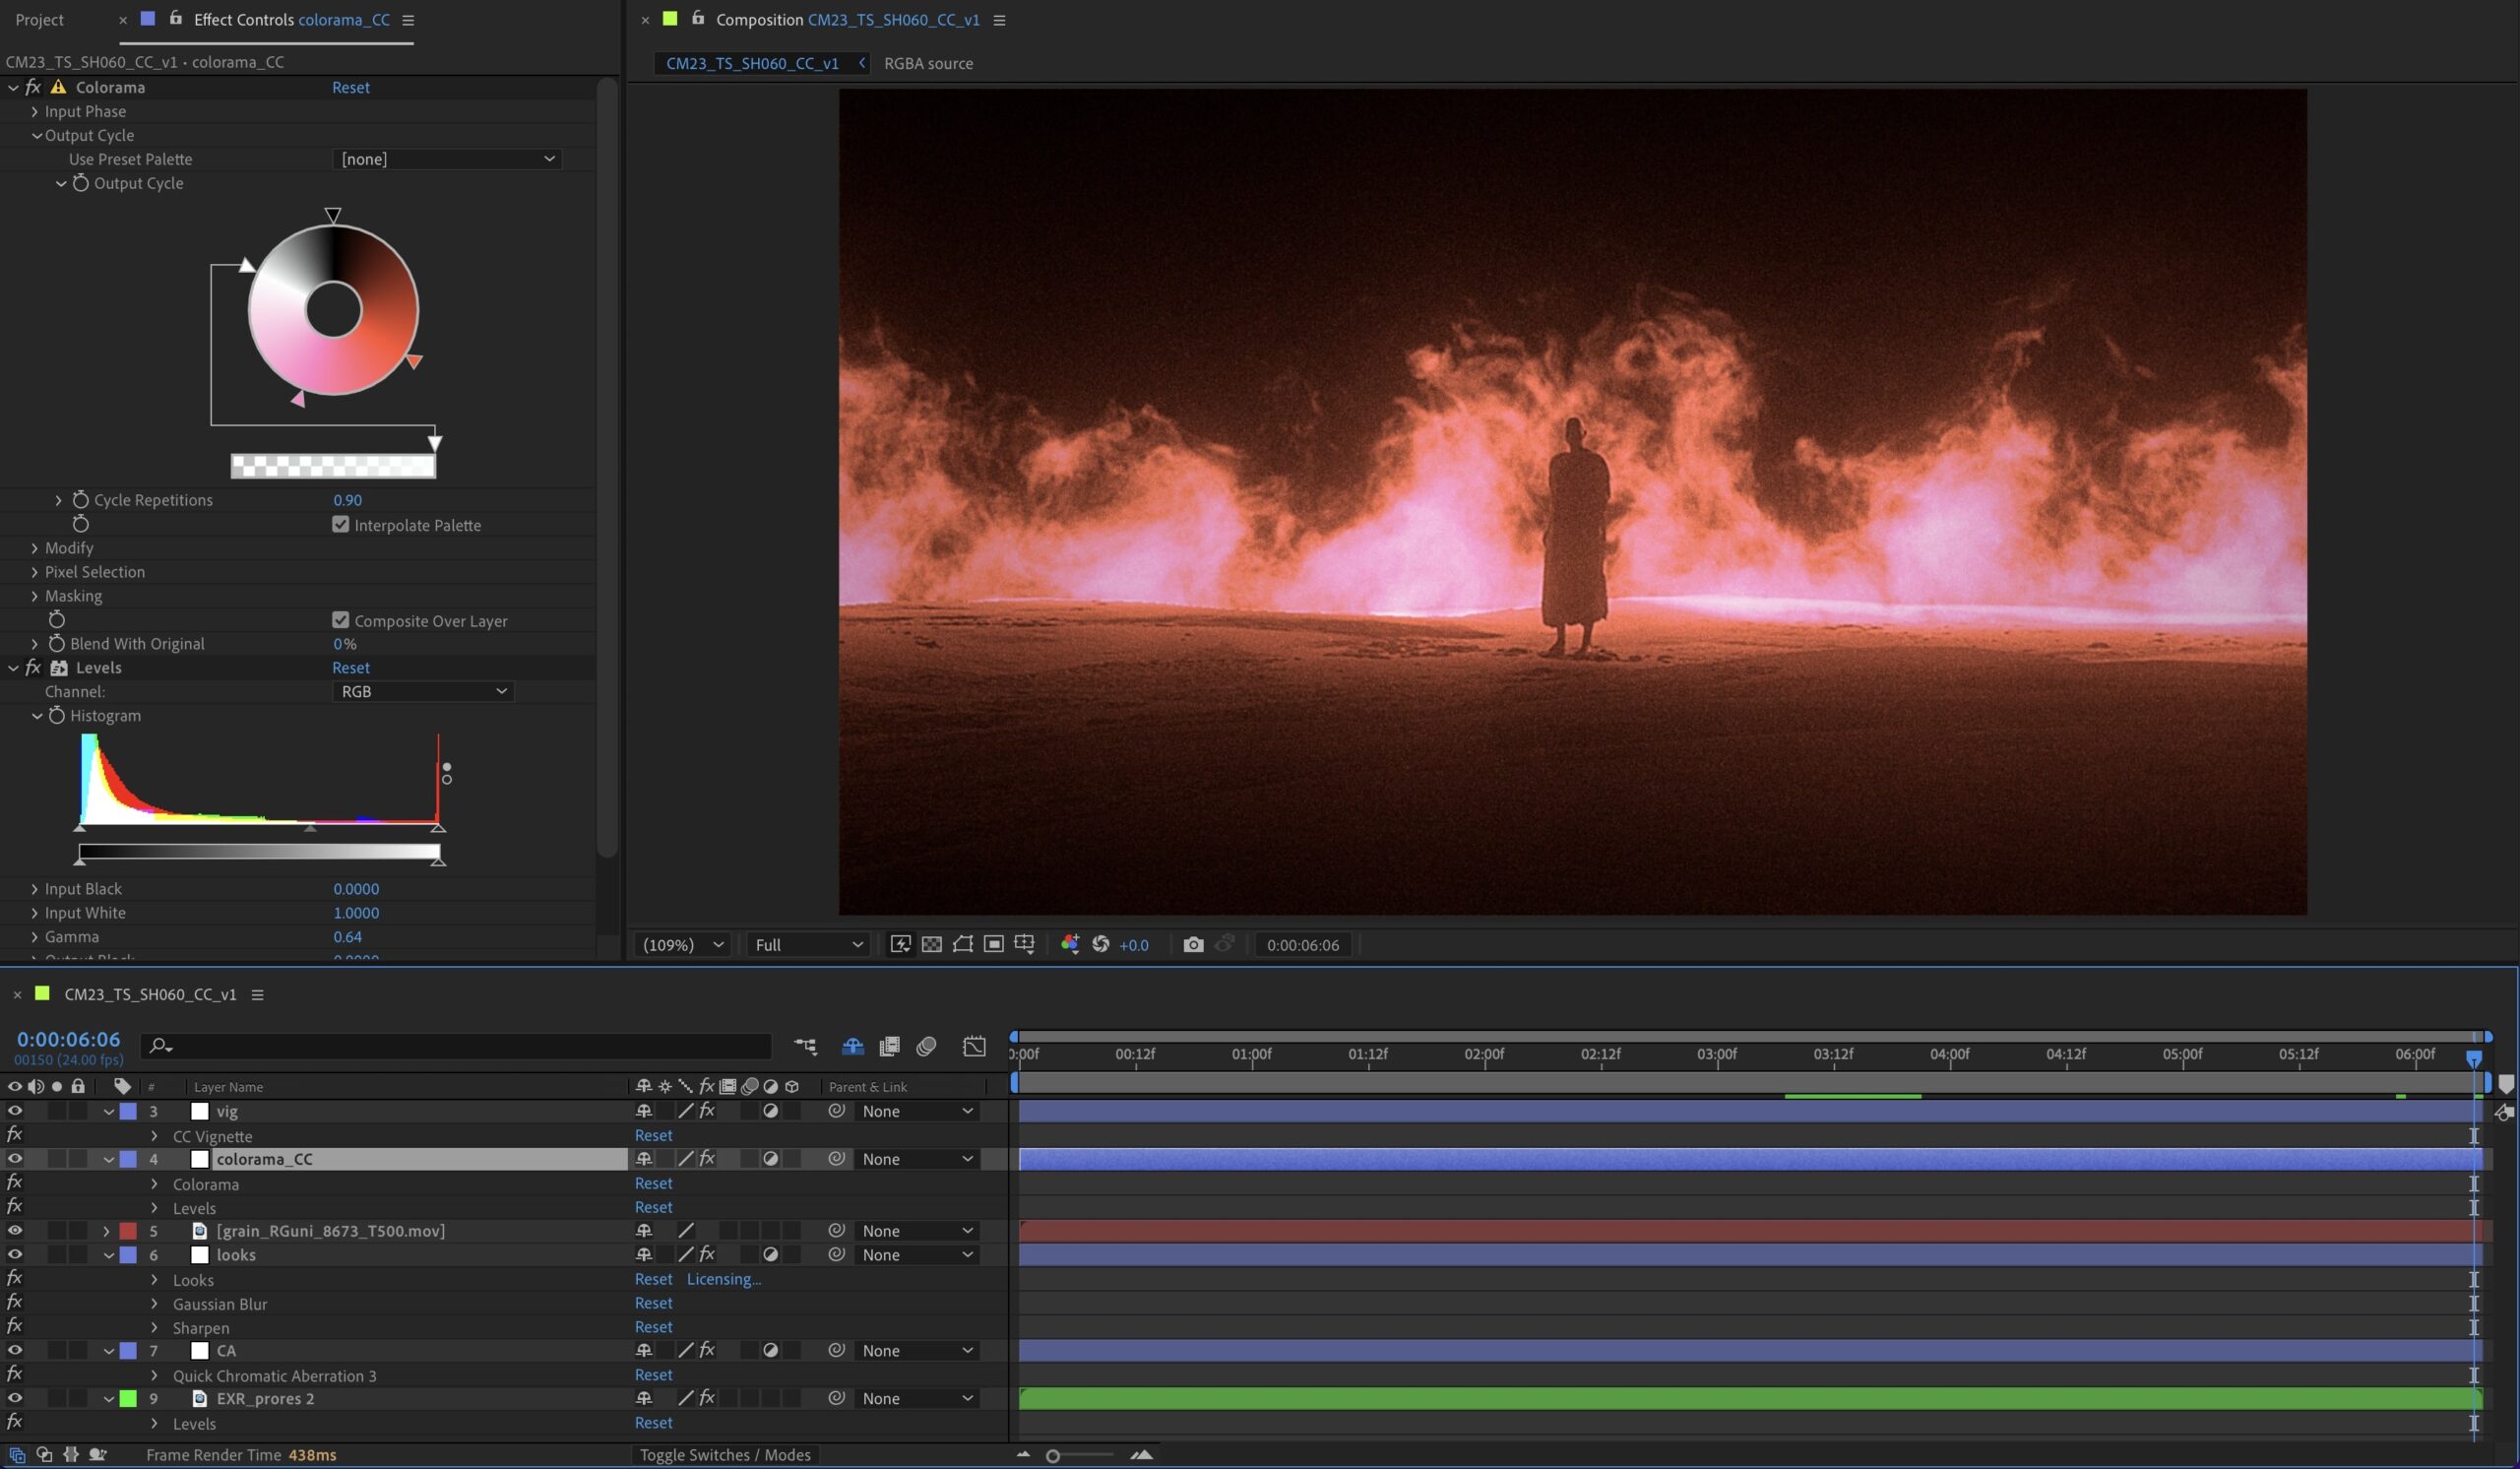
Color Grading
As part of my responsibilities, I was in charge of color grading EXR sequences from the 3D team, live-action footage, and experimental animation from various team members. This was done to ensure consistency across all materials and reduce the workload involved in creating stylization for the rest of the team. The colorization and stylization was primarily achieved through a Colorama effect and Optical Diffusion from Red Giant Look.
Tool Development
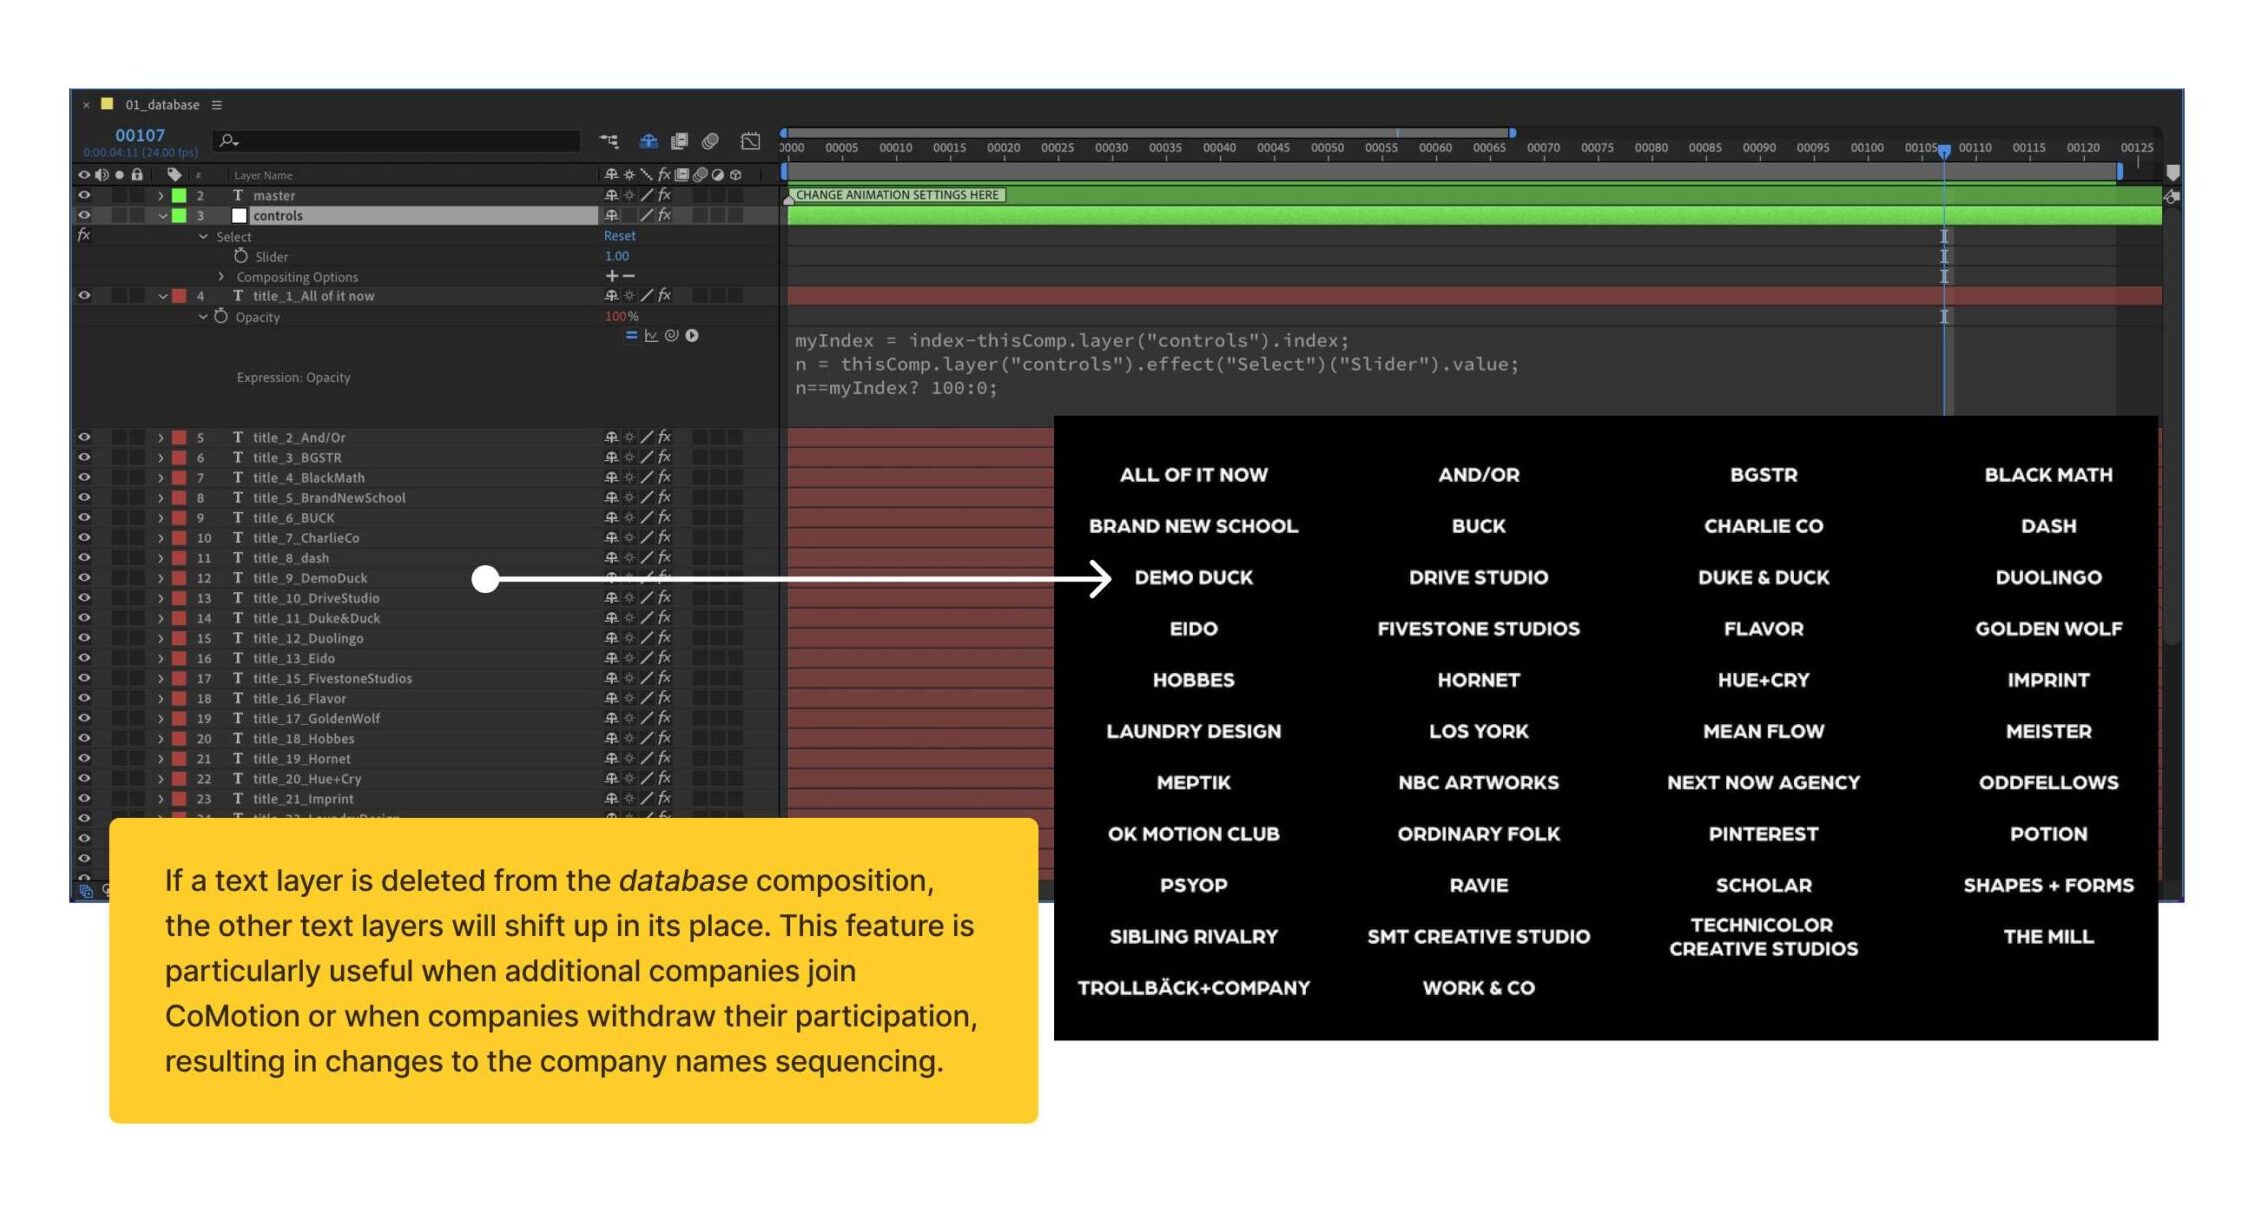
TitleMaster
TitleMaster is An After Effects MOGRT toolkit that allows you to change the animation type for all text layers using controls from one master layer. Additionally, it has a feature that when deleting a title from the “database” composition, it causes the rest of the titles to shift up in position automatically. This is especially useful because companies often drop out of the event, and their names need to be removed from the title sequence. This toolkit will be made available for download in the near future.
Optimizing Collaboration with Technology
As the animation lead, I’m always searching for ways to improve collaboration and communication within the team, including adopting new tools and technologies. However, I’ve found it can be challenging to get team members to adopt these new tools, whether in a work or school setting. People are resistant to change, especially if they already have something that works for them, even if it may be less efficient. So, how can we effectively introduce and encourage the use of new tools and workflows? In the past, I’ve found that about 10% of people actually see the values of what I was proposing. For example, when I shared a knowledge base wiki with essential hyperlinks and information that we use regularly at WarnerMedia, it was a freelancer sitting next to me who appreciated its value the most. This just goes to show that human nature plays a big role in accepting change.
One approach that has worked for me is to introduce the new tool and clearly demonstrate its benefits and utility to the team. By gradually familiarizing themselves with the tool and seeing how it’s being implemented to improve our workflow, team members can better understand its value and be more likely to adopt it.
Implementation of Adobe CC Library for sharing assets
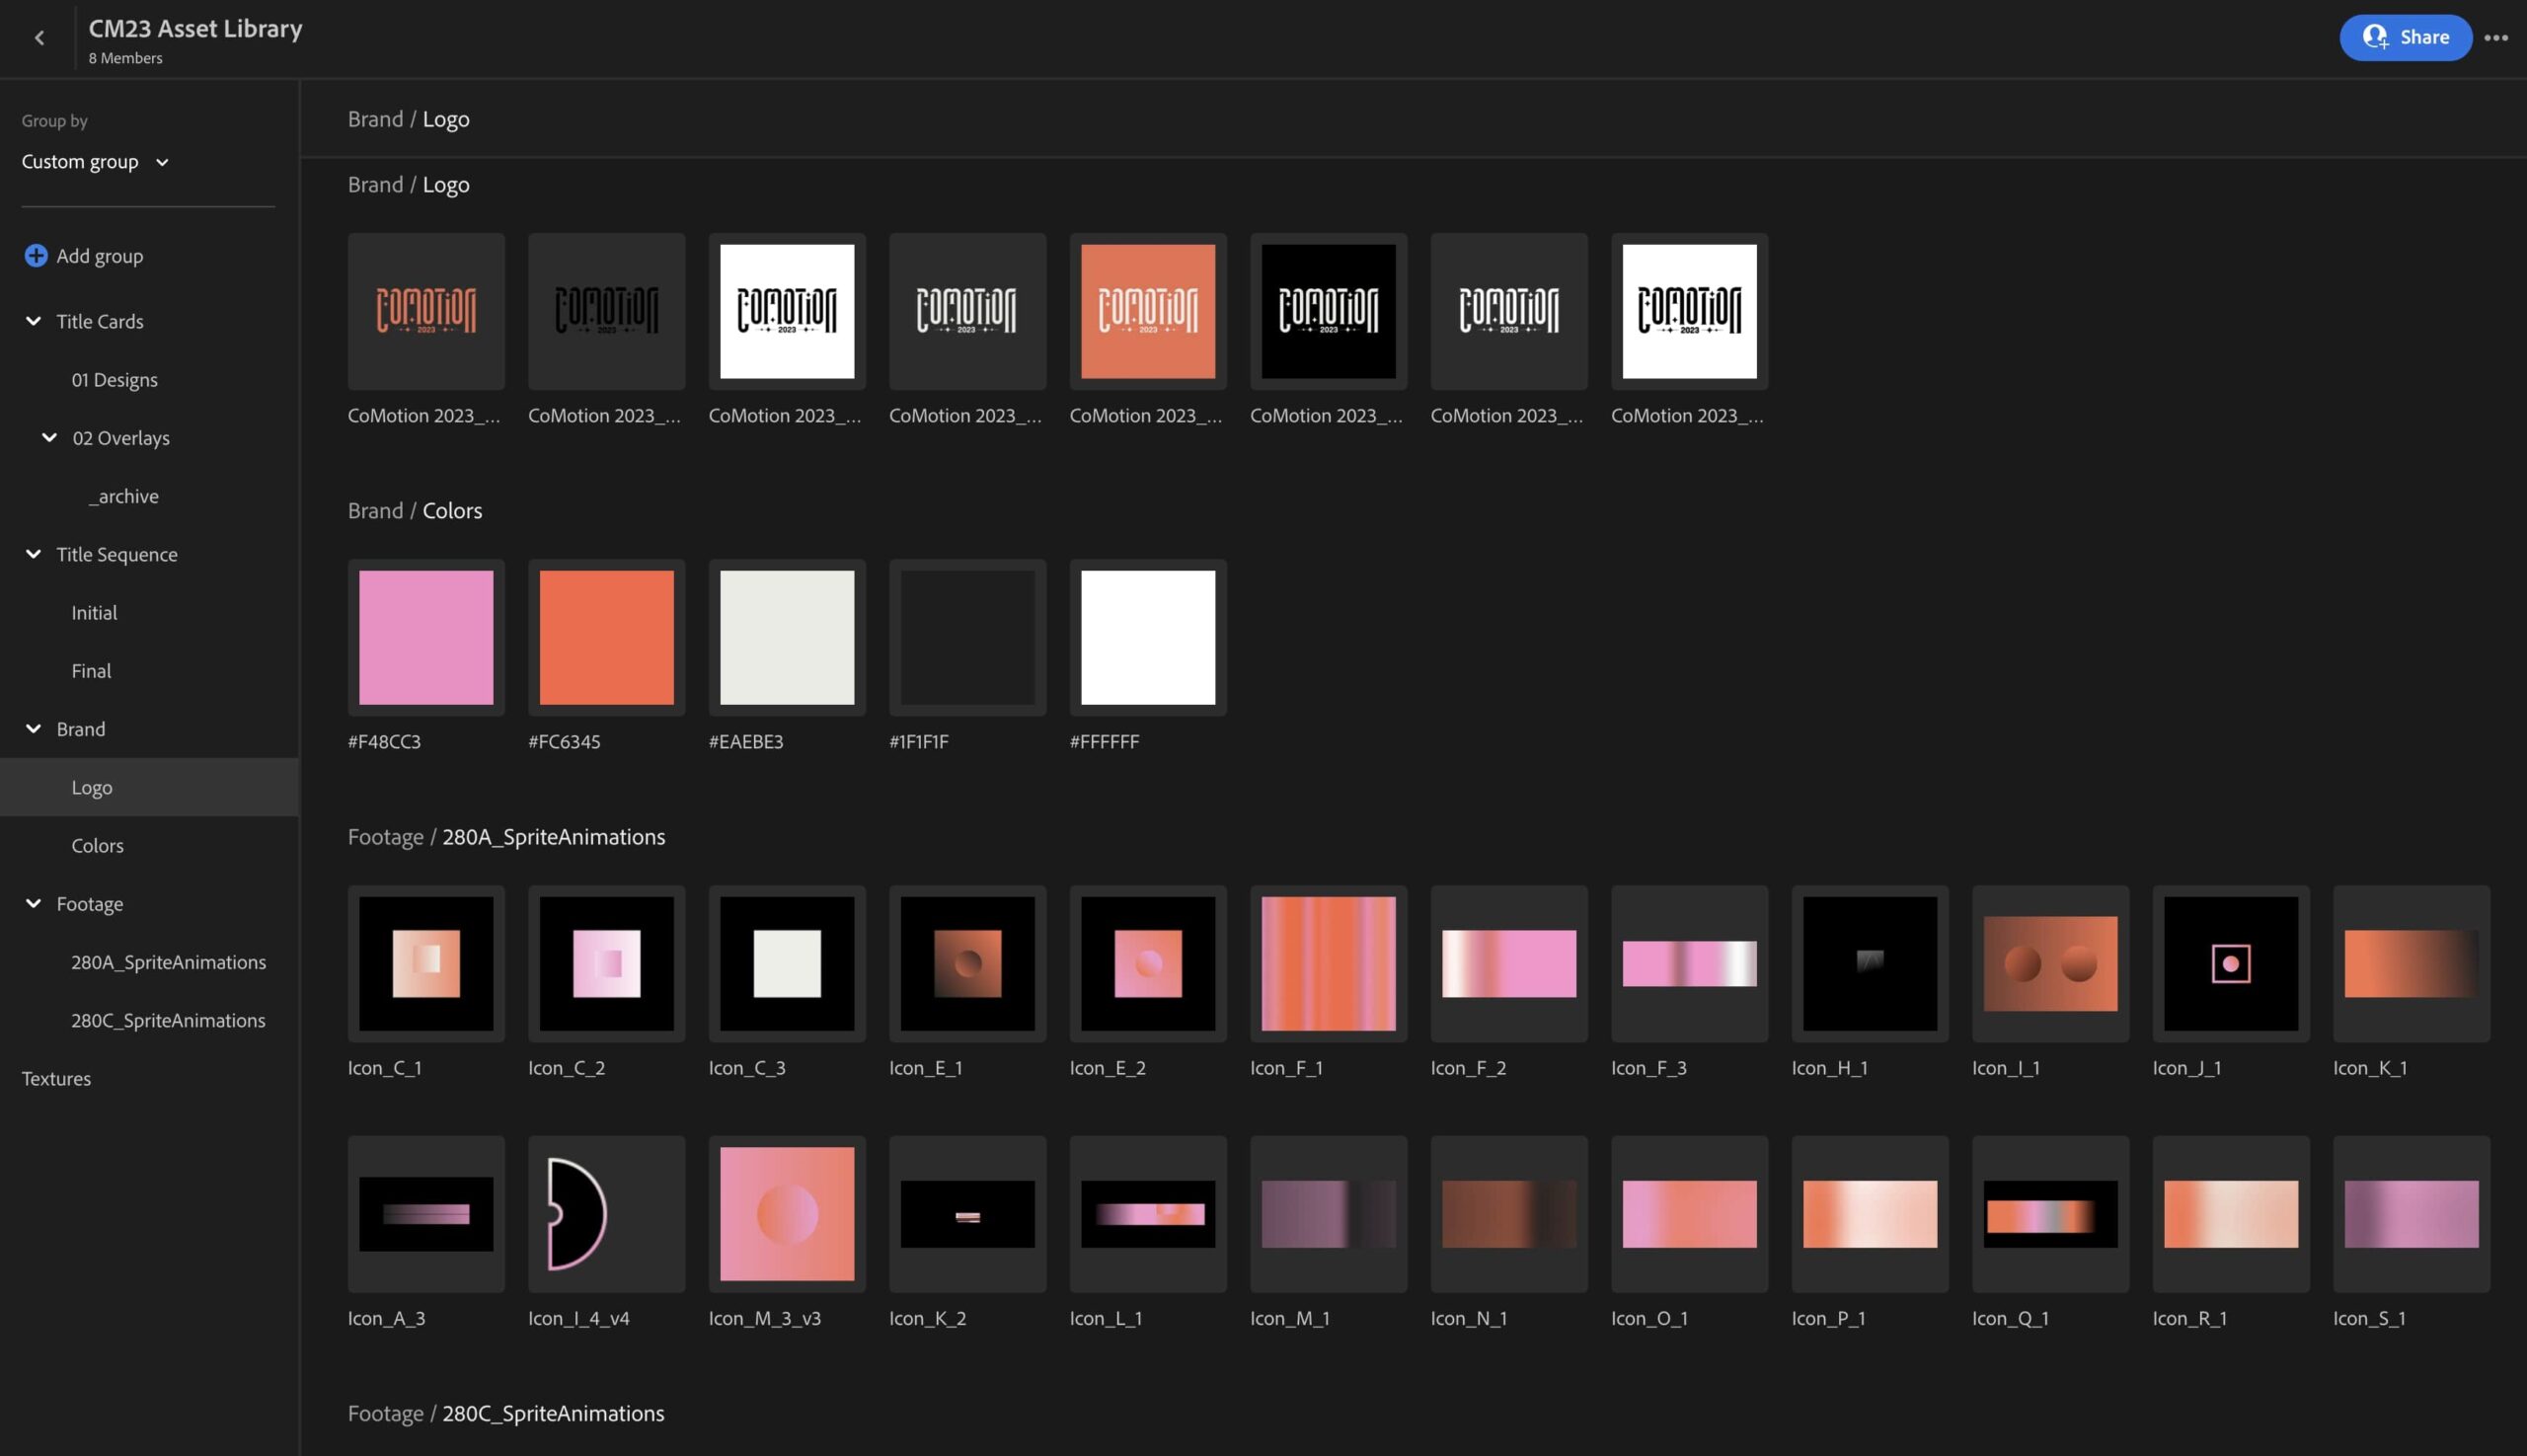
This year we implemented the use of the Adobe CC Library, which allows us to easily share design assets across formats and channels. This has proven to be extremely useful, as it streamlines the process of sharing assets with team members. Previously, we had to follow a multi-step process involving uploading assets to a third-party cloud drive, copying the download link, and sharing it over Slack, which required team members to download and place the files in their project folders before importing them into After Effects. With the Adobe CC Library, team members can simply import shared assets directly into their projects within After Effects, eliminating the need for these extra steps. We have used the CC Library to share a variety of assets, including colors, animation overlays, texture files, and styleframe workfiles.
In addition, we implemented Boords for the first time to improve our organization and collaboration in real-time with storyboarding and production management. Previously, we had a two-part process that involved creating a static storyboard in an Adobe app (e.g., Photoshop or InDesign) and then transferring each frame and its information to Google Sheets.
One of the major benefits of using Boords is the ability to switch between grid and shot list view, making it easier to see the overall structure of the storyboard and the details of each individual frame. In addition, Boords has columns for inputting reference hyperlinks and assigning artists, which helps us keep track of important information and manage our team. We can also create animatics directly within the app, eliminating the need for separate software. Overall, Boords has made our storyboarding and production process more efficient and easier to navigate.
Credits
Creative Director: Aanvik Singh
Art Director: Marly Koven
Producer: Alexis Dow, Rachel Golla
Lead Designer: Tiffany Lo
Design: Alexis Wang, Antara Ghosh, Xinxun Liao (Evian), Jessica Liou, Peter Wang, Tiffany Tedy, Yining Li
Lead Graphic Designer: Josie Glassman
Graphic Design: Meghna Shourie, Nicole Lin, Punasa Sihsobhon (Bee), Sophia D’Alleva, Stephanie Sandoval, Claire Lin
Lead Animator: Desmond Du
Lead 3D Animator: Stephen Mok
Animation: Cathy Lin, Erica Kim, Harshitha Suresh, Isabelle Kalyn Winarto, Kaleb Sweeney, Kyle Samuel Switzer, Meg Aki, J.C. Petrofsky
Sound: Miguel Concha Seltzer
Lead Experiential Designer: Sam Woods
Experiential: Juan Pablo Silhy, Alyssa Mackersie, Meghan Romance
Documentary Lead: Libby Nett
Documentary: Caitlin Crooker, Savitri Trivedi
Website: Amadeus Cameron, Belle Duffner
Special Thanks – MOMELove: Alexandera Marca, Cora Keene, Shivani Varandani, Lauren Neu, Fatema Sultan, Claire Lin, Peter Wang, Samantha Woods, Tucker Ziegler, Maria Chuiz, Harshitha Suresh
Special Thanks – SCAD Motion Media: Kelly Carlton, Duff Yong, Dominique Elliot, John Colette, Michael Betancourt, Minho Shin, James Gladman, Brandon Sugiyama, Walter Woods, Christina Maloney, Matt Van Rys, Alessandro Imperato
Conclusion
Over the past 5 years of being a part of the CoMotion Branding Team, I have observed the growth and maturity of the students as they work together more effectively. In the past, I remember that people who had participated once were hesitant to join the team again, but in recent years, I’ve seen more enthusiasm from those who want to join. Both MOMELove and the students have built a solid foundation for the team, which allows us to focus on improving processes rather than starting from scratch each year.
One of the reasons I continue to participate in the CoMotion Branding Team is that it provides a great opportunity for me to practice my leadership skills. As someone with more experience and skills, I feel a responsibility to deliver more value to the team by guiding them toward completion in the most efficient and effective manner.
It is also in these collaborations, I become aware of my weakness of trying to do everything by myself, resulting in taking on too much and not relying on my team or the producers. I often find my role a hybrid between animation lead and project manager because of my nature to keep things in control. One might think that making a great work involves working with the best artists and working with students with less work experience and expertise may not yield the best results. For me, I choose see the potential in these students, acting as a catalyst and scaffolding their training. If I can lead a team of students to produce an incredible result, I don’t think I will find it difficult to work with professionals in the future.
A note for students
Hello aspiring designers, and potentially the future directors of CoMotion Branding Team! Congratulations on reaching the end of this page, which I have dedicated to providing you with a comprehensive guide on how to successfully run a branding team. As an alumnus of this team, I am more than happy to offer my support and guidance to help you achieve your goals.
This guide was written with the intention of serving as an instruction manual for future animation teams, and I have put a great deal of effort into making it as informative and useful as possible. If you have any questions or require further assistance, please do not hesitate to reach out to me on Instagram. I would be more than happy to offer my advice, resources, and guidance to help you run your team successfully.