
Abstract
- This is a study in developing a custom OSL node called “MOOM — Many Objects, One Material” for Maya and Arnold Renderer, and using it to texture a scene with mahjong tiles.
- The implementation of the MOOM node allows an artist to:
- Randomly apply an arbitrary number of texture maps to multiple surfaces using a single OSL shader by referencing the assigned custom user attributes for each surface.
- Linearize the color space of the textures.
- Convert the textures to black and white, which then can be used as a displacement map.
- Some potential uses of this shader include: a scene of a port facility with hundreds of shipping containers, or a library showing hundreds of books on shelves. To learn more about MOOM OSL technique documentation, visit Professor Kesson’s OSL Multiple Textures I.

Theory 🧠
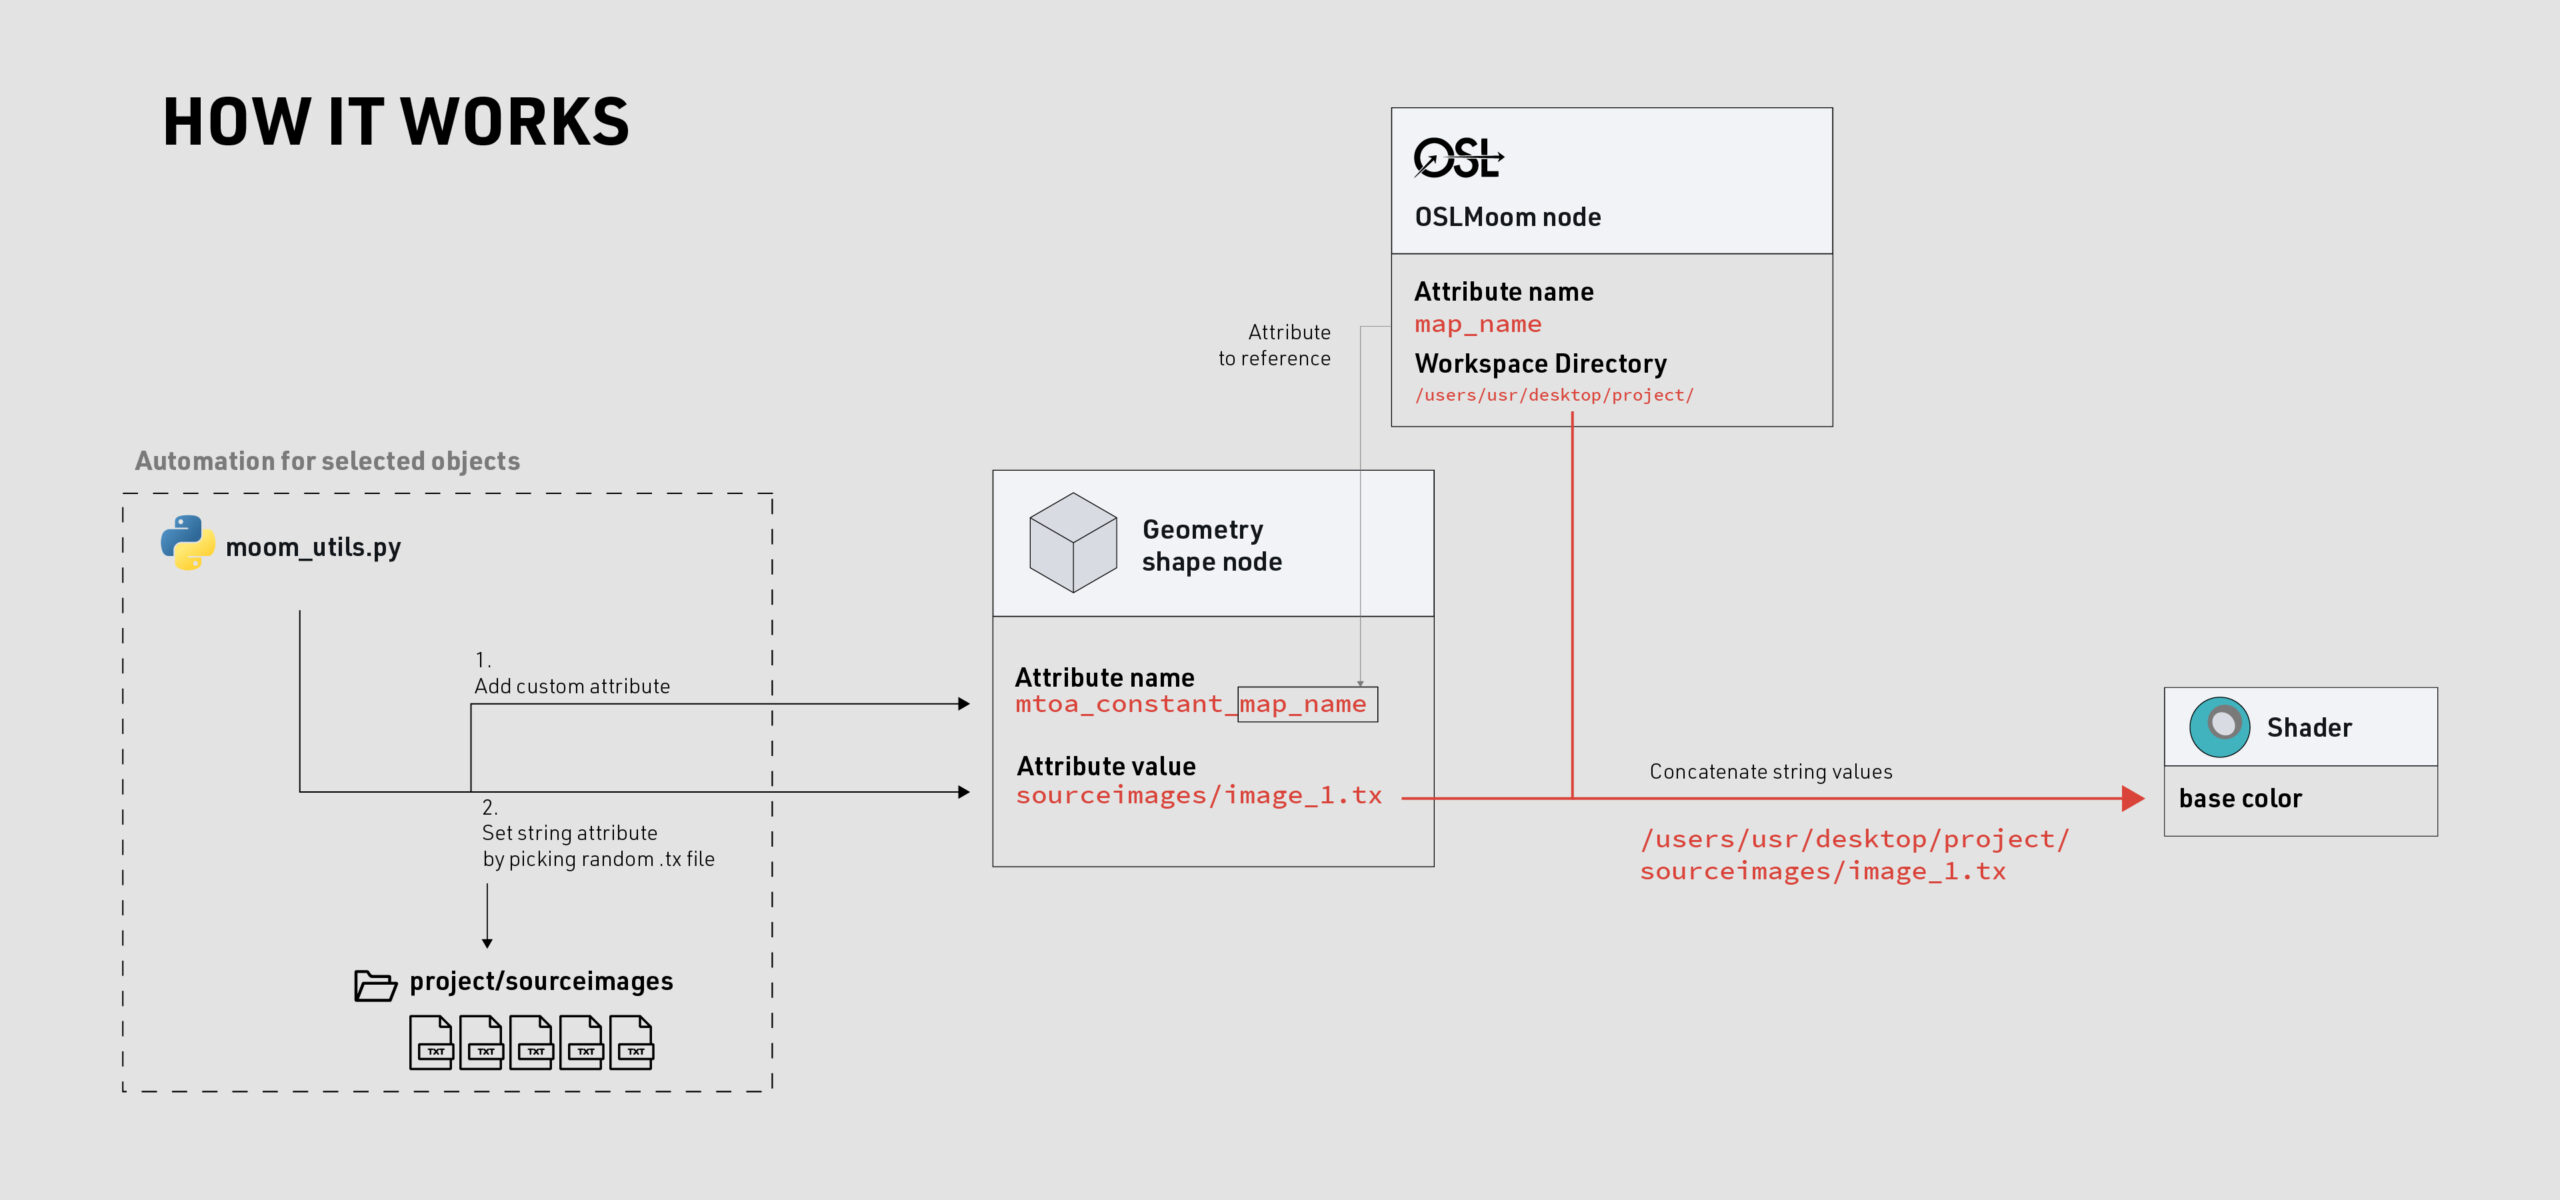
Essentially, the OSL MOOM shader works by referencing the string value from an assigned custom user attributes from a object shape node, and connect the corresponding texture file as the Out Color.
This Out color can be connected to the Base Color of a single material, which then can be assigned to the dozens of object, and thus shading each object uniquely.
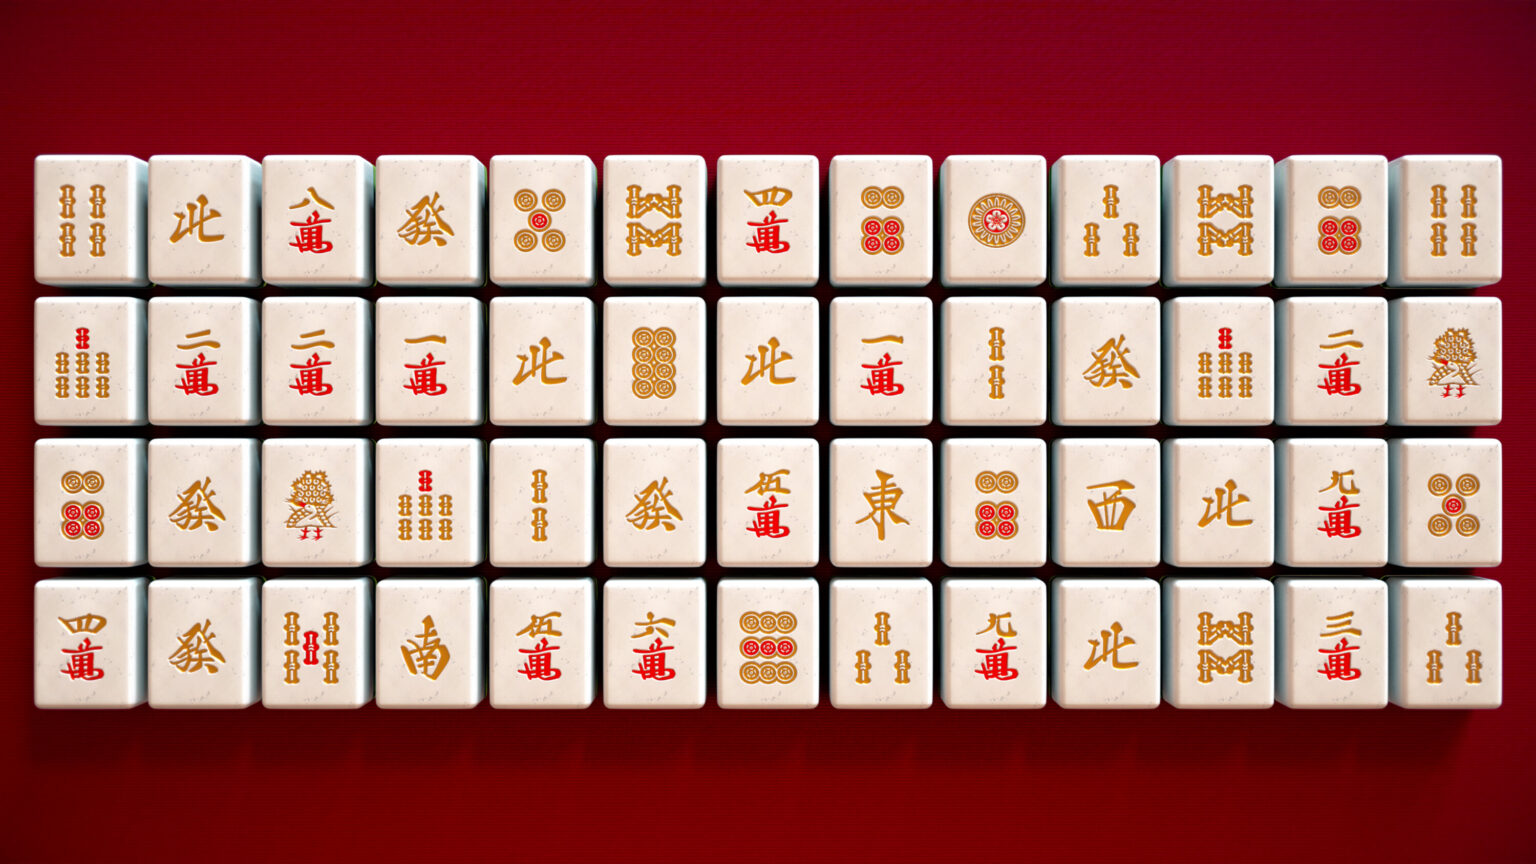
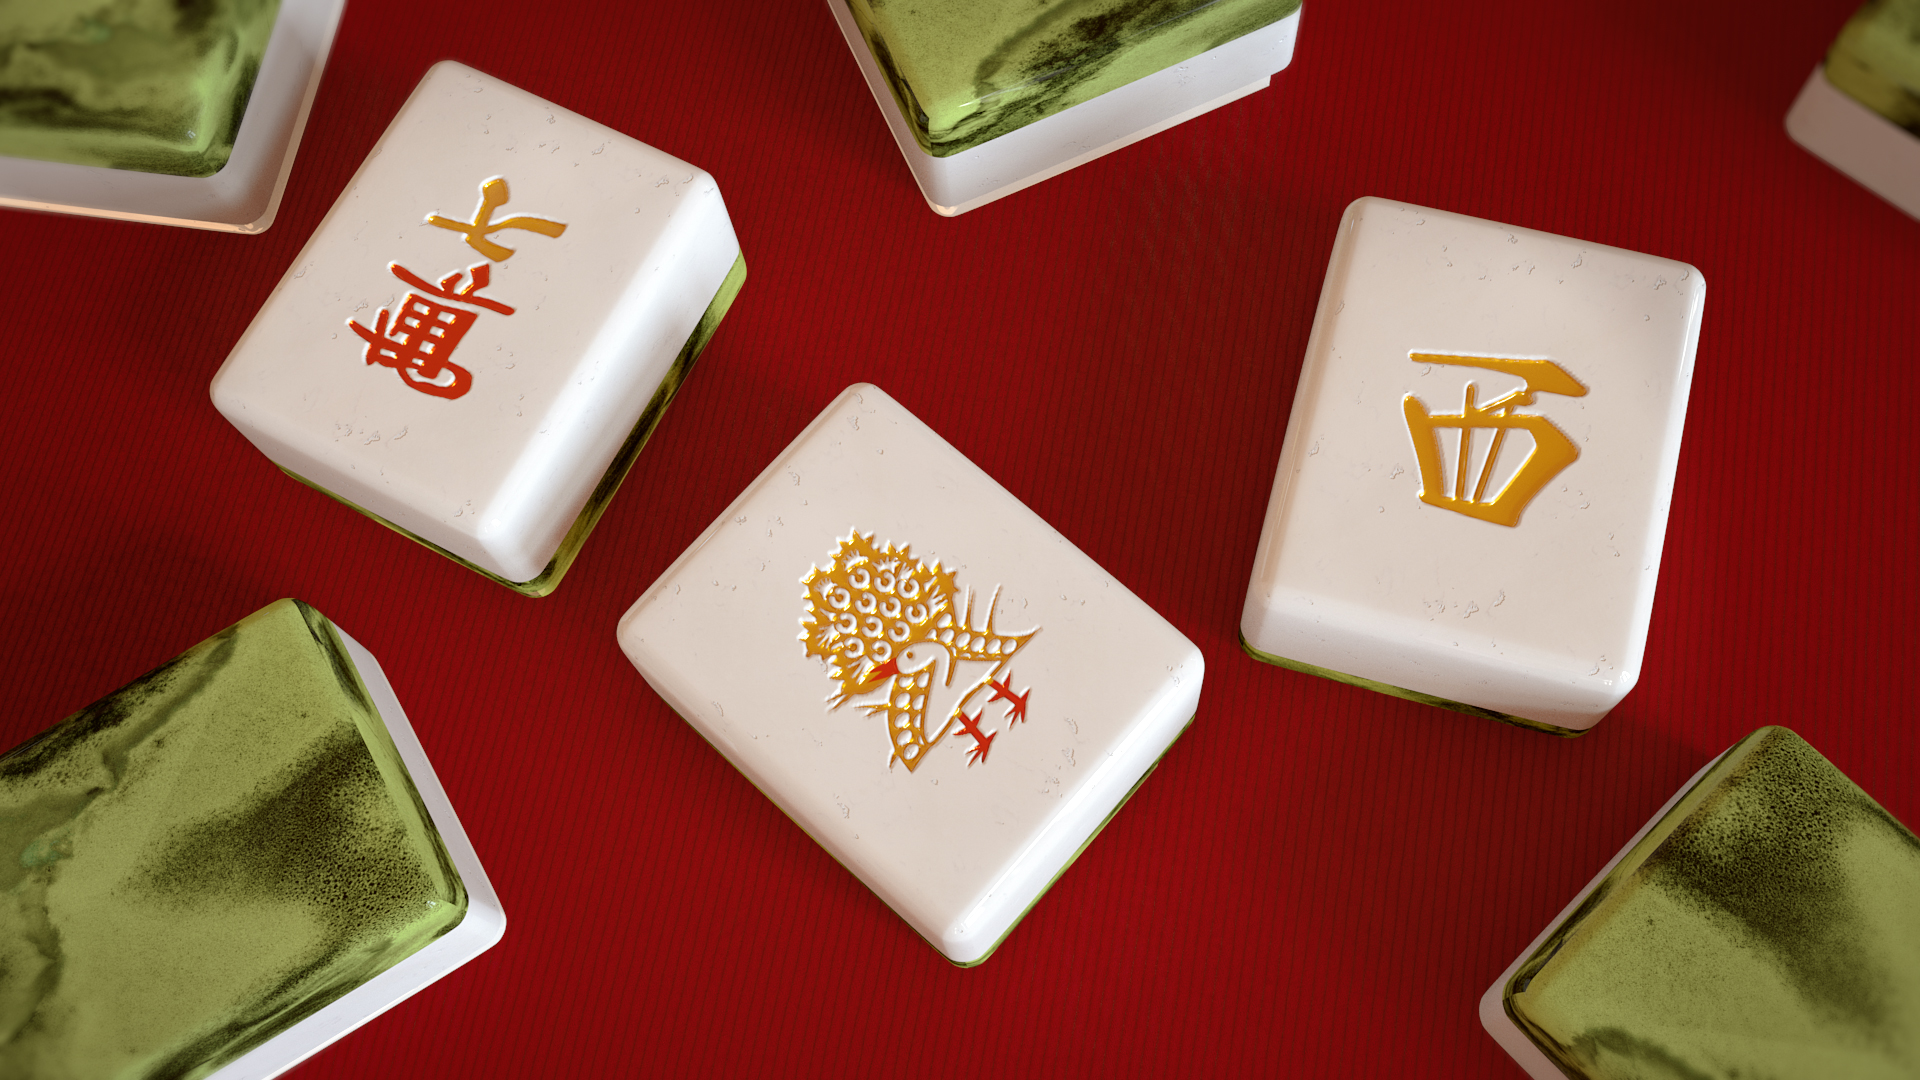
In the image below, the 52 mahjong tiles are all sharing a single shading network.
Adding custom attributes with Python

To fully utilize the functionalities of MOOM shader for a project, it is recommended to use it to texture a scene with a huge quantity of objects (dozens or hundreds). That would means having to automate the process using Python to:
- Add a custom string attribute to each of the shape nodes of a number of selected objects in a maya scene with a user-specified name which will concatenate to mtoa_constant_name eg. “mtoa_constant_TEX.”
- Read the sourceimages folder in the workspace by concatenating the project path and texture path, and return a list of .tx files.
- Set that attribute with a value of a texture map chosen at random from that list.
This process is important because to do those steps manually for each object would be too time-consuming and prone to human error.
Referencing attributes with Python
Subsequently, for my mahjong tile project, I wanted to create additional custom attributes for other types of texture maps (eg. mask, red mask color) which are stored in its own individual folder.
To reference the same mahjong tile design but from different folders, I wrote an additional Python function that creates another string attribute with a user-specified name, copy the value from a targeted attribute, and search and replace parts of the value with a new value.
Below is the moom_utilities.py below demonstrates the above functionalities functionalities, and how it can be executed in Maya Script Editor.
Algorithm
OSL MOOM
					//  workspaceDir might be "/Users/malcolm/Documents/maya/projects/default/"
//  texpath might be "sourceimages/test/swazi.tx"
//  To get the full path the texture map we must concatenate the two strings.

shader
mkOSLMoom(
    string attrName = "TEX",
    string workspaceDir = "",
    color  missingTexColor = color(1,0,1),
    int    linearize = 1
        [[
        string widget = "boolean",
        ]],
    int    convertBW = 0
        [[
        string widget = "boolean",
        ]],
    output color resultRGB = 0)
{
string texpath;
if(getattribute(attrName, texpath) == 1) {
    resultRGB = texture(concat(workspaceDir,texpath),u,v);
    }
else
    resultRGB = missingTexColor;
// The linearization code is from Pixar's implementation of
// pxrsRGBLinearize() found in PxrTextureShared.h
if(linearize) {
    float r = resultRGB[0];
    float g = resultRGB[1];
    float b = resultRGB[2];

    r = (r < 0.04045) ? r * 0.07739938 : pow((r + 0.055) * 0.947867299, 2.4);
    g = (g < 0.04045) ? g * 0.07739938 : pow((g + 0.055) * 0.947867299, 2.4);
    b = (b < 0.04045) ? b * 0.07739938 : pow((b + 0.055) * 0.947867299, 2.4);
    resultRGB = color(r, g, b);
    }
if(convertBW) {
    float gray = (resultRGB[0] + resultRGB[1] + resultRGB[2])/3;
    resultRGB = color(gray,gray,gray);
    }
}
moom_utils.py
					# maya/scripts/moom_utils.py

import maya.cmds as cmds
import os.path
import random


def read_textures(texturesDir='sourceimages'):
    projpath = cmds.workspace(q=True, rootDirectory=True)
    texpath = os.path.join(projpath, texturesDir)
    texnames = cmds.getFileList(folder=texpath, filespec='*.tx')
    outnames = []
    for name in texnames:
        outnames.append(os.path.join(texturesDir, name))
    return outnames


def add_string_attr(attrname, textures):
    attrname = 'mtoa_constant_' + attrname
    selections = cmds.ls(sl=True)
    for sel in selections:
        shapes = cmds.listRelatives(sel, s=True)
        # sel is a shape, therefore, does not have shape relatives
        if shapes == None:
            shapes = [sel]
        if len(shapes) == 0 or len(shapes[0]) == 0:
            print('Cannot find a shape to add attribute')
            return
        shape = shapes[0]
        if cmds.attributeQuery(attrname, node=shape, exists=True) == False:
            cmds.addAttr(shape, ln=attrname, sn=attrname, dt='string')
        texture = random.choice(textures)
        cmds.setAttr(shape + '.' + attrname, texture, type="string")

// additional moom utillities
def addcopy_string_attr(attrname, srcAttrName, oldValue='sourceimages', newValue='sourceimages/mask'):
    attrname = 'mtoa_constant_' + attrname
    selections = cmds.ls(sl=True)
    for sel in selections:
        shapes = cmds.listRelatives(sel, s=True)
        # sel is a shape, therefore, does not have shape relatives
        if shapes == None:
            shapes = [sel]
        if len(shapes) == 0 or len(shapes[0]) == 0:
            print('Cannot find a shape to add attribute')
            return
        shape = shapes[0]
        if cmds.attributeQuery(attrname, node=shape, exists=True) == False:
            cmds.addAttr(shape, ln=attrname, sn=attrname, dt='string')
        texture = cmds.getAttr(shape + '.' + srcAttrName)
        newDir = texture.replace(oldValue, newValue)
        cmds.setAttr(shape + '.' + attrname, newDir, type="string")
Python script usage
					import moom_utils
reload(moom_utils)
names = moom_utils.read_textures()

# create single custom attribute named 'TEX'
moom_utils.add_string_attr('TEX', names)

# additional attributes that reference the TEX attribute
moom_utils.addcopy_string_attr('TEXmask', 'mtoa_constant_TEX')
moom_utils.addcopy_string_attr('REDmask', 'mtoa_constant_TEX','sourceimages','sourceimages/red')
Workflow 🛠

The above diagram summarized the workflow of how to use the MOOM node for a project, and below are the written step-by-step workflow.
Setup
- Save the custom script (“init_mooms.mel”) in the maya/scripts folder, and ensure on line 6 the name of the MOOM node is correspond to your MOOM OSL file name .
- Go to Render Settings → Render Options: Pre-render MEL, and insert this line of code:
init_mooms() - Convert the image files in the sourceimages folder to .tx files with Arnolds TX Manager.
Texturing
Select all the objects in the outliner or viewport that will be MOOM-shaded.
In a Python tab in the Script Editor, assign a custom string attribute called “TEX’ and assigned a random TX file from the sourceimages folder by running this code:
In HyperShade, connect the Out Color of the MOOM shader to to the appropriate input of the material (eg. baseColor)
					import moom_utils
names = moom_utils.read_textures()
moom_utils.add_string_attr('TEX', names)
Implementation ⭐️
Automating texture preparation
For my implementation of OSL MOOM workflow to make a scene filled with mahjong tiles, the first step was to source the texture maps (from FluffyStuff’s GitHub) and prepare additional alpha maps to mix the shaders for the base of the mahjong tile with the golden and red paint.
The MOOM node is a powerful node, however, it does not have an Out Alpha. That means I have to make a set of textures that are just luma mattes. Unfortunately, the tile textures that I sourced only had EPS and PNG files for each individual tiles.
Instead of opening each file one by one, and changing the fill of the design to white with a black background, I made use of a Homebrew Formulae, ImageMagick, to instantaneously extract the alpha from the source files into jpegs via the Terminal command line with this code: mogrify -set colorspace RGB -alpha extract -format jpg *.png.
However, I had to manually create the luma mattes for the red color mask since it was not something that could be automated.
Material building

Once the maps were prepared, an aiMixShader was used to combine the base material and gold paint using a MOOM node that source the mask texture files. This MOOM node was also used as displacement shader.
Finally, the mix shader was mix with the red paint shader using another aiMixShader, and connected to the Surface Shader of the Shading Group. The scene was then rendered and post-processed in After Effects with depth of field and color grading.
Conclusion
“I wish to do something Great and Wonderful, but I must start by doing the little things like they were Great and Wonderful.”
Albert Einstein
People often say how the little details in a work is what separate the great from the good. I never really could internalize what that truly meant since I had thought I always have been conscientious of the details of put into my work. Yet, in this and my other VSFX classes, I come to understand that quality comes from doing the simple things in a deep and profound manner.
Greatness and complexity is just a series of small things done really well.
When I was doing my Motion Media undergraduate program, I felt that the curriculum did not allow time for us to hone in on one discipline and niche down. Every project we do tend to cover all the aspects of making an animation: ideation, storyboarding, visual development, motion tests, animation, and et cetera. I was able to do a lot of things at the end of the program, but I could not really do something great at one thing.
In this class, I was able to focus solely on the technical side of CG and not having to worry about about using it to tell a creative story or animation. I really appreciate this learning environment because it gave me more time to reflect upon my processes and learn how to best present them in a form of writing which I think it is important for Graduate students or anyone who wants to take on leadership roles to advance their career.
Process page update
In this version of process page, the process has been organized into 3 categories:
- Theory: Since this is a tech-driven project, I first explained what was researched and how it works.
- Workflow: Subsequently, I gave more context on how this theory relates or fits into a CG pipeline or project.
- Implementation: Lastly, a proof of concept or demonstration of how I was able to make use of the theory and workflow I developed into a real-world practice.
For comparison, here are my comments on how things were organized in the previous study:
- Breakdown — animation breakdown should placed at the back because readers has not gained enough context
- Process (subcategories of how the shader worked) — Instead of labeling it as a process, it should be something along how it works eg. Theory. Process is more about how I do things like texturing, lighting, shading, or animation.
- Algorithm — While having the code is good documentation, it is more effective to show people how I used the algorithm to create something amazing. Hence, the algorithm should be nested under the Theory category, or not be a main category.