
Abstract
- This project is a study in recursive procedural subdivisions algorithm for polygon meshes allowing the user to create modular-style topology and looping animation.
- The end product is to create a complex animation of responsive-sizing keycaps with icon textures that represents parts of my life, which is inspired by Pasha Ho’s Scaler animation.
Reference

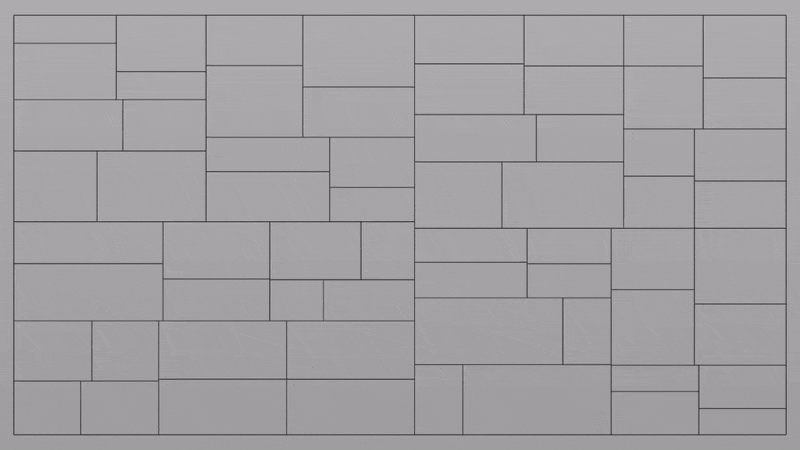
Comparison

Theory
Recursive subdivision with VEX

The project first begin with writing a VEX algorithm that procedurally subdivides an object’s faces by:
- Selecting a primitive face and randomly decide where to split it
- It then generates 6 points which are the corners the of the 2 new faces using
lerp - Finally, the points are used to create new prims, and the source primitive is deleted.
- This process is repeated using
foreachnode
					// prim wrangle - subdivision
float x = chf("x");
float y = chf("y");

// store list of points on a primitive in an array
int pnts[] = primpoints(0,@primnum);
vector pos_0, pos_1,pos_2,pos_3;
vector pos_a,pos_b,pos_c,pos_d,pos_e,pos_f;

// assign the points into vector variables
pos_0 = point(0,"P",pnts[0]);
pos_1 = point(0,"P",pnts[1]);
pos_2 = point(0,"P",pnts[2]);
pos_3 = point(0,"P",pnts[3]);

// lerp the points
pos_a = lerp(pos_0,pos_1,y);
pos_b = lerp(pos_1,pos_2,x); // not sliding between 1 & 3, account for orientation of points
pos_c = lerp(pos_3,pos_2,1-y); // inversion
pos_d = lerp(pos_0,pos_3,x);

pos_e= lerp(pos_d,pos_b,y);
pos_f = lerp(pos_d,pos_b,1-y);

// add the points
int pnt_a = addpoint(0,pos_a);
int pnt_b = addpoint(0,pos_b);
int pnt_c = addpoint(0,pos_c);
int pnt_d = addpoint(0,pos_d);
int pnt_e = addpoint(0,pos_e);
int pnt_f = addpoint(0,pos_f);

//delete source prim, and make new prims
addprim(0,"poly", pnts[0],pnt_a,pnt_e,pnt_d);
addprim(0,"poly", pnt_a, pnts[1],pnt_b,pnt_e);
addprim(0,"poly", pnt_b, pnts[2],pnt_c,pnt_f);
addprim(0,"poly", pnt_d,pnt_f,pnt_c, pnts[3]);
removeprim(0,@primnum,0);0000
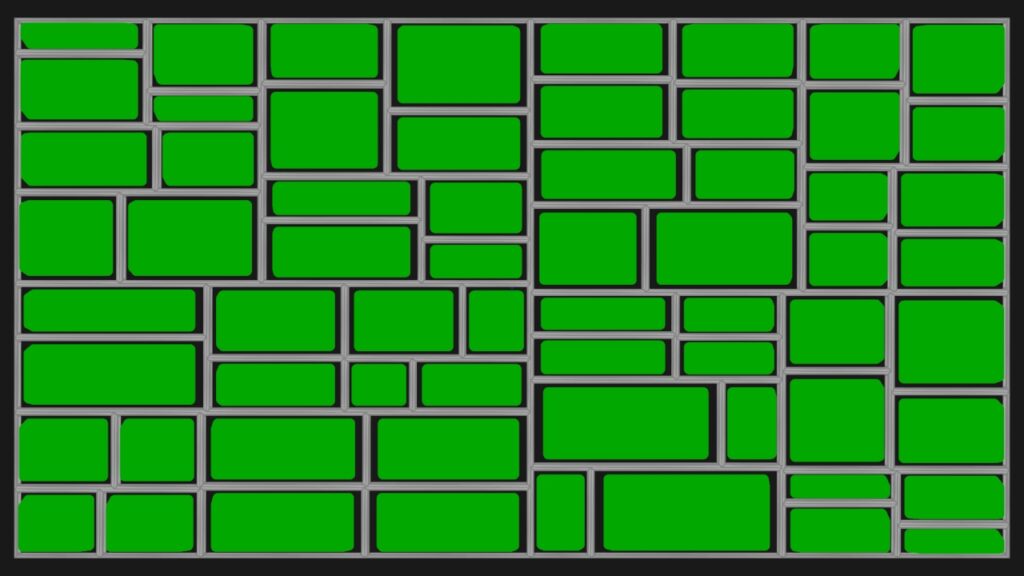
Adding complexity to animation
In the previous algorithm, the X and Y float sliders gives a uniform value to how the prim are animated. To introduce variations:
- A random value is generated with
flownoiseusing the Position value. - Next, the value is clamped within a range using a
fitfunction, - Finally, the value can remapped with a
chrampuser controls.
					float time = chf("time"); // animate this from 0 to 1
float seed = chf("seed"); // control speed

float x = flownoise(@P+seed,time*2);
float y = flownoise(@P-seed,time*2+.5);

// normalize the value to be used in a ramp
x = fit(x,.1,.9,0.1,0.99);
y = fit(y,.1,.9,0.1,0.99);

// Evaluates a ramp parameter and return its value.
x = chramp("Xramp",x);
y = chramp("Yramp",y);
Implementation
Instancing based on prim sizes
With the subdivided surfaces, the next challenge was to instance objects onto the prim points and resizing based on the faces’ sizes, but there is no existing prim attributes to do that. The solution was to:
- Within a
foreachloop, create a new parameter called “primsize” and get the primitive$SIZE - Promote the class of parameter from Primitive to Point
- Rename the “primsize” attribute to Cd
Resizing instances
One problem I encountered when instancing scaled objects using a copytopoints to the prim points of the subdivided surfaces is that the objects do not scale proportionally in length and height, and gaps can be observed. As I wanted my instanced objects to encapsulated with a frame, they needed to be smaller.
The solution was to use a polyextrude and reduce the inset of the subdivided grid, then reference the primitive points of the extrudeFront group.
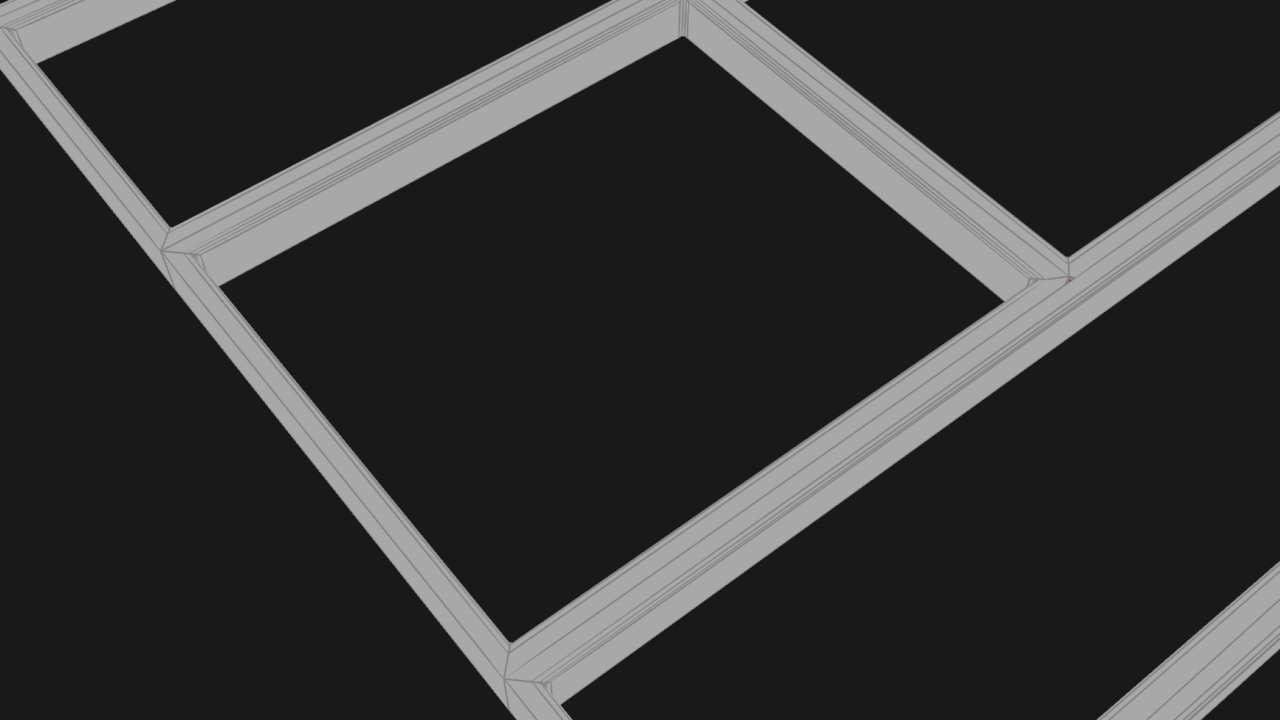
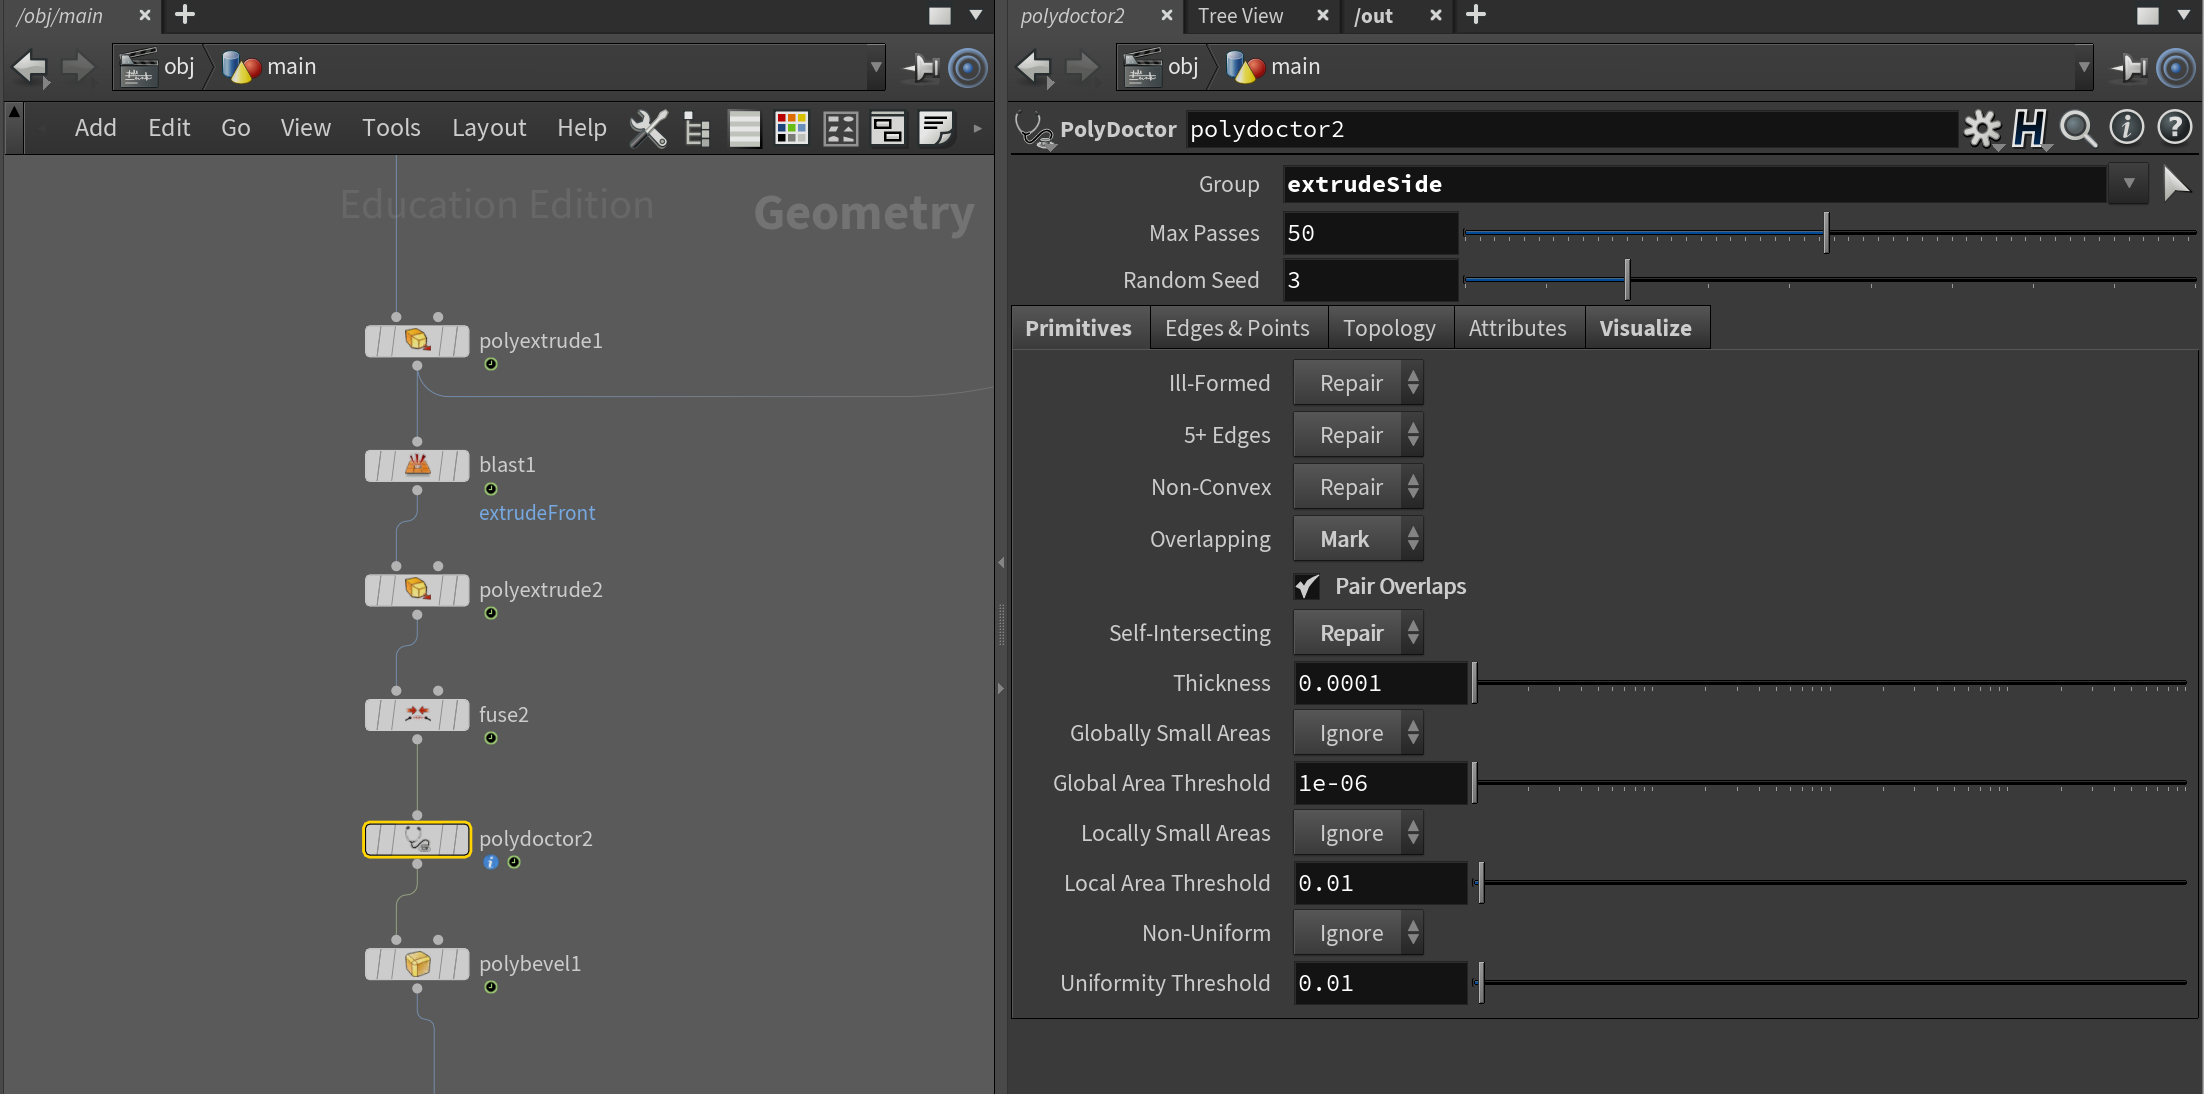
Modeling of the frame
The frame may seem like the simplest part of this project as one can just polyextrude the object. However, when the subdivided surface’s individual elements are extruded, it introduced overlapping primitive faces within. This can be observed when output Front and Back is turned off and visualize with polydoctor.
The solution is to:
- Fuse the points after the
polyextrude - Repair the overlapping faces with
polydoctor bevelthe object using the “extrudeSide” group
Material building & Instancing textures
Finally, to instance random icon textures onto the top of the keycap:The extrudeFront group of the keycap was UV-ed.A material builder was applied and to mix two shaders using the texture alpha. This allows the color of the icon texture to be manipulated. The texture map and icon base color parameters were promoted for texture overriding.In the material node, the texture map and icon color parameters were overridden in using the following expressions:
					// texture map
$HIP/textures/keycaps_icon/image_`padzero(3,ceil(fit01(rand(@ptnum),0,6)))`.png

//icon color - to be white if keycap is colored
if(@Cd.r!=1||@Cd.g!=1||@Cd.b!=1,1,0)
Conclusion
It's good to be technical, but it's better to be technical and understandable"
Ziye Liu
Process of the process
I had been investigating how to utilize my technical expertise in Motion Design in a favorable positioning and demonstration, and this Houdini course has helped me do that by learning how to demonstrate comprehension and mastery through the communication of my methods and procedures on a process breakdown.
Some key factors to what I believe makes a process page great are:
- Instantaneous comprehension. While it is a given that artists are recommended to do their process pages but they do not know how to organize information and visuals coherently. I do so by being being as contextual and descriptive as I can with my headers and sub-headers, and using GIFs to show what I am talking about. I think a good way to balance visuals and words is by using 80-20 rule. 80% of the process should be images, and 20% are words because the people (producers, technical or creative directors) who are viewing your websites might not read deeply into your process; it is possible that they just want to know if you are a person who can communicate their processes effectively.
- Less is more. A good process page is about what you show and what you DON’T show.
- Doing the process page as you go. During this project, I found myself writing down my process as I worked in Houdini. Sometimes when I hit an obstacle, I would just let go of the problem and head over to review what I did so far. This helps me be more conscious about what I am doing, and as well as identifying areas where may I overlooked or could have been done better or easier.
Complexity is just a series of small things done greatly
Originally, I had thought this assignment might have been too simple since the subdivision algorithm was available via a tutorial. Even though the subdivision algorithm is the 20% that drives 80% of the projects, I realize I spent 80% of my time troubleshooting what comes next. Every time I solve a problem, another one appears. I suppose the challenge as an artist is not about the tools or algorithm, but rather where and how far you take it to.
My process of learning
I realized that I learned Houdini and VEX is by following a tutorial and writing out the code first even if I do not comprehend. Then, I review the code and try to explain what’s going on at each step as if I was going to teach someone. If I am unable to do so, I fill the holes in my comprehension by referring back to the tutorial.
Essentially, what I am saying is that: A master can explain to me a complex concept simply, but true competency lies in me being able to teach the concept in my own words.
